https://ift.tt/3tW3RnA How to build a complicated Machine Learning web application serverlessly on AWS GIF by author A lot of work and ...
How to build a complicated Machine Learning web application serverlessly on AWS
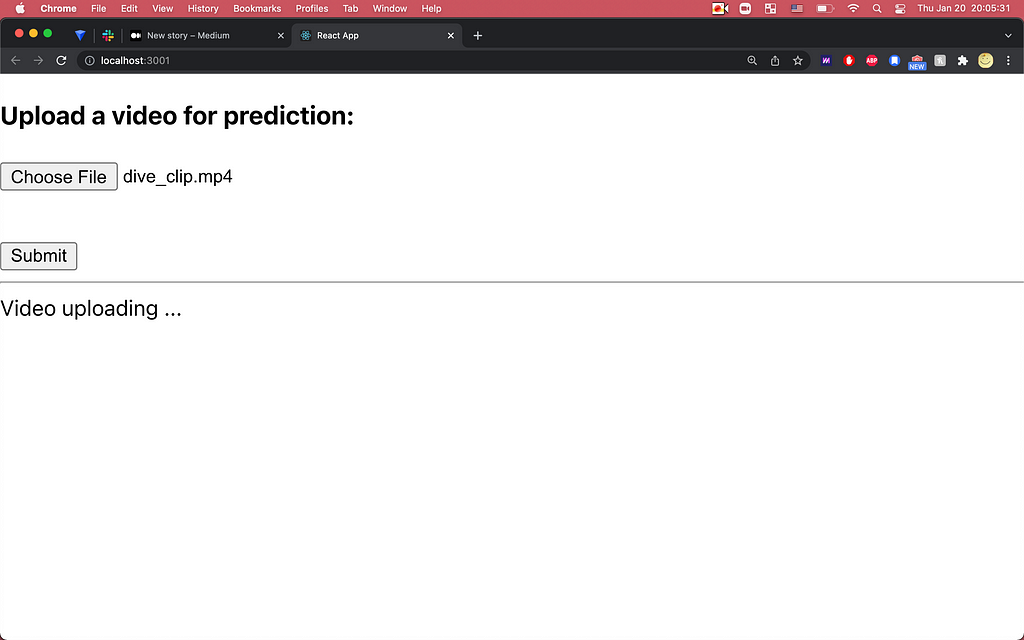
A lot of work and effort goes into productionizing a machine learning based product. We recently finished developing a web application to predict an Olympic diver’s performance. Given an Olympic diver’s video, the web app predicts what score a human judge would give and outputs the score. The ML models were already trained on-premises and we had to deploy and productionize them into a service. We chose a serverless architecture so that we don’t have to provision, run and maintain servers but instead focus on developing a user-friendly application. Below is the React web app implementing the serverless architecture.
In this post, we will introduce our deployment design and implementation of a simple but “complicated” Machine Learning web application hosted on AWS. It is a very simple project that only has one function, to make a prediction score of the diving action from a user uploaded video. But we do consider this project “complicated” for the following 3 reasons:
- The web application needs to receive a user-uploaded video, which is relatively large (up to 200MB), as an input.
- The Machine Learning models that are involved in the prediction process are relatively large (564MB) in size.
- The web application needs to wait for the prediction process which takes quite some time (maybe more than a few minutes) to finish.
For the theory behind the Machine Learning part of our prediction process, you can find more in this article if you are interested. Here we will only introduce our deployment design and discuss the tools we use in detail. The following is our cloud architecture design diagram, and we will discuss each part of the architecture in detail below.
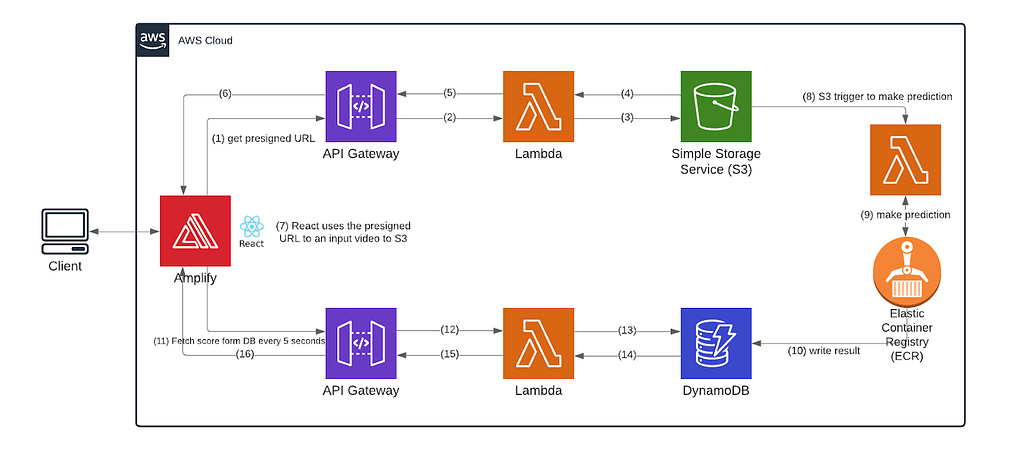
In a nutshell, our front-end React service is hosted in AWS Amplify and it interacts with AWS API Gateway endpoints that are connected to AWS Lambda, AWS Simple Storage Service (S3), and AWS DynamoDB.
How shall we handle (large) user uploaded data?
The user uploads a video file as an input through our front-end React service. It’s not easy to handle a video file on the front end due to its large size. In our case, the user can upload one video at a time and each file has to be less than 200 MB. The red arrows (#1 — #8) describe handling of the input file from the client and that’s what we will describe below.
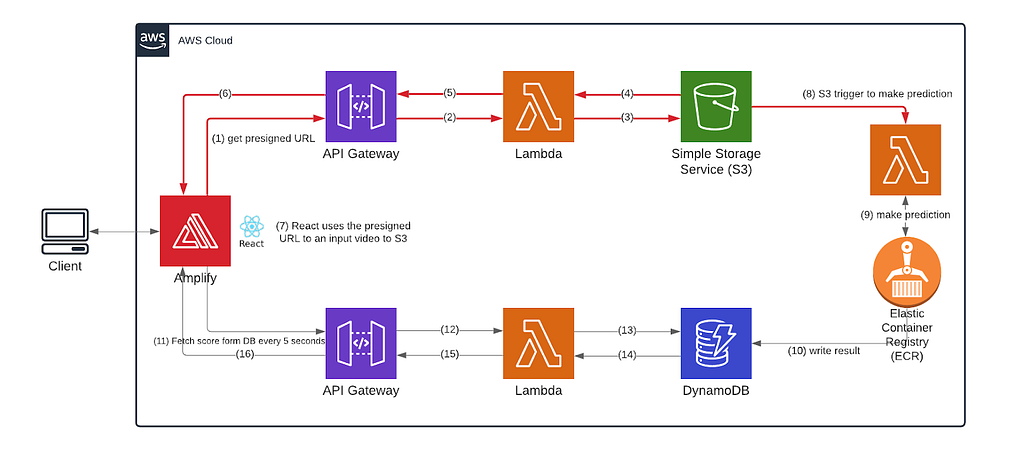
When the user is uploading a large file, the best way to handle it at the frontend is DON’T. We followed this documentation from AWS about how to send the videos directly to S3, which will notify our backend when it detects a newly uploaded video. The video file originates on the user’s computer, and our front end code uploads the file into an S3 bucket (arrows 1 through 7); the S3 bucket has a trigger on it (arrow 8) so that once the upload is done, the lambda with the model in it gets invoked on the new video input (arrow 9).
In brief, our frontend does these 2 things:
- When receiving a video, the frontend sends a GET request to our HTTP API (arrow 1) and the lambda function behind it to get a pre-signed URL of the S3 bucket that stores all the user uploaded videos (arrows 2 and 3).
- After getting the pre-signed URL (arrows 4, 5, and 6), the frontend sends a PUT request to that URL with the video in body as binary data, which gets deposited into the S3 bucket (arrow 7). Once the data is uploaded into the bucket, a trigger fires, alerting the model lambda that new data is ready (arrow 8).
The above tutorial is detailed enough for one to follow and understand the basics of it. But sometimes adjusting a tutorial to our own specific needs can still be challenging. Hence we will link our codebase here.
This is the lambda function that generates a pre-signed URL from S3.
https://github.com/yumyumqing/AQA_s3_presigned_url/blob/main/getSignedURL/app.py
This is the SAM template we have for this lambda function and the HTTP API in front of it.
https://github.com/yumyumqing/AQA_s3_presigned_url/blob/main/template.yaml#L6-L70
You can see that we implemented an AWS API gateway for our front-end application to get a pre-signed URL here. When you deploy the stack using sam deploy –guided, following this documentation from AWS, you might encounter the AWS SAM CLI error:
“Security Constraints Not Satisfied.” It occurs when you answer No to this question: HelloWorldFunction may not have authorization defined, Is this okay? [y/N]. You can find detailed information to fix the issue here.
It might seem a bit complicated to set up all of these (it means we need to learn all these tools first!) when we could instead send the videos from the frontend directly to the host that runs the inference code. However, in this case we would be responsible for a great deal more operational detail: the multi-part transmission of the large video, waiting for the large file to arrive, the encodings, the checks, the temporary and permanent storage handling of these data and many more things we might not even think of.
How to deploy large Machine Learning models serverlessly
Next, the user data gets processed in AWS lambda. AWS Lambda is “a serverless event-driven compute service that lets you run code without provisioning or managing servers.” It’s pretty much an abstracted backend where you can implement it as if you are just implementing a function. AWS Lambda manages scaling, and supports high availability and fault tolerance on behalf of their clients. Lambda deployment package is a zip file, which contains code, libraries and dependencies. However, the package size limit for lambda got in our way because the total size of our files and ML models to be deployed is at least 564MB, but Lambda imposes the following size limits:
Deployment package size limit for a zipped file: 50MB
In December 2020, AWS started supporting the feature to deploy a Docker container image as a lambda function. You can check more information on Docker here (https://www.docker.com/). It means a docker container image can be deployed to lambda instead of a zip file. One just has to make sure that container images are linux-based. The good thing for us about using a docker image for Lambda is that it provides more space. Our models don’t even come close to fitting inside the 50 MB Lambda allows, but do fit inside the limits you get when you deploy a Docker image to Lambda. These limits are a bit more complicated to deal with, but it still works out to a lot more space for your models.
As for serverless deployment of models, there were not a lot of options available and a lambda container was our best bet to be able to contain the half-gigabyte models. Unlike Sagemaker, lambda docker did not require multiple things such as endpoints and endpoint configurations to manage. Most importantly, lambda provided a true serverless solution without having to choose a particular instance for deployment. Lambda container deployment has the following limits that are important to keep in mind:
Deployment package size limit for lambda container image: 10GB
Temporary file system storage at /tmp: 512 MB
The information above is very important in order to figure out where ML models belong. We considered two options: (1) S3, and (2) attaching the models to the container image with the inference code files. With the option #1, the ML models need to be loaded from S3 into the container image. Any extra file that is loaded from somewhere else such as S3 gets written to temporary file storage at /tmp and that’s the only path available for external files to be downloaded to. The max size of the files that can be written to the path is 512 MB. However, the total size of our models is 564MB, which exceeds the limit of temporary file system storage. Therefore, we went with the option #2 to attach our models as one of the code files to a container image.
Step 1. Write a Dockerfile
In our example, we’re pulling an image from the public aws repositories and setting the base image with lambda python 3.7. It’s important to set up the base image to be a lambda base image. Most dockerfiles start with a FROM instruction and the image can be any valid image. Then the inference code package for lambda is copied to the working directory so that the code could be available for subsequent instructions. Since we have a brand new image, we’re installing necessary libraries and setting variables afterwards with the RUN, which executes commands inside your docker image. Requirements.txt contains every library we want to have installed in a brand new image. At the end, CMD executes a command line to call the lambda handler and specify the name of your file where your lambda handler is located.
Step 2. Write inference logic
- Model location
We considered having our ML models in S3 and downloading them, but this time we attached the models to the docker container. It means when we packaged our container, we left our models as files for our inference logic to directly consume the models. Here, we attached the model and its weight files in our deployment.
- Handler file
Under the handler function name you specified in the Dockerfile, you can add your inference logic. For the handler, the following template is suggested:
def handler_name (event, context):
You can choose to return a value or not. In our case, we return a prediction value so that a client application can display the prediction value.
Step 3. Add cloud formation template
https://github.com/yumyumqing/AQA_s3_presigned_url/blob/main/template.yaml#L75
You can configure your lambda container for cloud formation to automate the deployment. Make sure the type is ‘AWS::Serverless::Function’ and the package type is “Image” to indicate that it’s a lambda docker image container. You can get further information on this from here: https://docs.aws.amazon.com/lambda/latest/dg/configuration-images.html#configuration-images-cloudformation Also, you can easily integrate lambda functions to be notified by changes in S3. As noted under the Events section, we made it so that S3 sends an event to a lambda function when an object is created or deleted.
Step 4. Local Test: Verify the functionality
In order to test its functionality locally, we will test by running sam build. Make sure to download docker and have it running before you test it locally. Then, make sure you have the right sample data information available in your sample_data.json. In our case, we are using the video file in s3, so we had our video and s3 information in sample_data.json. Then run sam local invoke <function name> -e <sample event file>
sam local invoke “ProcessPredictFunction” -e getPredScore/sample_event.json
There’s another way to test your lambda function locally, which does not involve aws sam, and it’s AWS Lambda Runtime Interface Emulator (RIE). You can get more information here, but I found using SAM much easier to test my lambda function.
Step 5. Deploy with sam build
Then you can deploy the app using sam again. It’s simply sam deploy –guided. After the deployment is over, you will see that the docker image is deployed to AWS Elastic Container Registry (ECR) and the lambda function refers to the image in the ECR.
Lambda docker container image provided an interesting solution to launch our ML models serverlessly. It is simple to attach the models as code and deploy in a packaged container. The convenient integration of S3 with lambda provided a more independent and secure solution. It’s independent because our front-end application just has to put the inputted video data to S3 without having to touch other parts of the architecture and our lambda function gets automatically triggered to process the input video and make a prediction on it. It’s secure because the front-end application does not have to contain any authentication information in its attempt to directly invoke the lambda function.
How to handle long prediction requests?
Machine learning predictions can sometimes take quite a long time to process. We will now describe how we handled prediction results from our machine learning models, and the process is represented with red arrows in the diagram.
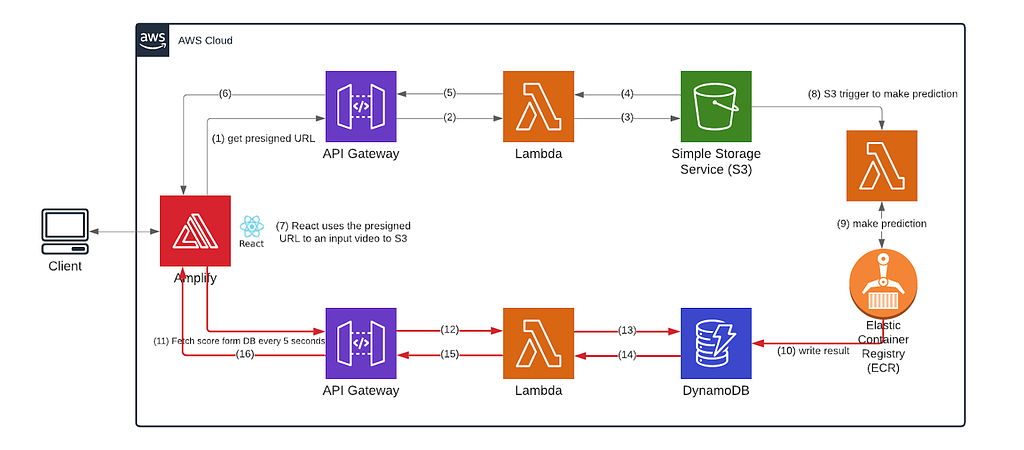
Instead of keeping our frontend waiting and listening for slow response, we incorporated DynamoDB to store the results sent from our backend and make our React frontend ping the database every five seconds to check whether the result is ready and refresh the browser with the newest status. In this way, we are using more pings to avoid long open connections.
In our lambda function that makes the prediction, we send the score to our DynamoDB table whenever it’s ready, and you can see the code here. Our frontend keeps pinging a HTTP Api that is tied to a lambda function which talks to our DynamoDB table. Here’s the front-end implementation to continuously pinging the DB for the prediction result availability.
You can also check out HTTP Api and lambda function behind it:
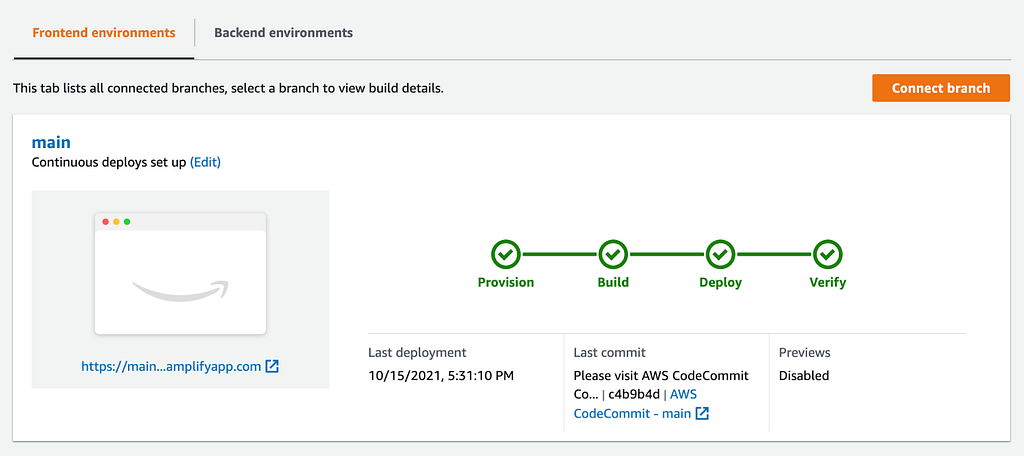
Our frontend deployment (AWS Amplify).
We used AWS Amplify to deploy our frontend code. It has nice continuous deployment features and since our codebase resides on AWS CodeCommit, whenever we push a new change, it will rebuild and redeploy our app by default without our website down. AWS Amplify can also detect React apps well enough to pick up our configuration file directly and start working on itself. Here is more information about how to deploy a React app on AWS Amplify.
Conclusion
We demonstrated a serverless architecture design for our machine learning service. The design is not as simple as the functionality of our service sounds. Multiple AWS components were used including AWS Amplify, HTTP API Gateway, Lambda, Simple Storage Service (S3), Elastic Container Registry (ECR) and DynamoDB.
Machine Learning Serverlessly was originally published in Towards Data Science on Medium, where people are continuing the conversation by highlighting and responding to this story.
from Towards Data Science - Medium https://ift.tt/3GWZcoX
via RiYo Analytics


ليست هناك تعليقات