https://ift.tt/3q6zlVL Best-practices to follow when building image and video datasets. Image by Author Data is hoarded in large quanti...
Best-practices to follow when building image and video datasets.

Data is hoarded in large quantities by almost every organization. People coining phrases like “data is the new oil” further incentivizes this. Visual data is no different. Logs and video snippets are constantly packaged and stored in robot fleets. Tesla cars constantly send recorded footage back to Tesla servers for the development of their self-driving car technology. Security cameras store footage 24/7. There’s one key pattern to note though:
While generating new data is easy, organizing and finding relevant data is extremely difficult.
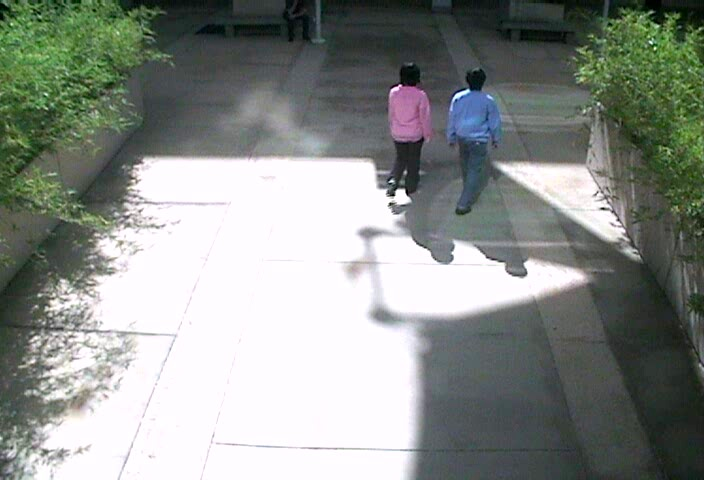
Let’s take an example of a security camera setup. You have 10 cameras recording footage 24/7 at 30 FPS, 1920x1080 resolution. They’re all configured to send video clips back to the cloud in 10-minute intervals. A standard compression setup results in ~1 TB of video stored per day or 27 million individual frames . The videos might be searchable by timestamp, but finding moments with movement or people is like searching for a needle in a haystack. If you had humans labeling these images (assuming the task takes 5 seconds per image), it would take ~38000 hours — for only a single day’s worth of data.
Using this data to build a dataset is difficult. In this blog, we’ll walk through the best practices for curating datasets from raw petabyte-scale image and video data. We’ll use the security camera example to guide us.
Our Sample Task
Let’s keep this security camera setup in mind and define a task: detect a bounding box around each jacket in the frame.

Below, we’ll showcase a step-by-step process that’ll help you build the best dataset, which means the best models as well for this task. We’ll be working with standard deep learning paradigms here — which means we need a large labeled dataset.

1. Clearly define where the model should work
Deep learning models struggle with generalization. This means it’s important to set reasonable expectations for our model. Do we need our security cameras to detect jackets, even during a heavy blizzard when snow covers the camera lens? Or do we expect more “sane” weather conditions? Let’s think of a few factors like this:
- Weather (sunny, windy, rainy, snowy)
- Lighting (pitch dark, dark, dim, normal, bright)
- Camera Angle (low angle, face-level, onlooking, top-down)
- Presence of reflective surfaces (True, False)
- Presence of motion (True, False)
- Presence of people (True, False)
- Blurriness (Numerical Scale)
- Resolution (SD, HD, 4K, etc.)
For each factor or combination of factors, have an understanding of how often it occurs and what level of performance your use-case can tolerate in that scenario. It’s extremely difficult to think of every possible variable and the expected values for it but it’s important to cover ones that you deem to be most significant and set expectations.
2. Collect + pre-process your data
Go out and collect some security footage. Keeping the factors from the previous step in mind, see if there are ways to set up cameras such that they’ll be able to collect data involving all aforementioned scenarios.
For our use-case, we need to extract individual frames of video to train our deep learning model. We need to pre-process the video by saving individual frames with designated folder / naming conventions to keep video order intact. This way, you can access raw data in a later step.
At Sieve we found this part of the process to be pretty annoying so we built a simple repo you can run which will automatically collect and store video data using our platform so it’s easy to query later. Upload video via API request and Sieve takes care of the rest — more on that in the end of this post.
3. Understand the data you have
One of the most underrated steps in building good datasets is understanding the raw data you have access to in the first place. By understanding this, we build awareness for any biases that exist within data collection and also have the chance to eliminate them. It can also be helpful to compare the raw data distribution to the distribution of the curated dataset that yielded the best-performing model.
We can use the model constraint variables from step 1 as a helpful guide in profiling our dataset. Ideally, we’d be able to accurately tag every image in our dataset with this profiling information. This way, we have a holistic view of the distribution: what do we have and what do we not?
Some factors such as location (i.e. hallway, corridor, courtyard, etc) and camera angle can be tagged automatically based on a camera_id or another unique identifier for a specific camera and where it was set up during data collection. Other dynamic factors such as weather, motion, people, lighting, and more must be extracted in some other form.

Option 1: High Quality Data Labeling Service
We could submit our images to a high-quality labeling platform and ask for each of our variables to be precisely tagged by a fleet of humans. Unfortunately, the accuracy comes with a high cost — at ~$0.05 per classification and with 5 tags per image, that brings the total cost to $0.25 per sample.
Pro: High Quality, Accurate
Con: High Cost
Option 2: Mechanical Turk-like Service
Mechanical Turk is a cheaper labeling platform where we can pay ~$0.01 / classification (5x less than above). The issue is that it offers fewer specialized services and QA checks which you’ll have to manage on your own. This means a tradeoff for cheaper labeling, but with slightly more effort on your end and inconsistent results.
Pro: It’s cheaper but not by much
Con: Inconsistent Quality
Option 3: Model-based Tagging
Model-based Tagging uses existing computer-vision or deep learning models to tag our images with the target variables we’re looking for. The challenge is building good models that can detect the exact characteristics that we’re interested in. Our larger goal here is to build a model that detects people and it almost seems like we’re being side-tracked into a process that takes even more effort as we build these side models. This is why we need to take advantage of general-purpose models that are already out there. It’s also important to note that we don’t care for 100% accuracy on these labels. Even if we meet say ~75–80% accuracy scores with these models, it gives us a far better idea of what’s in our dataset compared to having no information at all.
Traditional computer vision models and algorithms can help us determine some basic things like brightness, lighting, contrast, contours, and more.
Deep learning models like YOLO-9000 can help us detect objects that are listed under their class lists. Moreover, we can conditionally create other tags such as “indoor/outdoor” based on which types of objects we expect in each setting.
We can use even more cutting-edge models such as CLIP to generate accurate captions for some of our images, and extract even more tags in that way as well.
Pros: Automatic, cheap, consistent
Cons: Not 100% accurate, target variables are slightly different
All things considered, no single option is a clear cut winner. It’s likely that a combination of different options will work best depending on your monetary budget, time budget, team size, and more.
There are still issues we can’t ignore however. The biggest is the sheer amount of data we’re trying to process. Collecting video data at 30 FPS means that ~2.6 million individual frames are being generated every day from a single camera. Even with our cheapest approach of model-based tagging, we’ll have a hard time running expensive models on every frame of video. We need something smarter.
Efficient Video Processing Pipeline
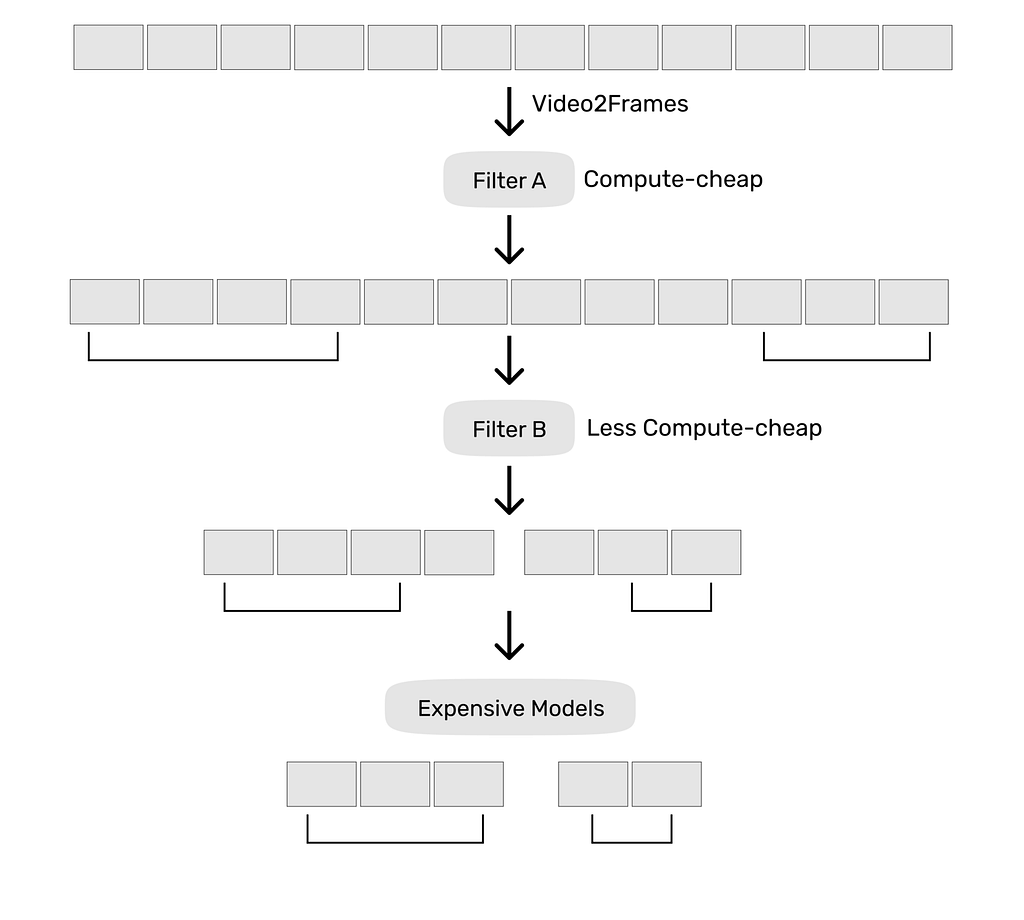
What if we instead selectively ran certain operations on certain frames of video? Let’s say we build an arbitrary definition for which frames we care about. For example with security footage, we might only care about frames that consist of motion. We can run a motion detector on our video frames, and then only process the expensive models over those frames. We could even decide to run a motion detector, then a cheaper people detector model over those that passed motion detection, and then run our really expensive models on frames that passed both. We can concurrently build in various forms of smoothing / clustering to determine which “intervals” of video are interesting in each layer so as to eliminate false triggers.

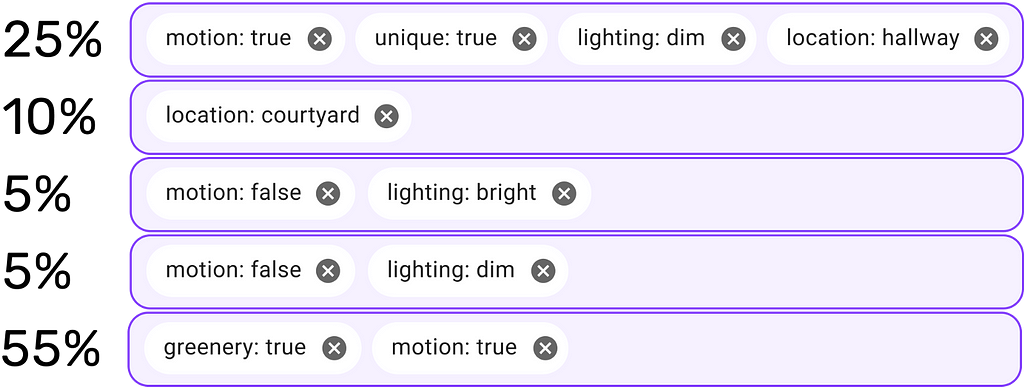
After all of this is done, we can write our tags to a DB to link frames of video to their associated tags, at which point we can make arbitrary queries and analyze our data at a macro-level.
4. Sample a Good Dataset
Now we have all the tools necessary to build a good dataset. Based on the expectations we set in step 1, we can build multiple subsets to uniformly balance across all the variables mentioned.
Typically, data might be collected over a short period of time (~1 month) while there are greater variable changes that can happen over a longer span of time (~1 year) due to various factors like seasons and weather. This is why your dataset distribution may not match the distribution your model will experience when deployed in the real-world.

Even if intuition says that your defined scenarios don’t all occur equally often, it’s important to start with an equal distribution and iteratively make changes to your dataset depending on how the model reacts while training. Given that some scenarios simply occur less often in your dataset, you can try various approaches like under-sampling to start. If you feel that this makes your dataset too small, include as many minority class samples as possible and treat the next least occurring class as the minority class to do under-sampling again. Deep learning models tend to struggle with the long-tail so applying techniques like these is vital to re-emphasize such scenarios in training.
Sieve’s querying functionality makes this entire process completely automatic to do over petabyte-scale videos.
5. Label your Dataset
There is tons of literature on getting data labeled at the highest quality. Platforms such as Scale, Labelbox, Hive, SuperAnnotate and others all provide great solutions.
6. Train Model
Follow a typical model training procedure by experimenting with various hyperparameters, data augmentation combinations, model architectures, ensembles, and more.
7. Evaluate Model
When people speak about model accuracy, they typically use a single number or metric. This is a flawed approach.
Your model by virtue will have different levels of performance depending on where it’s deployed and the conditions in that location. Having a single metric hides these differences in performance.
Just like with regular software unit tests, let’s come up with a set of cases, or critical populations of data, that we can separately evaluate our model on. If it passes each of these tests separately, it is ready for deployment. “Passing” each of these tests is typically an arbitrary performance threshold set by how difficult the task is, how much data one has access to, and how compute-intensive the model is.

World-class ML teams working on the largest-scale projects regard such an approach as the gold-standard. Read this post if you’re interested in learning about the principle in more detail.
8. Feedback Loop
Depending on which test cases are below a desired bar of performance, we can now try a few different things to get to a desired level of performance.
First, we could try to increase the percentage representation of poorly performing scenarios in the training set. This means the model pays more attention to those specific cases, meaning greater performance. However, this type of rebalancing always comes with the tradeoffs of performance in other scenarios — so it’ll require experimentation to get the right balance.
Next, we could also find samples within each test scenario where our model is outputting low confidence scores. We could then do two types of sampling to add more data to our training set.
- Across each of the tagged attributes, measure that distribution of samples that contain at least one confidence score under some threshold. Sample more images from raw data according to each of these distributions separately into our dataset.
- Find low-confidence samples within each test scenario and perform a similarity search to find other images that look similar. Doing similarity search on the bounding box-level is more difficult, but more effective in finding scenarios with similar-looking objects. This process is known as active learning.
Retrain your model and loop through the steps that follow until a desired level of performance is reached on validation data.
9. Final Model Performance
Measure final model performance over a set of data that was completely held out of anything done in prior steps. This acts as an unbiased way of evaluating model performance which wasn’t biased during the training process.
How Sieve can Help

At Sieve, we’re building core infrastructure that makes it easy to process, organize, search, and export petabyte-scale video data. We know that what we’ve described in this tutorial is just the tip of the iceberg in making use of your visual data, and know all the complexities involved in implementing a plug-and-play pipeline that anyone can use. Upload video data using our API and we’ll take care of the rest. This repository can help you get started.
- Slice videos into individual frames
- Automatically generate domain-relevant metadata like motion, objects, people, and more at the frame level
- Search your videos based on individual frame-level metadata
- Explore and analyze data statistics like percent frames with motion, etc.
- Export datasets based on search queries, packaged automatically for download in minutes
Above is a short walkthrough of using the Sieve API and dashboard.
If you have any questions, feel free to leave any comments or reach out to me directly via mokshith [at] sievedata.com!
Curating a Dataset from Raw Images and Videos was originally published in Towards Data Science on Medium, where people are continuing the conversation by highlighting and responding to this story.
from Towards Data Science - Medium https://ift.tt/3pZHJGu
via RiYo Analytics

No comments