https://ift.tt/3FODKS3 Making Sense of Big Data , A STEP-BY-STEP GUIDE TO AWS PANORAMA MODEL DEPLOYMENT Deploy an Object-Detector Model at...
Making Sense of Big Data, A STEP-BY-STEP GUIDE TO AWS PANORAMA MODEL DEPLOYMENT
Deploy an Object-Detector Model at the Edge on AWS Panorama
Learn how to deploy state-of-the-art computer vision models on AWS Panorama, a powerful edge device to realize online and cost-effective object detection.
This article was co-authored by Janos Tolgyesi and Luca Bianchi.
In recent years, Computer Vision has become one of the most exciting fields of application for Deep Learning: trained convolutional neural networks (CNN) models can reach human-like accuracy levels detecting objects within an image or a video stream. These incredible advancements opened a broad field of application ranging from retail customer behavior analysis to security and industrial quality assurance.
In this scenario, a couple of different deep learning models emerged to solve a frequent use case for computer vision: object detection. It is a desirable result per se and a universal foundation of a wide range of applications such as object tracking, pose estimation, and environment monitoring.
Moreover, when video cameras produce input images, modern computer vision capabilities raise the bar of what is achievable with object detection deep learning models applied to security and monitoring. Such scenarios are nevertheless highly challenging due to the short response time requirement of real-time applications. An alarm should fire within a few seconds from danger detection; otherwise, it would be useless or even harmful.
Latency plays a significant role in defining constraints to the kind of computation available. Due to restricted bandwidth and unreliable networks, streaming massive video streams to the cloud, processing the video by fast and accurate deep learning model running on a cloud instance is often not feasible or has prohibitive costs. Video analysis constantly requires high provisioned computation capacity, and this requirement fades the advantages of an on-demand or serverless-like, autoscaling infrastructure. Additionally, bandwidth is never cost-effective, making such solutions unaffordable in most use cases.
Edge computing became a desirable solution to achieve better latencies and lower the total system cost, opening an entirely new market. Unfortunately, building reliable and not expensive hardware with a GPU to run a computer vision model is not an easy task for most data scientists. Considering that the video streams managed by some use cases might contain sensitive information of people’s video footage, security requirements make this task is even more difficult.
Entering AWS Panorama
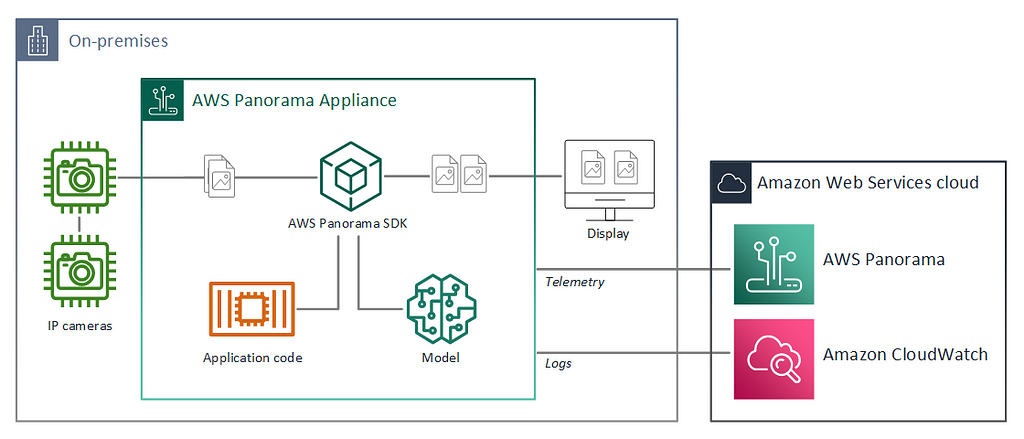
In the 2020 virtual edition of Amazon re:Invent, former CEO of Amazon Web Services Andy Jassy presented a new device named AWS Panorama, wholly designed for edge computing. Inside a small package with a compact design and an IP5 enclosure, an Nvidia Jetson Xavier graphic processing unit can analyze up to 16 concurrent video streams. The device’s appearance and setup are presented more in detail in the amazing video by AWS Machine Learning Hero Mike Chambers.
The easy initial configuration and provisioning experience makes Panorama suitable for installation for non-technical users.
Development concepts
Under the hood, AWS Panorama does not just deploy a deep learning model but requires the developer to define a Panorama Application. A Panorama Application is a collection of packaged deep learning models, business logic code, and a manifest structure (application graph) that defines the data pipeline between these components.
The application components are called nodes. Every resource on the device is represented by a node: deep learning models, business logic code, camera streams, even display output, and parameters. Each node has one or more interfaces that define its inputs and outputs. Before deployment, the model and code-type node resources are archived into binary assets. The assets together with a manifest file (package.json) are referred to as packages. The package’s manifest file contains all the information about its assets and defines the interfaces e used within the application graph. Additional node-specific details can be provided in a package descriptor, for example, the input layer shape of the deep learning model or the application executable entry point. The packages are uploaded to an S3 access bucket managed by the AWS Panorama service and registered.
When the developer is deploying the application with the AWS Panorama service, an application manifest file (graph.json) should be provided, defining the application as a graph with nodes and edges. At deployment time, the Panorama service finds the registered packages referred by name in the manifest file and downloads them to the Panorama appliance.
In summary:
- A Panorama application is a collection of connected nodes. The connections of the nodes are described by the application manifest (or application graph).
- The nodes can have the following types: deep learning model, application source code, camera input, display output, and deploy-time parameters.
- The nodes also define their interfaces. The interface is a list of input and output ports. The ports are named and typed fields. Numeric, boolean, string, and “media” types are supported.
- Application code and ML models are archived into assets. The assets, together with their manifest file, are referred to as packages. Packages are uploaded to a registered by the Panorama service.
- At deployment time, the user should specify the application graph. The Panorama service looks up the packages associated with the single nodes in the graph and downloads the required packages to the appliance.
For additional information, refer to the AWS Panorama Developer Guide.
Choosing a state-of-the-art computer vision model for object detection
You Only Look Once (YOLO) deep learning model for real-time object detection was presented at CVPR 2016. Since then, it has become the standard benchmark for this kind of task. It provides real-time inference performance, generalized object representation understanding (improved accuracy on never seen before images), and scale along the model size / accuracy axis. In contrast to earlier Region-Based Convolutional Neural Networks (R-CNN), YOLO models process the image in just one step. The models have dramatically improved in the following years, introducing a wide range of enhancements, moving through YoloV2, YoloV3, YoloV4, and YoloV5.
YOLO models can detect objects and identify their position within an image, drawing a bounding box encompassing them. In earlier implementations, the models used a list of pre-defined bounding boxes called anchors and predicted their offset within the image. This approach requires specifying the number of anchors to be detected within a given image region, which can be constraining in some use cases.
In 2021 the model was further improved, adopting an anchor-free approach with the rise of YOLOX. YOLOX is implemented in PyTorch, and pre-trained models on the COCO dataset are released on GitHub. The COCO dataset contains 80 different object classes including persons, vehicles, some animals, sports equipment, and everyday objects, so the pre-trained model is ready to detect these objects out-of-the-box.
Creating a Panorama Application
Prerequisites
To follow this step-by-step guide, an AWS Account and an AWS Panorama device are needed. The Panorama device should be provisioned into the account (please refer to Mike’s tutorial above for these steps).
An RTSP stream is also required for testing the solution, and Panorama should be able to access it from the network where it is connected. The stream can be provided by most IP cameras or by a computer running an RTSP server.
The deployment steps will be carried out using AWS Command Line Interface (CLI) and Panorama (CLI), starting from the sample application provided in the AWS Panorama Developer Guide. Ensure that the AWS CLI, the Panorama CLI, and Docker are installed and configured on the workstation.
This tutorial also comes with an accompanying GitHub repository, where you can follow the evolution of the project commit by commit, and use it as a reference if you are stuck. We will provide a link to relevant commit after each step with the bookmark icon: 🔖.
The packages of a Panorama application
Firstly, Initialize a pro project using init-project command within AWS Panorama CLI:
$ panorama-cli init-project --name yolox-panorama
which generates an empty project. It is just the scaffolding with empty folders named assets and packages, and a JSON file in graphs/yolox-panorama/graph.json. GitHub checkpoint: 🔖
To deploy a Panorama application, at least the following nodes have to be defined:
- camera input,
- model (will wrap YOLOX),
- application code (business logic), and the
- display output (HDMI, for debug).
AWS Panorama defines a particular concept, the “abstract nodes”, because during application development the exact RTSP URI is unknown since it is dependent on the source camera stream.
This abstraction allows the same application to be released to different appliances, processing different streams (with different RTSP URIs). The Panorama SDK provides an “abstract camera node,” a placeholder node for a camera whose connection URI will be defined later, at deployment time.
The abstract camera node is added running using the
add-panorama-package --type camera
command of Panorama CLI. Defining abstract nodes for cameras is not mandatory: a specific RTPS camera stream can be added, using the command
create-package --type camera
then providing the camera RTSP URI, username, and password inside the “interfaces” field of the generated file packages/${AWS_ACCOUNT_ID}-[camera_name]-1.0/package.json.
AWS Panorama also offers another type of abstract node to map an HDMI display output. An annotated video can be displayed on an HDMI monitor connected to the panorama appliance using this media sink. A note to consider is that the display is for debugging purposes, and only one application can use it at a time, the first one that was deployed with such a resource.
Wrapping together all the commands so far, the configuration is achieved through:
A note about AWS account IDs
Every Panorama project uses the owner’s AWS account ID in almost every project artifact. It is used in the folder names, as well as in multiple JSON configuration files. The account ID is typically considered a piece of sensitive information that one might not want to expose publicly. In this tutorial, the account ID is replaced with ${AWS_ACCOUNT_ID} in the shell script. This expression refers to the shell variable that can be initialized with the real AWS account id so that the shell will automatically substitute it. In the JSON snippets, we will use the dummy account ID 123456789012 that should be always replaced manually with the actual AWS account ID.
Define the nodes of the application
The AWS Panorama CLI does not create nodes in the application graph for the business logic and the deep learning model, so the developer must add them manually.
This can be done by opening graphs/yolox-panorama/graph.json and adding the following objects in the nodeGraph.nodes array:
Parameters can be added to a Panorama application, and their value will be specified at deployment time. Application logic can access the value of these parameters at runtime. Parameters are useful for a series of purposes: to define model-related parameters (for example, detection threshold) or application settings (for example, an S3 bucket name). AWS Panorama supports different parameter types: int32, float32, boolean, and string.
In this deployment, a single float32 parameter represents the confidence threshold for the object detector. A detection confidence level below this threshold makes the relative object discarded. Parameters need to be added to the application graph manually as parameter type nodes. Default values and overriding configuration can be specified with a human-readable text displayed to the user at deployment time. Add the following object to the nodes array:
More information about parameters here can be found in the relevant section of the Panorama Developer Guide.
Build the computer vision pipeline
Each node plays a particular role within the application: some emit information (camera_node, detection_threshold), others consume data (display_node), and some either emit and consume data such as code_node and model_node.
Edges direct the information that flows through the application, connecting an output port of a node to the input port of the following one. Input and output ports have a particular type, and only compatible types can be connected.
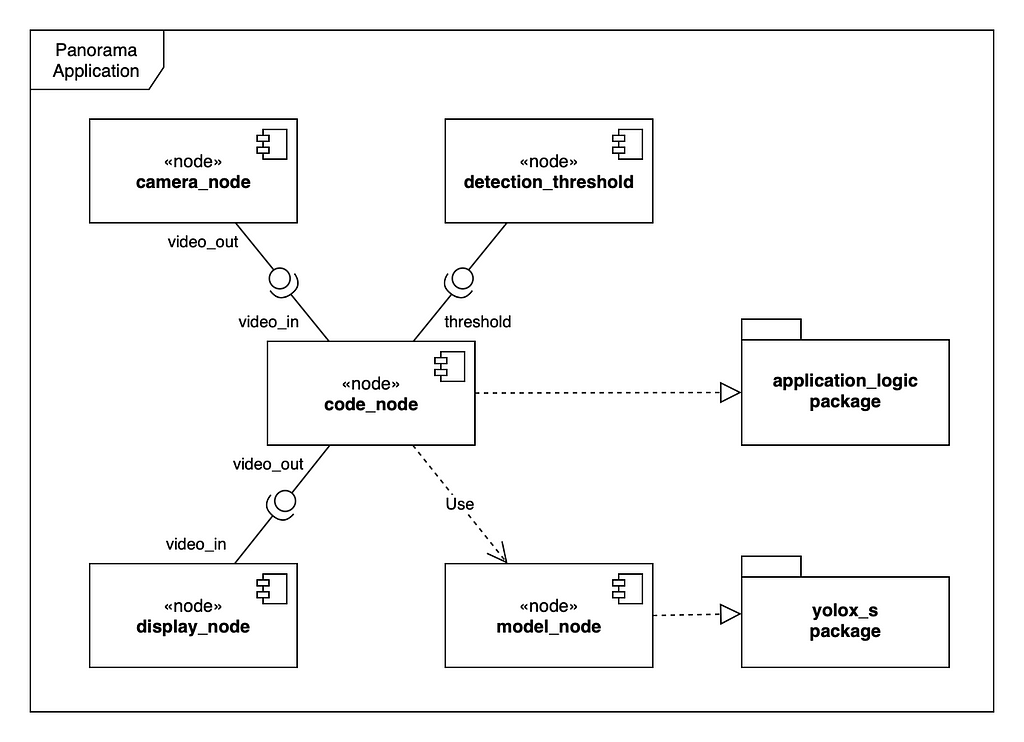
The detection threshold parameter and camera node are linked to the code node. The output of the code node is then linked to the display node. The model node is not connected to other nodes in the graph because the application logic handles information flow to/from the model. We will see latter how to send input data to the model after pre-processing, and read out the inference results from the model for post-processing.
Nodes are connected through edges in the graphs/yolox-panorama/graph.json:
Add machine learning model artifact
The YOLOX model has to be converted to TorchScript, one of the formats supported by AWS Panorama. The full workflow is outlined in the yolox-torchscript Jupyter notebook.
One important aspect is to remember the expected input shape of the exported model, which is needed at a later stage when writing inference code. For image processing models, the input shape has the format of [batch_size, channel_size, width, height]. In this case, batch_size is 1, channel_size equals 3 (red, green, blue), and model specifications define width and height. For yolox-s model the input shape is [1, 3, 640, 640].
In the last steps of the Jupyter notebook, the TorchScript model is saved as a tar.gz package. This archive will be used to create the package of the model node.
The Panorama CLI adds the archive as a project asset, taking the path of the model archive in the --model-local-path parameter. Before issuing any of these commands, it is important to export the local AWS account ID to have reproducible and portable steps.
The result is a new node in graph.json, named yolox_s_asset, that should be merged to the already created model_node. Edit the nodes list in a way that only one node remains with this contents:
The interface field refers to the interface attribute in the yolox_s package. The interface name created by Panorama CLI can be changed to a more suitable one, editing the name attribute simply to “interface” in the nodePackage.interfaces array inside packages/${AWS_ACCOUNT_ID}-yolox_s-1.0/package.json.
The model descriptor at packages/${AWS_ACCOUNT_ID}-yolox_s-1.0/descriptor.json should contain additional required metadata about your model. Edit this file and adding the framework name PYTORCH and the input name and shape. The final version of the model descriptor should look like this:
Implementing a computer vision pipeline
A computer vision application deployed on AWS Panorama should implement the following functionalities:
- continuously query the last frame from the video stream,
- preprocess the frame and convert it into a NumPy array that has the same shape as the deep learning model’s input,
- pass the preprocessed frame to the model (it is already initialized for you by the model node),
- read the inference results and eventually post-process it,
- annotate the frame with the inference result bounding boxes,
- send the annotated frame to the downstream display node.
In addition to these basic video pipeline handling steps, a model usually implements some might business logic:
- counting the number of persons and measuring the distance between them,
- generating alarms if certain conditions verify, for example, the persons do not respect social distancing rules,
- send these alarms to interested parties using some messaging protocol, MQTT or AWS SNS,
- generate some business metrics and persistent them (for example in CloudWatch) that can be later used for analytics purposes,
- in general, integrate with downstream business applications,
- take a “screenshot” of an interesting frame and upload it for example to S3.
In this tutorial we implement only the media pipeline, with no particular emphasis on the business logic. The main focus is to display the video stream on the HDMI monitor, then integrate the YOLOX object detector model.
Build a Panorama application with an Open Container Image format
AWS Panorama supports the Open Container Image (OCI) format, to provide the context for an application to run on the device. A minimal docker file, bundled with OpenCV and NumPy to handle respectively images and arrays in Python can be crafted from the stub file created by the Panorama CLI in packages/${AWS_ACCOUNT_ID}-application_logic-1.0/Dockerfile.
The resulting file should resemble:
The code above performs the following steps:
- Builds on top of the panorama-application base image (this is obligatory for all Panorama applications). This base image contains the Panorama SDK, the infrastructure of communication with other nodes, and others.
- Updates pip and installs OpenCV and NumPy.
- Copies the contents of the local src folder inside the /panorama folder in the container.
Other required dependencies can be installed within the same Dockerfile as well.
Define application node interface
The first step to do before writing application code for inference is to define the code node’s interface: a construct that lists the input and output ports of the node, providing a way to communicate with other nodes. The interface is defined in packages/${AWS_ACCOUNT_ID}-application_logic-1.0/package.json. Add these objects in the nodePackage.interfaces array:
This defines the video_in input for the media stream, the threshold input as a float32 parameter, and a video_out output for the downstream media consumers. Refer to the edges section of graph.json on how these inputs and outputs are connected with other nodes.
Logging setup
Since there is not any way to debug application logic directly on the Panorama appliance, diagnostic log messages need to be properly configured to achieve application observability. Access to the standard output of the container running on Panorama is disabled, which means that printing messages to the stdout or using a naiv configuration of python logger will not work. Log Messages needs to be integrated with the logging infrastructure of the Panorama SDK.
The Panorama daemon watches /opt/aws/panorama/logs folder of the container running on the appliance: any text file written to this folder is going to be sent incrementally to AWS CloudWatch logs. This means that by simply adding a log entry to a file in that folder pushes the new lines directly to the cloud.
A standard python logger configuration to fulfill this task is as follows:
Create an application stub
The stub of an application can be created in a new file called
packages/${AWS_ACCOUNT_ID}-application_logic-1.0/src/application.py with the following contents:
The initializer of the Application class saves the logger as an instance property and initializes the threshold property that later will be populated with the node parameter value. Actually, there is no way to retrieve the name and the expected input size of the model from an external variable, for this reason, they have been hardcoded.
Then, the init function reads the node parameter values. The inputs of the code node, are defined in the node interface and accessible, through the self.inputs property. The names of the inputs come from the code node interface definition. Here the value of the threshold parameter is read and saved as an instance property.
Whenever more than one camera is connected to the application, the process_streams method iterates over all input streams and call process_media for every one of them. At the end, it sends the modified (annotated) media streams to the video_out output, to be processed by downstream nodes, which here is going to be the HDMI display.
The process_media method computes every single frame of each stream. It passes the frame to the preprocessor function, calls the model node with the preprocessed frame, and finally post-processes the inference results.
The preprocess and the postprocess are the core functions just stubbed here.
Finally, the main application loop should be started, ensuring an entry point from the docker file. It is achieved adding the following at the end of application.py:
One last thing regarding to the application execution is to specify the entry point script of the processing container in the application’s package descriptor. Open packages/${AWS_ACCOUNT_ID}-application_logic-1.0/descriptor.json and modify it to the following:
Building the application skeleton
Building the docker container is quite easy with Panorama CLI tool:
After this, edit the node section of graphs/yolox-panorama/graph.json to remove every code_node except the following and change the interface name to interface:
Sometimes, Panorama CI adds a second interface within packages/${AWS_ACCOUNT_ID}-application_logic-1.0/package.json. There should be only one of them, so after remove the redundant one, update the other as as follows:
Packaging the application
The AWS Panorama appliance downloads the application packages from a central package repository implemented by an S3 access point and maintained by AWS. The compiled package must be uploaded to this central repository with
panorama-cli package-application
Panorama CLI uses the AWS CLI under the hoods to deploy the application’s assets, which means it is going to use the default configured AWS region, so make sure it is configured pointing to the same region Panorama is provisioned to.
Deploy the basic pipeline
The application can be deployed to the Panorama appliance as described in the Panorama Developer Guide. Since the application does not use any AWS service, there is no need to provide an IAM role for the application. After the deployment phase, the application has the control of the HDMI display (since it is the only application deployed to the device). The RTSP video stream coming from the camera is then shown on the screen. Apparently not a big achievement for so much work, but it sets the baseline for further development and closes the loop of deployment.
Deploying the YOLOX object detector model to the AWS Panorama
The YOLOX model does require frames to be sent with a specific format and outputs a prediction, which means images have to be pre-processed and post-processed. Post processing is a fundamental step for classification because it projects the prediction array to object class names. These pre- and postprocessing directly can be picked directly from the YOLOX repository, double checking to have all de dependencies within the docker image.
The original yolox-s pytorch model has a dynamic computational graph that allows using dynamic sized inputs but it has some inference-time performance drawback. AWS Panorama requires the model in an optimized torchscript format, using a static graph..
Pre-processing is all about resizing to 640 square pixel input size. Resizing is achieved using a “fit+padding” logic that does not crop any part of the image but resizes it in a way that the longer side of the image fits the 640 x 640 format. The eventually remaining empty space is padded with gray color. The logic is implemented in preproc function of yolox/data/data_augment.py script in the YOLOX repository and should be added to the packages/${AWS_ACCOUNT_ID}-application_logic-1.0/src/application.py:
The model outputs 8400 bounding box candidates of the detected objects, and a single detection can have multiple candidates. Using Non-maximum suppression (NMS) algorithm in the post-processing method, it is possible to find the candidate with the highest probability to contain the actual object. The YOLOX repository contains this function and some other helpers that can be added to a newly created packages/${AWS_ACCOUNT_ID}-application_logic-1.0/src/yolox_postprocess.py file as well as the following functions from yolox/utils/demo_utils.py in yolox repository:
- demo_postproces
- nms
- multiclass_nms
- multiclass_nms_class_aware
- multiclass_nms_class_agnostic
The resulting application.py file, after having imported the NMS functions and wired them up in the process_results method should contain:
The process_results method iterates over the output of the model and calls the post-processor methods to extract the bounding boxes of the detections. The boxes are scaled to the [0; 1] interval as expected by the stream class of Panorama SDK. Then a rectangle is added for each detection for the output stream. The postprocess method (taken from demo/ONNXRuntime/onnx_inference.py in the YOLOX repository) converts the model output to the expected format of the Non-maximum Suppression algorithm.
Change the process_media method to invoke process_results instead of preprocess:
Now the application can be built and deployed to the panorama following the steps described in the previous sections. AWS Panorama sends application logs to CloudWatch console using the above configuration. It can be found filtering the logs with /aws/panorama/devices/ as log prefix.
Where to go from here?
This article just scratched the surface of what can be achieved with computer vision at edge and AWS Panorama offers a great production environment to do that. This step-by-step tutorial is a first example about how a state-of-the-art object detection model can be deployed, allowing to recognize the 80 different object classes of the COCO dataset and locate them with a bounding box, showing the annotated video stream on an HDMI display.
From here a custom YOLOX model can be trained with a custom image dataset, then deployed to a Panorama application to implement a very specific classification.
On the “developer side” a lots of business logic can be added to build a complete service around the model, since with the proper IAM role, the application running in the Panorama device can directly access AWS resources such as S3 buckets, MQTT topics, SNS notifications, or CloudWatch metrics.
About the authors
Janos Tolgyesi is an AWS Community Builder and Machine Learning Solution Architect at Neosperience. He works with ML technologies for five years and with AWS infrastructure for eight years. He loves building things, let it be a video analytics application on the edge or a user profiler based on clickstream events. For any questions, you can find me on Twitter as @jtolgyesi, on Medium, or on LinkedIn.
Luca Bianchi, PhD is an AWS Hero and Chief Technology Officer at Neosperience. He loves serverless and machine learning and is in charge of Neosperience Research and Development. Passionate about technology, ML and computer vision, can be contacted on Twitter, Medium, and LinkedIn.
Deploy an object detector model at the edge on AWS Panorama was originally published in Towards Data Science on Medium, where people are continuing the conversation by highlighting and responding to this story.
from Towards Data Science - Medium https://ift.tt/3168CPh
via RiYo Analytics


No comments