https://ift.tt/qyzpvQR See What You Segment with SAM How to generate and visualize Segment Anything Model predictions Segmentation of Op...
See What You Segment with SAM
How to generate and visualize Segment Anything Model predictions
Over the past few weeks, Meta AI Research’s general purpose image segmentation model has attracted a lot of attention. The model, aptly named Segment Anything Model (SAM) (Apache license 2.0), was trained on a dataset consisting of 11 million images and more than a billion segmentation masks.
SAM is remarkably powerful. But as always, before deploying a model in production, you need to understand how the model performs on your dataset. In the context of computer vision, a crucial element in this equation is visualizing model predictions.
This blog post is designed to help you get up and running with SAM: we’ll walk you through how to use SAM to add segmentation masks to your dataset, and how to systematically visualize these segmentation masks across the entire dataset. By visualizing (and evaluating) these predictions, we can better understand how SAM fares on our dataset, its limitations, and the potential downstream impacts of integrating the model into our pipelines.
SAM provides multiple avenues for generating segmentation masks:
- Automatic: it just works, without any prompts or hints
- From bounding box: given a bounding box, SAM segments the bounded object
- From points: given point labels, which can be positive or negative SAM infers the area to be segmented
- From points and boxes: you can provide both points and bounding boxes to improve performance
Below, we will explicitly go through the first three. The post will be structured as follows:
Setup
Installation
This tutorial requires python≥3.8, pytorch≥1.7 and torchvision≥0.8. If you don’t have Torch or Torchvision installed, run:
pip install torch torchvision
Additionally, we will be using the open source computer vision library FiftyOne, for loading datasets and visualizing predictions. If you don’t have FiftyOne installed, you can run:
pip install fiftyone
In order to use SAM, you can install the Segment Anything library from source, with:
pip install git+https://github.com/facebookresearch/segment-anything.git
You will then be able to import the library as segment_anything.
After that, download a model checkpoint. For this walkthrough, we will be using the default ViT-H SAM model, i.e. the “huge” vision transformer Segment Anything Model. If you’d prefer, you can instead use the large (ViT-L SAM) or base (ViT-B SAM) model.
Importing modules
Here is the header code we will need to import all of the modules we will use:
import numpy as np
import PIL
import torch

import fiftyone as fo
import fiftyone.zoo as foz # for loading/downloading datasets

from segment_anything import sam_model_registry, SamAutomaticMaskGenerator, SamPredictor
Defining constants
We can also define some elements that will not change across all of our segmentation applications:
sam_checkpoint = "path/to/ckpt.pth"
model_type = "vit_h"
device = "cuda"

sam = sam_model_registry[model_type](checkpoint=sam_checkpoint)
sam.to(device)
Loading the dataset
For this tutorial, we will be using images from Google’s Open Images V7 (Apache license 2.0) dataset. The dataset already has instance segmentation masks for many images, but for the sake of illustration, we will only load in point labels and object detection bounding boxes. For a comprehensive tutorial on how to work with point labels in Open Images V7, check out this Medium post.
Let’s load in 100 random images from the validation split:
dataset = foz.load_zoo_dataset(
    "open-images-v7",
    split="validation",
    max_samples=100,
    label_types=["detections", "points"],
    shuffle=True,
)
We will name the dataset and make it persistent. Additionally, we will store the image width and height in pixels by running compute_metadata(), so that we can use this information to convert between absolute and relative coordinates:
dataset.name = "openimages_sam"
dataset.persistent = True
dataset.compute_metadata()

## visualize the dataset
session = fo.launch_app(dataset)
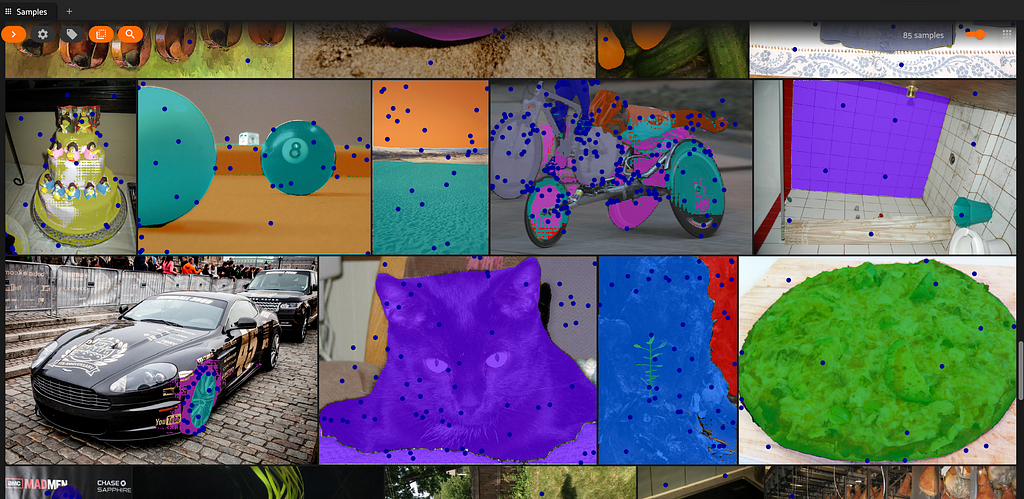
This is what the dataset looks like, before we start adding in SAM predictions:

Auto-segmentation with SAM
If you don’t have any existing keypoints or bounding boxes with which to guide the Segment Anything Model, you can use “auto-segmentation” functionality to generate segmentation masks for any things and stuff in an image. This is done via the SamAutomaticMaskGenerator class. Note that this is not panoptic segmentation, as the masks are not labeled.
You can instantiate a SamAutomaticMaskGenerator object, setting the intersection over union (IoU) threshold, minimum area of a returned mask, and other parameters:
mask_generator = SamAutomaticMaskGenerator(
    model=sam,
    points_per_side=32,
    pred_iou_thresh=0.9,
    stability_score_thresh=0.92,
    crop_n_layers=1,
    crop_n_points_downscale_factor=2,
    min_mask_region_area=400
)
For a complete list of allowable parameters, see this SAM notebook.
Given a sample (image located at sample.filepath), we can generate masks by reading the image with Pillow and calling the generate() method of our SamAutomaticMaskGenerator object:
image = np.array(PIL.Image.open(sample.filepath))
masks = mask_generator.generate(image)
These masks contain 2D “segmentation” arrays, but no labels. If we wanted labels as well, we could use a library like Semantic Segment Anything. For the sake of simplicity, we will just show you how to combine all of these into a full image mask, assigning a different color to each of the individual masks returned by our mask generator.
To add an “automatic” segmentation mask to a single sample, we can pass the image associated with that sample to our mask generator. Then for each of the masks that is returned, we can add that mask to our full image mask, multiplying by a unique number so that the display color is unique to that sub-mask. We can then store this complete image mask as a Segmentation label object on our dataset.
This is encompassed in the function:
def add_SAM_auto_segmentation(sample):
    image  = np.array(PIL.Image.open(sample.filepath))
    masks = mask_generator.generate(image)

    full_mask = np.zeros_like(masks[0]["segmentation"]).astype(int)
    for i in range(len(masks)):
        x, y = np.where(masks[i]['segmentation'])
        full_mask[x,y] = i + 1

    sample["auto_SAM"] = fo.Segmentation(mask=full_mask.astype(np.uint8))
The addition step is valid here as long as you set crop_n_layers=1 when defining the mask generator. This code will work for up to 256 unique sub-masks.
We will loop through the samples in our dataset, saving each sample as we go:
def add_SAM_auto_segmentations(dataset):
    for sample in dataset.iter_samples(autosave=True, progress=True):
        add_SAM_auto_segmentation(sample)
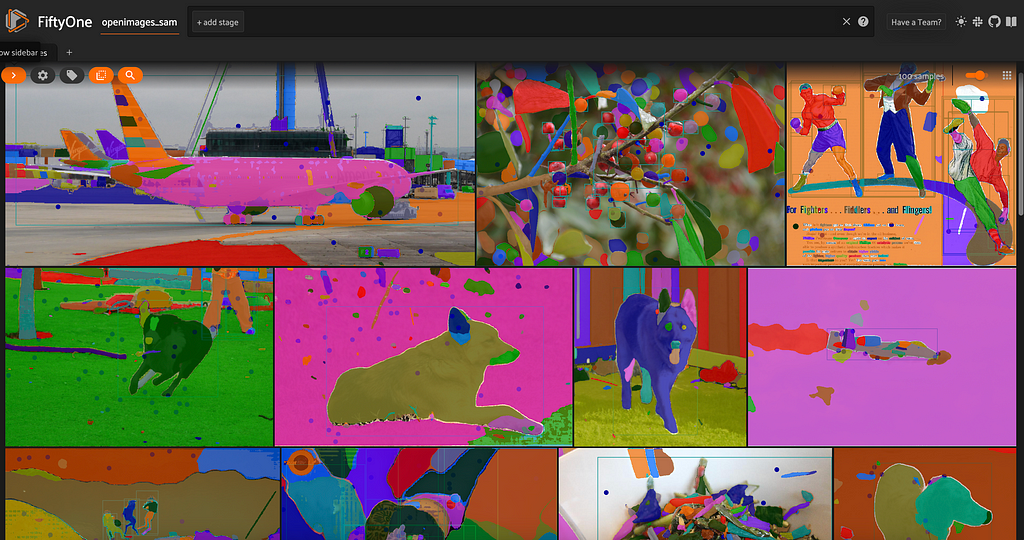
When we visualize the results in the FiftyOne App, this is what we see:
Looking at these automatically generated masks, we can see that there are quite a few tiny blobs that are not particularly meaningful to us. When we defined our mask generator, we set the minimum mask region area to 400 pixels. If we were going to use this method as part of a larger pipeline, we may need to consider increasing this minimum requirement, or using different minima for certain images, depending on the number of pixels in the image.
Semantic segmentation with SAM
If you have point labels (keypoints) on the images in your dataset, then you can use these point labels to prompt the SAM model. This is true for both positive and negative point labels! This section will show you how to do just that.
In FiftyOne, point labels are represented as Keypoint objects. In Open Images V7, each individual point displayed on an image is stored in its own Keypoint object within the “points” field, because it carries along additional information.
We can access the contents of these point labels for a given sample via the keypoints attribute. For instance, to get the first point label for the first sample in our dataset, we can use:
dataset.first().points.keypoints[0]
<Keypoint: {
    'id': '644c260d753fe20b7f60f9de',
    'attributes': {},
    'tags': [],
    'label': 'Rope',
    'points': [[0.11230469, 0.7114094]],
    'confidence': None,
    'index': None,
    'estimated_yes_no': 'no',
    'source': 'ih',
    'yes_votes': 0,
    'no_votes': 3,
    'unsure_votes': 0,
}>
This point is a negative label (estimated_yes_no field) for the class Rope, a result determined by the number of individual yes and no votes. Throughout the Open Images V7 dataset, point labels have estimated_yes_no in (“yes”, “no", “unsure”). We will ignore the unsure points (which represent a very small fraction of total point labels) and focus on the high certainty points.
Let’s instantiate a SAM predictor model, which we will use for both semantic and instance segmentation:
predictor = SamPredictor(sam)
To prime the predictor, we are going to pass in information about the point labels in the image via the point_coords and point_labels arguments.
The SamPredictor expects point_coords in absolute coordinates, whereas FiftyOne stores points in relative coordinates. Additionally, point_labels accepts arrays of 0’s and 1’s, so we will convert from [yes, no]. The following function takes in the list of point labels for a given image, and a label class, plus image width and height, and returns the point_coords and point_labels for all relevant points:
def generate_sam_points(keypoints, label, w, h):
    def scale_keypoint(p):
        return [p[0] * w, p[1] * h]

    sam_points, sam_labels = [], []
    for kp in keypoints:
        if kp.label == label and kp.estimated_yes_no != "unsure":
            sam_points.append(scale_keypoint(kp.points[0]))
            sam_labels.append(bool(kp.estimated_yes_no == "yes"))

    return np.array(sam_points), np.array(sam_labels)
For a single sample, we can add a SAM semantic segmentation mask with the function:
def add_SAM_semantic_segmentation(sample, n2i):
    image = np.array(PIL.Image.open(sample.filepath))
    predictor.set_image(image)

    if sample.points is None:
        return

    points = sample.points.keypoints
    labels = list(set([point.label for point in points]))

    w, h = sample.metadata.width, sample.metadata.height
    semantic_mask = np.zeros((h, w))
    for label in labels:
        sam_points, sam_labels = generate_sam_points(points, label, w, h)
        if not np.any(sam_labels):
            continue

        masks, scores, _ = predictor.predict(
            point_coords=sam_points,
            point_labels=sam_labels,
            multimask_output=True,
        )
        mask = masks[np.argmax(scores)].astype(int) ## get best guess

        semantic_mask *= (1 - mask)
        semantic_mask += mask * n2i[label]

    sample["semantic_SAM"] = fo.Segmentation(
        mask=semantic_mask.astype(np.uint8)
    )
Here, n2i is a dictionary mapping class name to integer value with which to populate the segmentation mask. It is also worth noting that with multimask_output=True, the predictor returns multiple guesses at segmentation masks for each input. We select the highest confidence prediction (maximum score).
Looping over the samples in our dataset:
def add_SAM_semantic_segmentations(dataset):
    point_classes = dataset.distinct("points.keypoints.label")
    dataset.default_mask_targets = {i+1:n for i, n in enumerate(point_classes)}
    dataset.default_mask_targets[0] = "other"  # reserve 0 for background
    NAME_TO_INT = {n:i+1 for i, n in enumerate(point_classes)}
    dataset.save()

    for sample in dataset.iter_samples(autosave=True, progress=True):
        add_SAM_semantic_segmentation(sample, NAME_TO_INT)
We can generate segmentation masks for our dataset:
Of course, not everything is semantically segmented here, as the images contain somewhat sparse point labels. Adding more points to the initial data would result in denser semantic segmentation masks for the images in the dataset.
We can also see that while SAM does a pretty good job across the entire dataset, it struggles to appropriately segment the motorcycle’s wheels.
Instance segmentation with SAM
If you already have bounding boxes for objects in your dataset, you can prompt the SAM model with these bounding boxes and generate segmentation masks for these objects! Here’s how:
As with point labels, we will need to convert bounding boxes from relative to absolute coordinates. In FiftyOne, bounding boxes are stored in [<top-left-x>, <top-left-y>, <width>, <height>] format, with coordinates in [0,1]. On the other hand, SAM bounding boxes are [<top-left-x>, <top-left-y>, <top-right-x>, <top-right-y>], absolute coordinates. The following function will perform the conversion for us:
def fo_to_sam(box, img_width, img_height):
    new_box = np.copy(np.array(box))
    new_box[0] *= img_width
    new_box[2] *= img_width
    new_box[1] *= img_height
    new_box[3] *= img_height
    new_box[2] += new_box[0]
    new_box[3] += new_box[1]
    return np.round(new_box).astype(int)
Once we have generated an instance segmentation mask with SAM for a given object detection, we can add the mask to the detection object with:
def add_SAM_mask_to_detection(detection, mask, img_width, img_height):
    y0, x0, y1, x1 = fo_to_sam(detection.bounding_box, img_width, img_height)
    mask_trimmed = mask[x0:x1+1, y0:y1+1]
    detection["mask"] = np.array(mask_trimmed)
    return detection
To add instance segmentation masks to an image, we loop through all object detections, using the SamPredictor object with each detection’s bounding box, and adding the resulting mask to the FiftyOne Detection object:
def add_SAM_instance_segmentation(sample):
    w, h = sample.metadata.width, sample.metadata.height
    image = np.array(PIL.Image.open(sample.filepath))
    predictor.set_image(image)

    if sample.detections is None:
        return

    dets = sample.detections.detections
    boxes = [d.bounding_box for d in dets]
    sam_boxes = np.array([fo_to_sam(box, w, h) for box in boxes])

    input_boxes = torch.tensor(sam_boxes, device=predictor.device)
    transformed_boxes = predictor.transform.apply_boxes_torch(input_boxes, image.shape[:2])

    masks, _, _ = predictor.predict_torch(
            point_coords=None,
            point_labels=None,
            boxes=transformed_boxes,
            multimask_output=False,
        )

    new_dets = []
    for i, det in enumerate(dets):
        mask = masks[i, 0]
        new_dets.append(add_SAM_mask_to_detection(det, mask, w, h))

    sample.detections = fo.Detections(detections = new_dets)
For instance segmentation, extending this to the entire dataset is trivial:
def add_SAM_instance_segmentations(dataset):
    for sample in dataset.iter_samples(autosave=True, progress=True):
        add_SAM_instance_segmentation(sample)
Coloring by label, we get something that looks like this:
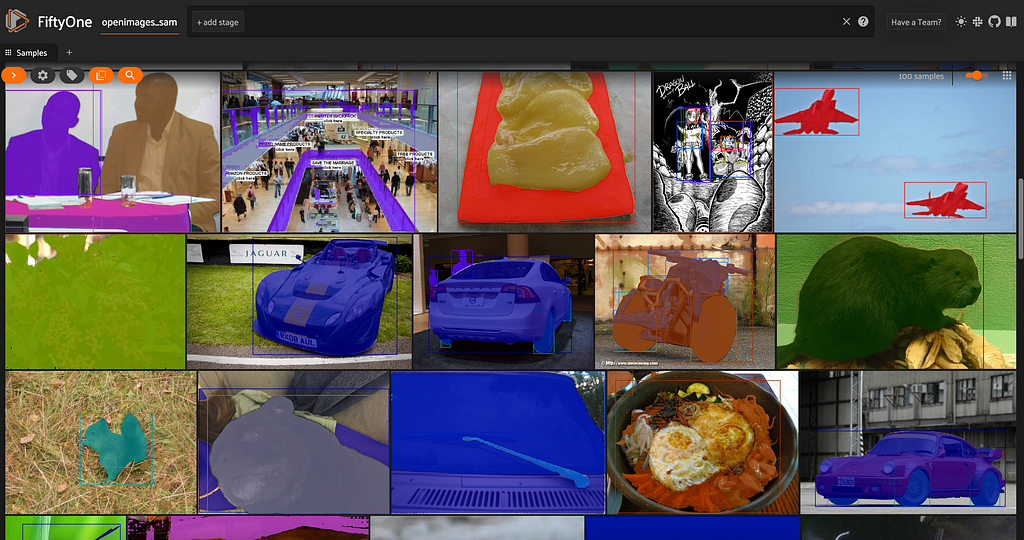
Note: for better efficiency, you can also batch these predictions!
Panoptic segmentation
If you wanted to use SAM to panoptically segment your dataset, you could combine keypoint and bounding box approaches in the following way:
For each bounded object, or thing, such as a car or a table:
- Generate a bounding box around the object, either via traditional annotation, or Grounding DINO, or some other method.
- Select the center of the bounding box as the default keypoint for that object. If this turns out to not be inside the object, adjust accordingly.
- Use these keypoints and bounding boxes to compute instance segmentation masks
For each contiguous region of stuff (for instance, sky or grass):
- Add one or multiple labeled keypoints.
- Compute semantic segmentation masks using these keypoints
Fill in the gaps:
- Given all of the instance and semantic segmentation masks, identify regions of overlapping coverage and regions without any mask.
- Address these regions with whatever strategy suits your application best.
Conclusion
Meta AI’s Segment Anything Model is incredibly powerful and versatile. That being said, SAM is just one of many exciting advances in the areas of segmentation and prompted/guided computer vision. The field is moving incredibly fast! If you are interested in learning more, I’d encourage you to check out the following related projects:
- Track Anything: video segmentation — built on top of SAM
- MedSAM: Segment Anything for medical images
- Inpaint Anything: Segment Anything + Inpainting
- Semantic Segment Anything: SAM + semantic labeling engine
- Segment Everything Everywhere All at Once: similar to SAM, and supports multi-modal prompts
Sources
See what you SAM was originally published in Towards Data Science on Medium, where people are continuing the conversation by highlighting and responding to this story.
from Towards Data Science - Medium
https://towardsdatascience.com/see-what-you-sam-4eea9ad9a5de?source=rss----7f60cf5620c9---4
via RiYo Analytics


No comments