https://ift.tt/EUvCu1P A Step-by-Step Guide Photo by Ivan Bandura on Unsplash This article aims to guide you in creating a simple yet...
A Step-by-Step Guide
This article aims to guide you in creating a simple yet powerful voice assistant tailored to your preferences. We’ll use two powerful tools, Whisper and GPT, to make this happen. You probably already know GPT and how powerful it is, but what is Whisper?
Whisper is an advanced speech recognition model from OpenAI that offers accurate audio-to-text transcription.
We’ll walk you through each step, with coding instructions included. At the end, you’ll have your very own voice assistant up and running.
Before you begin
Open AI API keys
If you already have an OpenAI API key you can skip this section.
Both Whisper and GPT APIs require an OpenAI API key to be accessed. Unlike ChatGPT where the subscription is a fixed fee, the API key is paid based on how much you use the service.
The prices are reasonable. At the time of writing, Whisper is priced at $0.006 / minute, GPT (with the model gpt-3.5-turbo) at $0.002 / 1K tokens (a token is approximately 0.75 words).

To get your key, first create an account on the OpenAI website. After signing in, click on your name at the top-right corner and choose View API keys. Once you click Create new secret key your key is displayed. Make sure to save it, because you won’t be able to see it again.
Packages
The code chunk shows the required libraries for the project. The project involves using OpenAI’s Python library for AI tasks, pyttsx3 for generating speech, SoundDevice for recording and playing back audio, numpy and scipy for mathematical operations. As always, you should create a new virtual environment before installing packages when starting a new project.
Code structure
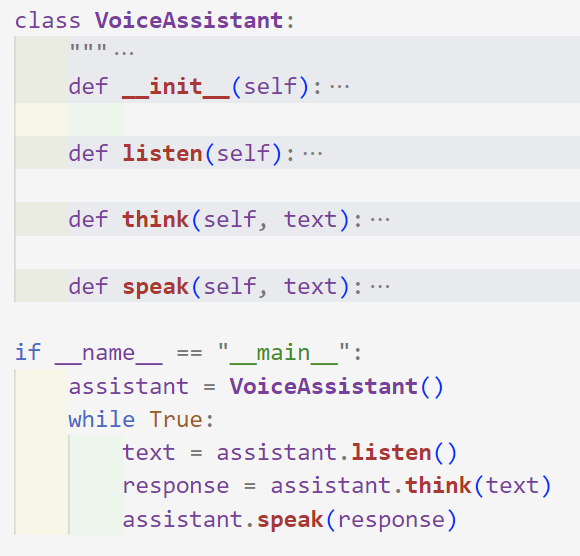
Our code will be structured around a single class, and take up approximately 90 lines of code in total. It assumes that you have a basic understanding of Python classes.

The listenmethod captures the user’s spoken input and converts it to text using Whisper. The thinkmethod sends the text to GPT, which generates a natural language response. The speakmethod converts the response text into an audio that is played back. The process repeats: the user is able to interact in a conversation by making another request.
__init__
This function takes care of initializing the history and setting up the API key.
We need a history that keep track of the previous messages. It’s basically our assistant’s short-term memory, and allows it to remember what you said earlier in the conversation.
listen

This method is our assistant’s ears.
The listen function allows to receive input from the user. This function records audio from your microphone and transcribes it into text.
Here’s what it does:
- Prints Listening… when recording audio.
- Records audio for 3 seconds (or any duration you want) using sounddevice at a sample rate of 44100 Hz.
- Saves the recorded audio as a NumPy array in a temporary WAV file.
- Uses the OpenAI API’s transcribemethod to send the audio to Whisper, which transcribes it.
- Prints the transcribed text to the console to confirm that the transcription was successful.
- Returns the transcribed text as a string.
In the example, the assistant listens for 3 seconds, but you can change the time as you want.
think

Our assistant’s brain is powered by GPT. The think function receives what the assistant hears and elaborates a response. How?
The response is not created on your computer. The text needs to be sent to OpenAI’s servers to be processed through the APIs. The response is then saved in the response variable, and both the user message and the response are added to the history, the assistant’s short term memory. provide context to the GPT model for generating responses.
speak

The speak function is responsible for converting text into speech and playing it back to the user. This function takes a single parameter: text. It should be a string that represents the text to be converted to speech.
When the function is called with a text string as an argument, it initializes the pyttsx3 speech engine with the command engine = pyttsx3.init() This object, engine is the main interface for converting text to speech.
The function then instructs the speech engine to convert the provided text into speech using the command engine.say(text). This queues up the provided text to be spoken. The command engine.runAndWait tells the engine to process the queued command.
Pyttsx3 handles all text-to-speech conversion locally, which can be a significant advantage in terms of latency.
Final touches
The assistant is now ready. We just need to create an assistant object, and begin the conversation.
The conversation is an infinite loop that ends when the user says a sentence containing Goodbye.
Tips to Personalize Your Experience
Customizing your GPT assistant is a breeze! The code that we built is very modular, and it allows you to customize it by adding a a variety of features. Here are some ideas to get you started:
- Give a role to the assistant: Change the initial prompt to make your assistant act as your English teacher, motivational speaker, or anything else you can think of! Check out Awesome ChatGPT Prompts for more ideas.
- Change the language: Want to use another language? No problem! Simply change english in the code to your desired language.
- Build an app: You can easily integrate the assistant in any application.
- Add personality: Give your assistant a unique personality by adding custom responses or using different tones and language styles.
- Integrate with other APIs: Integrate your assistant with other APIs to provide more advanced functionality, such as weather forecasts or news updates.
Conclusion
In this article, we explained how to retrieve your OpenAI API key and provided code examples for the listen, think, and speak functions that are used to capture user input, generate responses, and convert text to speech for playback.
With this knowledge, you may begin creating your own unique voice assistant that is suited to your specific demands. The possibilities are infinite, from creating a personal assistant to help with daily tasks, to building a voice-controlled automation system. You can access all the code in the linked GitHub repo.
Creating Your Personalized Voice Assistant with GPT and Whisper was originally published in Towards Data Science on Medium, where people are continuing the conversation by highlighting and responding to this story.
from Towards Data Science - Medium
https://towardsdatascience.com/creating-your-personalized-voice-assistant-with-gpt-and-whisper-ddb9bd8c419?source=rss----7f60cf5620c9---4
via RiYo Analytics


No comments