https://ift.tt/R2QatIJ Photo by Martijn Baudoin on Unsplash Custom YOLOv7 Object Detection with TensorFlow.js Training a custom YOLOv...

Custom YOLOv7 Object Detection with TensorFlow.js
Training a custom YOLOv7 model in PyTorch and converting it to TensorFlow.js for real-time offline detection on the browser
Recently, I open-sourced an implementation of YOLOv7 in Tensorflow.js and the most common question I received was:
How did you convert the model from PyTorch to Tensorflow.js?
This post will cover this process by solving a real-world problem using a custom YOLOv7 model running directly on the browser and offline.
The industry we will tackle is physical retail. Besides the digitalization that happened recently — mostly during the pandemic — the physical store remains the customers' most preferred shopping destination.
Everything in a store is about the experience. The Retail Feedback Group (RFG), which has been tracking the grocery shopping experience for around 15 years, consistently finds that the most crucial factor affecting customer satisfaction is whether shoppers are able to find everything they need during their visit, whether it be in-store or online.
So retailers are constantly focused on ensuring product availability and the right mix of items for their customers.
In a previous article, I showed how to create a TensorFlow.js model to recognize SKUs. In this post, we will explore how to identify empty shelves using a custom YOLOv7 model — everything running in real-time, offline, and in the browser of a smartphone.
What this post will cover:
- Configuring the environment;
- Gathering the data;
- Preparing the model for training;
- Training and reparametrizing the model;
- Evaluating the model;
- Converting to TensorFlow.js;
- Deploying the model on a web browser.
Configuring the environment
The entire training pipeline will be executed using the free GPU provided by Google Colab. If you want to access the notebook with all the consolidated steps, click here.
Gathering the data
The dataset we will use to train the model is the Retail empty shelves — stockout (CC0 1.0 License). It has 3608 annotations from 1155 images and a unique class: Stockout.

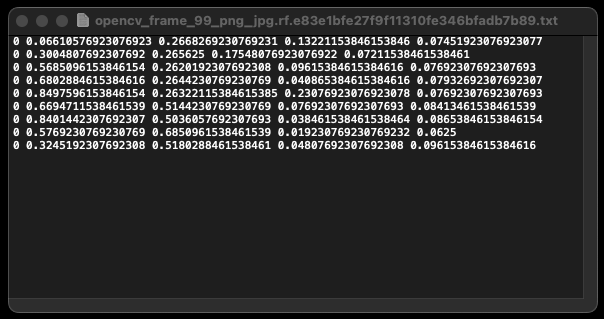
The annotations should be in the YOLOv7 format, where each image has its corresponding txt file. The first value in each line represents the class — for the Stockout dataset, all classes are the same and equal to 0. The remaining four numbers in the line indicate the coordinates of the bounding box.
If you want to create your own dataset, you can use a tool like CVAT.

To download and extract the stockout dataset, use the following code:
Preparing the model for training
The first step is to clone the YOLOv7 repository and install the dependencies:
Then, download the weights pre-trained on the COCO 2017 Dataset. They will be used to initialize the model and speed up the training — this technique is known as transfer learning.
Since we are working on a one-class problem, we opted for YOLOv7-tiny, a lightweight variation of YOLOv7.
And before starting the training, we have to configure a .yaml file with the parameters we want to use.
Training and reparametrizing the model
The training process is straightforward and customizable, allowing you to adjust parameters such as the number of epochs and batches to suit your dataset’s requirements.
By the end of the execution, you will have the weights saved at yolov7/runs/train/your-model-name/weights/best.pt .
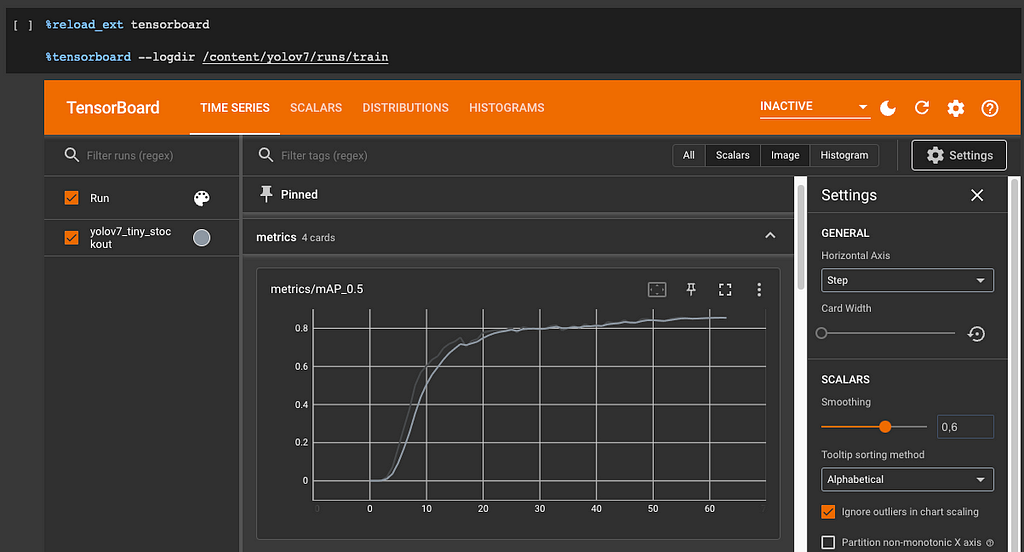
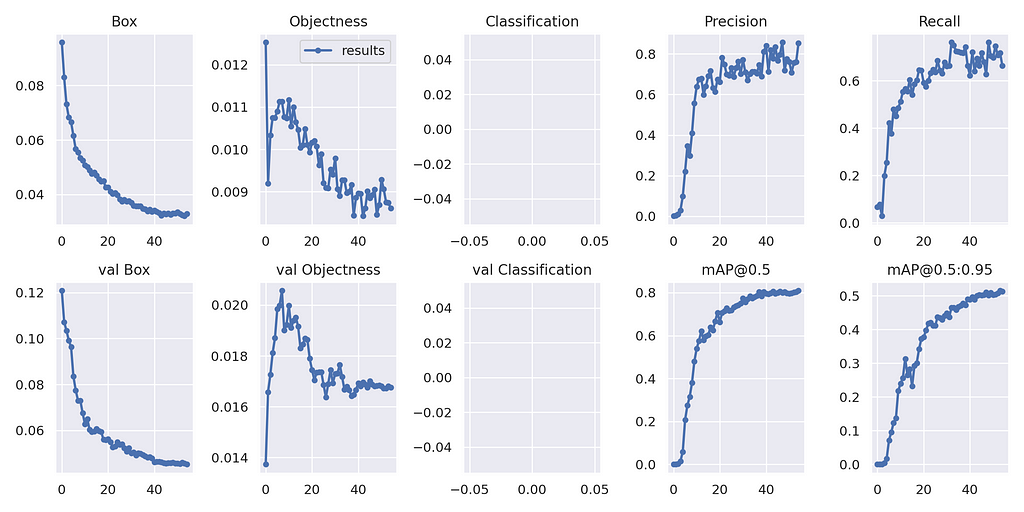
To view the training metrics in a visual format, launch TensorBoard or open the image yolov7/runs/train/your-model-name/results.png .


Now that you have the model trained, it is time to reparametrize the weights for inference.
Along with its architecture optimizations for real-time object detection, YOLOv7 introduces additional modules and methods that can enhance training efficiency and improve object detection accuracy. These modules, known as bag-of-freebies, must be streamlined for efficient inference. For more information, refer to the model paper.
Check the weight's path on the code below and execute it to generate a reparametrized model.
Evaluating the model
Now that the model is optimized for inference, it's time to run it in some testing images to see if it detects empty spaces on the shelves.
Converting to TensorFlow.js
Converting the model can be challenging, as it requires passing through several transformations: PyTorch to ONNX, ONNX to TensorFlow, and finally, TensorFlow to TensorFlow.js.
The following code will handle everything for you. Just make sure the model paths are correctly configured and then run it!
Upon completion, the resulting TensorFlow.js model will be automatically downloaded by Google Colab.
Assuming everything has been executed successfully, the model will now be converted to the TensorFlow.js layers format.
The folder downloaded on your local machine should contain a model.json file and a set of sharded weights files in a binary format. The model.json has both the model topology (aka “architecture” or “graph”: a description of the layers and how they are connected) and a manifest of the weight files.
└ stockout_web_model
  ├── group1-shard1of6.bin
  ├── group1-shard2of6.bin
  ├── group1-shard3of6.bin
  ├── group1-shard4of6.bin
  ├── group1-shard5of6.bin
  ├── group1-shard6of6.bin
  └── model.json
Deploying the model
The model is now ready to be loaded into JavaScript. As mentioned in the beginning, I open-sourced a YOLOv7 code in JavaScript. Therefore, we can utilize the same repository and replace the model with the one that we have just trained
Clone the repository:
git clone https://github.com/hugozanini/yolov7-tfjs.git
Install the packages:
npm install
Go to the public folder and past the model trained. You should have a structure like this:
├── git-media
├── index.html
├── LICENSE
├── node_modules
├── package.json
├── public
│    ├── stockout_web_model
│    └── yolov7_web_model
├── README.MD
└── src
Go to src/App.jsx and change the model name on line 29 to stockout:
const modelName = "stockout";
To execute the application go to the root folder and run the following command:
npm start
A local server will be started, and you should see something similar to this:

This model was deployed on CodesSandbox too. Access the link below to see it running.
With YOLOv7, it’s possible to detect up to 80 different classes. For businesses in the retail industry, this presents a great opportunity to improve their in-store product execution.
By training the model to recognize all of their company’s products, retailers can ensure that their products are properly placed on the shelves and that customers are able to easily find what they are looking for.
To validate the effectiveness of the model trained, I went to a grocery and drug store with my phone and recorded some examples of the detector running in real time.
In the video below, you can verify the solution's ability to accurately detect empty shelves in a real environment.
A stockout detector in conjunction with an SKU recognition model can greatly enhance the efficiency and effectiveness of retail operations.
While cloud-based solutions exist, they can sometimes be slow, taking up to 24 hours to process a single detection. In comparison, using TensorFlow.js models on a smartphone browser allows for offline, real-time recognition — allowing businesses to make more immediate decisions and respond to stockouts faster.
Overall, combining a stockout detector with an SKU recognition model can provide a powerful way for optimizing retail operations and enhancing the shopping experience for customers. By using real-time analysis and offline recognition capabilities, businesses can make informed decisions and respond quickly to changing conditions.
If you have any questions or want to share about a user case, feel reach me on Linkedin or Twitter. All the source code used in this post is available on the project repo.
Thanks for reading :)
Training a custom YOLOv7 in PyTorch and running it directly in the browser with TensorFlow.js was originally published in Towards Data Science on Medium, where people are continuing the conversation by highlighting and responding to this story.
from Towards Data Science - Medium
https://towardsdatascience.com/training-a-custom-yolov7-in-pytorch-and-running-it-directly-in-the-browser-with-tensorflow-js-96a5ecd7a530?source=rss----7f60cf5620c9---4
via RiYo Analytics

No comments