https://ift.tt/A78G0ed An open source, machine learning based approach to resolve identities at scale One of the main challenges in genera...
An open source, machine learning based approach to resolve identities at scale
One of the main challenges in generating useful insights from data is siloed and disjointed datasets having poor data quality. Data inconsistencies and duplicate records are often introduced due to multiple sources of information in enterprise data pipelines. This is a huge problem for data scientists working on fraud detection, personalization and recommendations. For data analysts, it is hard to report accurate customer lifetime value, most valuable customers, new customers added and other metrics as the underlying data is inconsistent.
For example, take a look at the customer data below
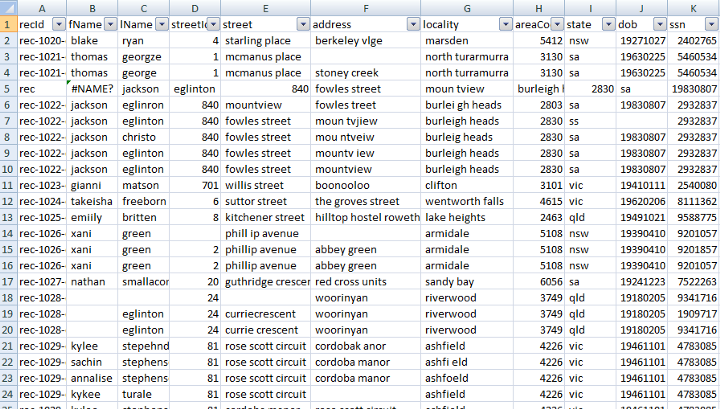
We can see that there are multiple rows for the same customer, such as the following

We have an ssn column, however, there is no guarantee that it would always be unique. In the example above, the ssn of the second record is not consistent with the other records. A quick human verification however confirms that these 3 records belong to the same customer.
Here’s another example of different records belonging to the same customer.

Defining rules across attributes and combining them all to assess matching records is time consuming and prone to errors. Building such a system can easily take months and delay the actual analysis. Trying to perform identity resolution at scale utilizing data columns is not easy either.
Overall, building an identity resolution system has the following challenges
- The total number of comparisons required to find duplicates becomes unmanageable with an increase in the number of records. The total number of comparisons we would make on N records for one attribute is given by

As our dataset size N increases, the number of comparisons shoot up

2. Understanding which attributes to use for identifying duplicates and deciding the matching criteria for large datasets with many attributes and variations is tough.
While building an identity resolution system, the following steps are generally involved
- Preprocessing: normalizing the data as much as possible such as getting rid of common occurring words, removing leading and trailing spaces, making attributes in lowercase or same case, cleaning punctuation etc. This is done so that we can define the attribute specific matching rules.
- Indexing: Since comparing each record with every other record shows scalability issues we segregate the dataset into smaller blocks and then perform comparisons within the block. This reduces the processing and it becomes much easier to scale the system to a larger volume of data.
- Attribute level rule definition: Relevant attributes are compared based on criteria, such as we will consider two records to be similar for email attribute if and only if the emails match exactly.
- Record level rule definition: Attribute level comparison defined above is rolled up to a combined definition of similarity at the record level. For example first name and last name match but email does not match completely.
- Group similarity: If two records match individually to a third record but do not match each other, maybe due to a missing attribute, how do we handle this?
Building this ourselves is certainly doable but is it worth our time? Let us explore an open source option — Zingg. We will use Zingg’s Python api and build an identity resolution pipeline for our customer data.
As an ML based tool, Zingg takes care of the above steps so that we can perform identity resolution at scale.
In order to perform entity resolution, Zingg defines five phases — findTrainingData, label, train, match and link.
- findTrainingData: As a supervised machine learning system, Zingg learns matching from training data. The findTrainingData phase selects sample pairs from our data through which the user can build a training set.
- label: This phase pulls up the interactive labeler that shows the pairs selected in findTrainingData. The labeler prompts the user to mark them as matches or non matches. If the user is not sure or unable to decide, the user can choose not sure as an option.
- train: Using the labeled data, Zingg learns similarity rules to identify potential duplicates. Zingg does not compare each record in the dataset with every other record in the dataset which would result in scalability issues for large datasets. Instead, Zingg first learns how to group similar records together into blocks. It also learns suitable similarity rules per the training set, thus cutting down the total number of comparisons required. Models are persisted to the disk for use with newer data.
- match: The trained models are applied to predict match scores that can be used to resolve identities.
- link: Finds matches across datasets
findTrainingData and label phase are usually run a few times and samples are marked by the user. Non matching, obvious matches and edge case samples are chosen carefully by Zingg through findTrainingData to build a robust training set with sufficient variations to train the models.
Once we have about 30–40 matching samples we can train and save the models by running the train phase. Once the model is trained, the match or the link phase can be performed as new datasets with the same attributes come in.
Let us use Zingg on the customer data and resolve identities.
Step 1: Install Zingg
The fastest way to get started with Zingg is to use the Zingg docker image. Let us get the docker image and start working with it.
docker pull zingg/zingg:0.3.4
docker run -u <uid> -it zingg/zingg:0.3.4 bash
For additional information regarding using Zingg docker, check out the official documentation linked here.
We will use the febrl example loaded into a table named customers in Postgres.
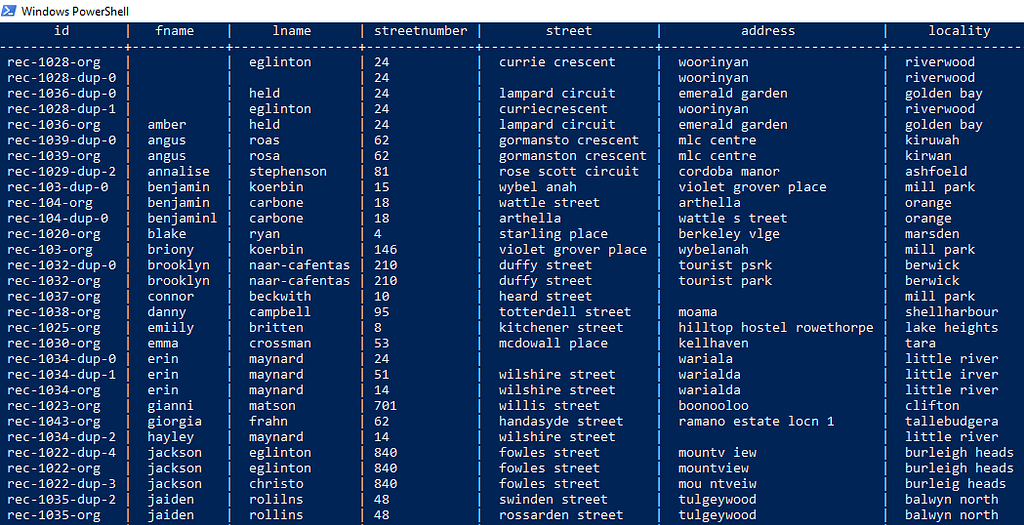
Step 2: Define the input location and match criteria
Zingg python package is already installed in the docker container, so we will use it directly.
Let us define the input for our customers table. We create a Python script named FebrlExamplePostgresql.py and import the necessary packages
from zingg.client import *
from zingg.pipes import *
For each column that we want to use as part of our output, we create a FieldDefinition object. The FieldDefinition takes the name of the attribute, its data type, and the match type. For example, we can define the first name column like this
fname = FieldDefinition("fname", "string", MatchType.FUZZY)
Match types configure Zingg on how we want the matching to be performed for each field. Zingg provides different matching criteria, some of which are
- FUZZY: Generalized matching with abbreviations, typos and other variations, applicable for fields like names
- EXACT: No variations allowed, applicable for fields like country codes
- DONT_USE: Fields with this match type are ignored during processing but will appear in the output
There are many more match types that we can use as per our column data documentation here.
The following Python program builds the arguments for Zingg and adds all the field definitions to it.
#build the arguments for zingg
args = Arguments()
#set field definitions
fname = FieldDefinition("fname", "string", MatchType.FUZZY)
lname = FieldDefinition("lname", "string", MatchType.FUZZY)
streetnumber = FieldDefinition("streetnumber", "string", MatchType.FUZZY)
street = FieldDefinition("street","string", MatchType.FUZZY)
address = FieldDefinition("address", "string", MatchType.FUZZY)
locality = FieldDefinition("locality", "string", MatchType.FUZZY)
areacode = FieldDefinition("areacode", "string", MatchType.FUZZY)
state = FieldDefinition("state", "string", MatchType.FUZZY)
dateofbirth = FieldDefinition("dateofbirth", "string", MatchType.FUZZY)
ssn = FieldDefinition("ssn", "string", MatchType.FUZZY)
fieldDefs = [fname, lname, streetnumber, street, address, locality, areacode
state, dateofbirth, ssn]
args.setFieldDefinition(fieldDefs)
Step 3: Connect Zingg with Postgres
Zingg lets us connect to various data sources and sinks using relevant configurations for each type of data platform as described in the documentation. Zingg’s Python API provides a generic Pipe through which we can define the data sources and sinks for our pipeline.
To connect Zingg with our customers table in Postgres, we create a Pipe object and name it customerDataStaging. We set the format as jdbc.
customerDataStaging = Pipe("customerDataStaging", "jdbc")
We specify the properties for the Pipe to connect with our Postgres database.
customerDataStaging.addProperty("url","jdbc:postgresql://localhost:5432/postgres")
customerDataStaging.addProperty("dbtable", "customers")
customerDataStaging.addProperty("driver", "org.postgresql.Driver")
customerDataStaging.addProperty("user","suchandra")
customerDataStaging.addProperty("password","1234")
To write our output to the customers_unified table, we create another Pipe object with relevant properties.
customerIdentitiesResolved = Pipe("customerIdentitiesResolved", "jdbc")
customerIdentitiesResolved.addProperty("url","jdbc:postgresql://localhost:5432/postgres")
customerIdentitiesResolved.addProperty("dbtable", "customers_unified")
customerIdentitiesResolved.addProperty("driver", "org.postgresql.Driver")
customerIdentitiesResolved.addProperty("user","suchandra")
customerIdentitiesResolved.addProperty("password","1234")
We also need the JDBC driver for Zingg to connect with Postgres. Let us download the Postgres JDBC driver and add the path of the driver to spark.jars property of zingg.conf as described here.
Step 4: Find pairs to label — findTrainingData
We have defined our input schema as well as input and output data source and sink. Let us now specify the directory to store the models and the model identifier. We also specify the fraction of the dataset to be used to select data for labeling so that our training data can be created fast.
args.setZinggDir("models")
args.setModelId("customer360")
args.setNumPartitions(4)
args.setLabelDataSampleSize(0.5)
Next, we invoke Zingg client and specify the appropriate <PHASE_NAME> which could be findTrainingData, label, train or match. We will take the phase name as an input on the command line.
options = ClientOptions([ClientOptions.PHASE,<PHASE_NAME>])
#Zingg execution for the given phase
zingg = Zingg(args, options)
zingg.initAndExecute()
Here is the complete code
from zingg.client import *
from zingg.pipes import *
import sys
#build the arguments for zingg
args = Arguments()
#phase name to be passed as a command line argument
phase_name = sys.argv[1]
#set field definitions
fname = FieldDefinition("fname", "string", MatchType.FUZZY)
lname = FieldDefinition("lname", "string", MatchType.FUZZY)
streetnumber = FieldDefinition("streetnumber", "string", MatchType.FUZZY)
street = FieldDefinition("street","string", MatchType.FUZZY)
address = FieldDefinition("address", "string", MatchType.FUZZY)
locality = FieldDefinition("locality", "string", MatchType.FUZZY)
areacode = FieldDefinition("areacode", "string", MatchType.FUZZY)
state = FieldDefinition("state", "string", MatchType.FUZZY)
dateofbirth = FieldDefinition("dateofbirth", "string", MatchType.FUZZY)
ssn = FieldDefinition("ssn", "string", MatchType.FUZZY)
fieldDefs = [fname, lname, streetnumber, street, address, locality, areacode
state, dateofbirth, ssn]
#add field definitions to Zingg Client arguments
args.setFieldDefinition(fieldDefs)
#defining input pipe
customerDataStaging = Pipe("customerDataStaging", "jdbc")
customerDataStaging.addProperty("url","jdbc:postgresql://localhost:5432/postgres")
customerDataStaging.addProperty("dbtable", "customers")
customerDataStaging.addProperty("driver", "org.postgresql.Driver")
customerDataStaging.addProperty("user","suchandra")
customerDataStaging.addProperty("password","1234")
#add input pipe to arguments for Zingg client
args.setData(customerDataStaging)
#defining output pipe
customerIdentitiesResolved = Pipe("customerIdentitiesResolved", "jdbc")
customerIdentitiesResolved.addProperty("url","jdbc:postgresql://localhost:5432/postgres")
customerIdentitiesResolved.addProperty("dbtable", "customers_unified")
customerIdentitiesResolved.addProperty("driver", "org.postgresql.Driver")
customerIdentitiesResolved.addProperty("user","suchandra")
customerIdentitiesResolved.addProperty("password","1234")
#add output pipe to arguments for Zingg client
args.setOutput(customerIdentitiesResolved)
#save latest model in directory models/599
args.setModelId("customer360")
#store all models in directory models/
args.setZinggDir("models")
#sample size for selecting data for labelling
args.setNumPartitions(4)
#fraction of total dataset to select data for labelling
args.setLabelDataSampleSize(0.5)
options = ClientOptions([ClientOptions.PHASE,phase_name])
#Zingg execution for the given phase
zingg = Zingg(args, options)
zingg.initAndExecute()
We will run our customer identity resolution Python program using the Zingg command line.
zingg.sh
--properties-file /zingg-0.3.4-SNAPSHOT/config/zingg.conf
--run /zingg-0.3.4-SNAPSHOT/examples/febrl/CustomerIdentityResolution.py findTrainingData
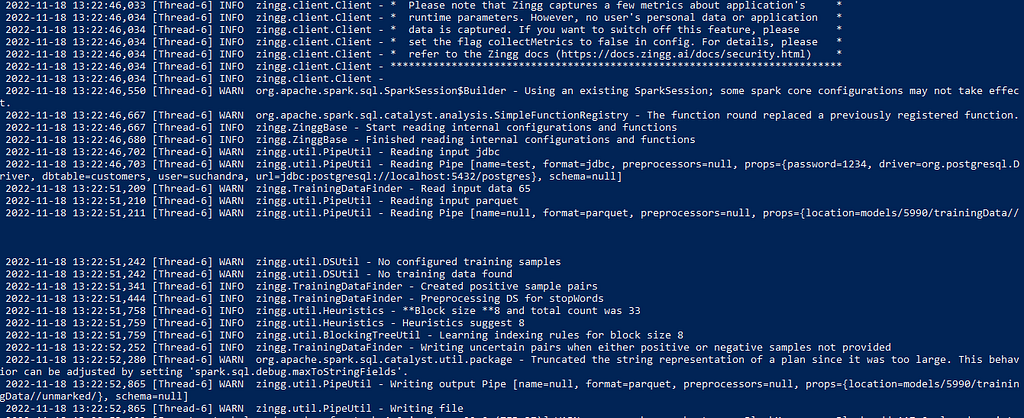
Here are some of the output logs during the findTrainingData phase.
Step 5: Label records as matches or non matches to build the training set
We can now run the Zingg label phase and mark the records selected by the program earlier.
zingg.sh
--properties-file /zingg-0.3.4-SNAPSHOT/config/zingg.conf
--run /zingg-0.3.4-SNAPSHOT/examples/febrl/CustomerIdentityResolution.py label
We are shown pairs of records
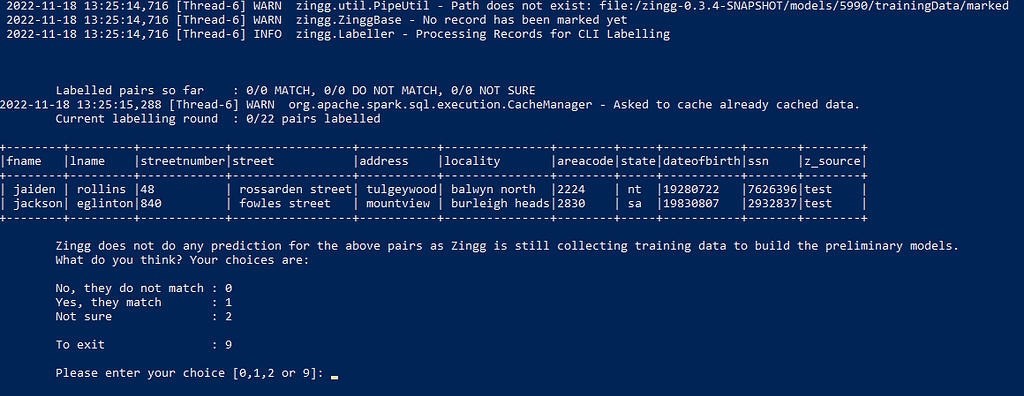
We need to specify whether they match, do not match or we are not sure whether they match or not. The above records do not look like they match so we mark them as 0

These records on the other hand look very similar hence we label them as 1
What should we do with this pair?
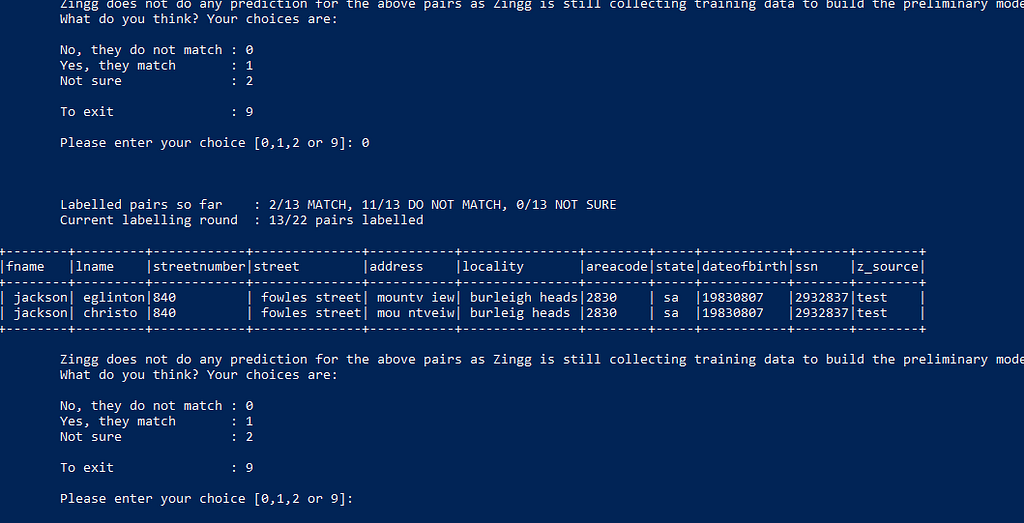
It is a little unlikely that there are two different people living in the same locality, same area with same date of birth and ssn number, these two records could be for the same person with incorrect entry for last name, however it could be for different persons as well. For such cases where we are unsure, we mark them as 2.
Step 6: Run Zingg Python phase — train
As our dataset was small, one round of findTrainingData and label was enough. So now, we can build our models by running
zingg.sh
--properties-file /zingg-0.3.4-SNAPSHOT/config/zingg.conf
--run /zingg-0.3.4-SNAPSHOT/examples/febrl/CustomerIdentityResolution.py train
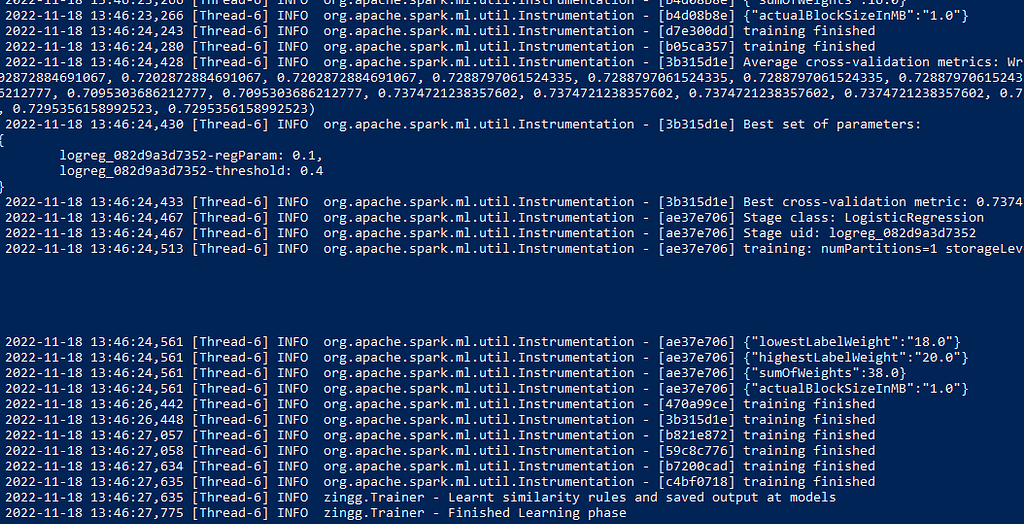
Training and cross validation parameters are printed on the screen.
Step 7: Ready to resolve identities!
Zingg models are ready, so let’s match
zingg.sh
--properties-file /zingg-0.3.4-SNAPSHOT/config/zingg.conf
--run /zingg-0.3.4-SNAPSHOT/examples/febrl/CustomerIdentityResolution.py match
On completion, Zingg writes the output to the table we specified in our Python program.
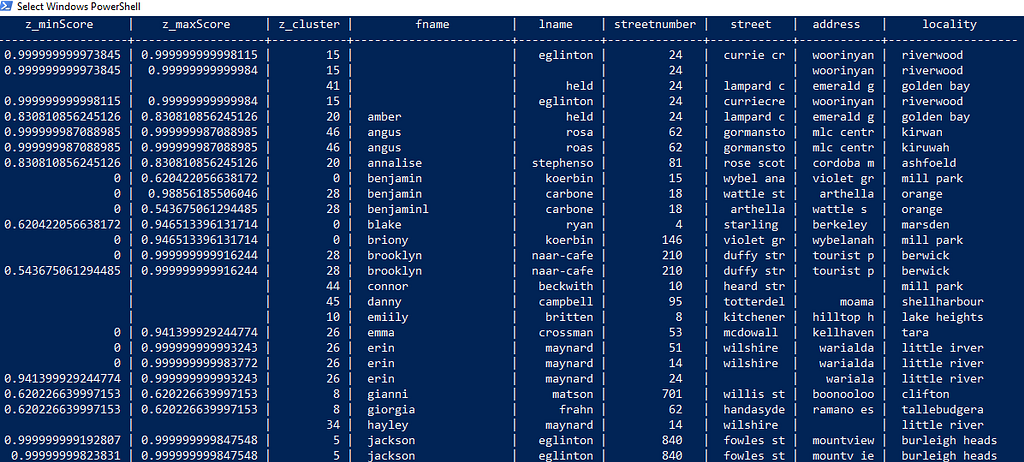
Zingg adds 3 new columns
- Z_CLUSTER — unique ID assigned by Zingg, all records with the same cluster are matching or duplicated.
- Z_MINSCORE — it indicates the least the record matched with any other record in that cluster
- Z_MAXSCORE — it indicates the maximum the record matched with any other record in that cluster
Using these columns and applying suitable thresholds, we can resolve identities. We can also get human review from annotators.
Let’s see how Zingg interpreted the duplicate records for eglinton and jaiden rollins we had see earlier.
Consider cluster 15

It has 3 records which are clear matches and should be resolved to the same customer. Each record shows a max and min score greater than 0.95, which means each record has a maximum match greater than 0.95 as well as the least match within the same cluster is also greater than 0.95. We can set a threshold of 0.95 and automatically mark records above this threshold as being sure matches requiring no human intervention.
Similarly, cluster 37 shows obvious matching records

Let’s look at cluster 20

This shows scores lesser than our selected threshold so we will pass it on to humans for review.
Identity Resolution is a critical step while building our data platforms and products. It enables us to understand who our core business entities are. As a custom tool for identity resolution, Zingg abstracts away the complexity and effort in building a fuzzy record matching system. Zingg takes care of data preprocessing, attribute and record level similarity definition and scalability. Thus we can use our customer, supplier, supplies, product, and parts data for critical business analytics and operations without worrying about missing or incomplete information.
Step by Step Identity Resolution With Python And Zingg was originally published in Towards Data Science on Medium, where people are continuing the conversation by highlighting and responding to this story.
from Towards Data Science - Medium
https://towardsdatascience.com/step-by-step-identity-resolution-with-python-and-zingg-e0895b369c50?source=rss----7f60cf5620c9---4
via RiYo Analytics

No comments