https://ift.tt/hi8YtBG Step-by-step guide on the basics of Kubernetes concepts and how to set up machine learning Rest API on Azure Kuberne...
Step-by-step guide on the basics of Kubernetes concepts and how to set up machine learning Rest API on Azure Kubernetes Service

What is Kubernetes?
The creation of scalable DevOps pipelines for production deployments requires enabling multiple daily deployments, hyper-scaling and monitoring of software applications. Kubernetes is a powerful DevOps tool for achieving scalable software applications deployments. Kubernetes is a tool for automating the deployment of multiple instances of an application, scaling, updating and monitoring the health of deployments. Kubernetes does these via Container Orchestration.
What is Container Orchestration?
It is the automation of the deployment, scaling, management and monitoring of multiple instances of containerized applications.
Note: In this tutorial, we are going to talk about docker container orchestration with Kubernetes.
Table of Contents
3 Concepts of Kubernetes Deployments
4 Step by step guide on Setting up Machine Learning Application on Azure Kubernetes Service
Kubernetes Installation
Kubectl: This is the command line tool for managing Kubernetes and it is through it that a user communicates with the Kubernetes cluster. We pass commands to the Kubernetes cluster using Kubectl. In the later part of this article, I will describe the Kubernetes cluster and its components.
Install Kubectl on Linux
Install and Set Up kubectl on Linux
Install Kubectl on Windows
Install and Set Up kubectl on Windows
Install Kubectl on MacOS
Install and Set Up kubectl on macOS
Kubernetes Key Concepts
There is a lot of confusing concepts in Kubernetes that can be very challenging for a beginner to understand. In this tutorial, I will address the basic concepts of Kubernetes, and explain how to perform step by step deployment with Kubernetes in Azure cloud.
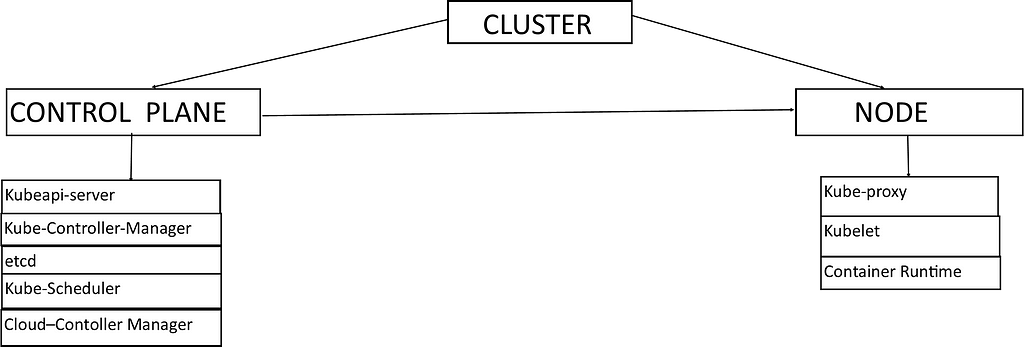
This diagram is a representation of a Kubernetes cluster and its components. It shows a cluster with a single node and a control plane.
Kubernetes Cluster: It is a combination of servers which interact together to implement container orchestration. There are two major types of Kubernetes cluster servers which are:
- Control Plane and
- Node
Control Plane: This is the server that serves as the brain of the Kubernetes cluster. It controls the activities within the cluster. The Control Plane is made up of components that enable it to carry out its controls within the cluster. Control Plane components include the following:
- Kubeapi-server: This is the component of the control plane that serves as a medium or pathway where instructions are sent to the cluster. Commands passed through the kubectl command line tool pass through the kubeapi-server to the cluster.
- Kube-Controller-Manager: This is the component that controls the major activities in the control plane. It executes the instructions a user passed from the kubectl to the kubeapi-server of the cluster. It controls activities such as deployment, scaling and monitoring the health of containers deployed in the cluster.
- etcd: This is the component of the control plane that stores data for the Kubernetes cluster. Information about the deployments in the cluster can be found in it.
- Kube-Scheduler: This is the component of the control plane that schedules the activities in the Kubernetes cluster.
- Cloud-Controller-Manager: This is the component of the control plane that manages deployment in the cloud. Cloud-controller-manager is the component used for Kubernetes cluster deployment in cloud services like Azure, AWS and Google Cloud Platform.
Node: This is the server that serves as the worker machine that runs the containerized applications. A Kubernetes cluster can have more than one node, but in this tutorial, we shall limit our samples to a single node Kubernetes cluster.
Node Components include the following:
- Kube-Proxy: This is the component of the node that handles the networking tasks of the the Kubernetes cluster. It manages networking services that make it possible to access containerized applications running in the node.
- Kubelet: This is the component that serves as a pathway between the node and the control plane of the Kubernetes cluster. The node interacts with the activities in the control plane through the kubelet.
- Container Runtime: This is the runtime for the containers to be deployed in the Kubernetes cluster. The container runtime used is Docker.
Concepts of Kubernetes Deployments
There are major concepts to be considered when deploying applications in Kubernetes. These concepts are:
- Pods
- Service
- Deployment
Pods: They are deployable units produced from a group of one or more similar containers sharing storage and networking resources. Docker containers are orchestrated(Deployed, Scaled and Monitored) within the pods in the node of the Kubernetes cluster.
Service: It is the networking interface that makes it possible to interact with the containers running in the pods. There are different types of Services in Kubernetes, but in this article, I will address the two major types of Services which are:
- LoadBalancer: This is the type of Service that allows a user to access a running container in the pods from outside the cluster. It exposes applications in the Kubernetes cluster to the outside world. It makes it possible for users to interact with Kubernetes applications deployed. LoadBalancer ensures internet connectivity with applications running in the Kubernetes cluster.
- ClusterIP: This is the type of Service that allows internal interaction or connectivity within the cluster. It is the Service that connects running containers in the pods to a database system in the Kubernetes cluster.
Deployment: It is a resource object in Kubernetes that handles the creation of Pods that house the containerized applications, scaling of multiple instances of containers, monitoring the health of containerized applications, rolling out and rolling back of updates of containerized applications.
Kubernetes Deployment in Azure Cloud(Machine Learning Application Deployment in the Cloud)
I have published a docker image on docker hub for PixelLib(a library I built for performing object segmentation in images). This docker image will be deployed as a machine learning application that is used for detecting objects in images on Azure Kubernetes Service.
Create A free Azure Account: We need an azure account to be able to create services on Azure. When you create an azure account, you will have free access to azure services for the first month.
Create Your Azure Free Account Today | Microsoft Azure
Install Azure CLI: We need azure cli which is the command line tool for creating and interacting with services on azure account. Azure cli makes it very convenient to create and communication with services on azure account.
Follow the instructions in this tutorial below to install azure cli:
Connect to Azure using Azure CLI: When azure cli is successfully installed, log into your azure account using this command in your command line tool.
az login
Create A Resource Group: Resource group in azure serves as host for other services that will be hosted on azure. It is a way to group many services together. Use this command to create a resource group on azure cli.
az group create --name resgroup --location eastus
The resource group will be created in less than a minute and this will be the output json for the created resource group.
{
  "id": "/subscriptions/<guid>/resourceGroups/resgroup",
  "location": "eastus",
  "managedBy": null,
  "name": "resgroup",
  "properties": {
    "provisioningState": "Succeeded"
  },
  "tags": null
}
Create Azure Kubernetes Service: Create an Azure Kubernetes Service using azure cli with this command:
az aks create --resource-group resgroup --name deploymentcluster --node-count 1 --enable-addons monitoring --generate-ssh-keys
Note: You can observe from the command to create Azure Kubernetes Service that we used the resource group named resgroup created earlier for creating the Kubernetes cluster. We specify the name of the cluster to be created as deploymentcluster and specified the node count to one. The creation of the Kubernetes cluster will take some minutes. When it is created it will return a long json formatted information about the cluster.
Connect to Kubernetes Cluster on Azure: We will use this command to get the Kubernetes cluster created and connect to it.
az aks get-credentials --resource-group resroup --name deploymentCluster
It displays this output when it is connected:
Merged "deploymentcluster" as current context in C:\Users\<pathtokubenetesconfiglocation>
It merges the Kubernetes cluster from Azure as the current context for Kubernetes. Kubernetes context is the configuration used to access a Kubernetes cluster. deploymentcluster is the configuration cluster used.
Code for Kubernetes Deployment
Step By Step Deployment Code Breakdown
- apiVersion: We defined the api version for the deployment which is apps/v1.
- kind: It is set to Deployment.
- metadata: It contains information about the deployment. We set the name of the deployment to pixellib-demo.
- spec: It contains a complete list of the specifications for the entire deployment and the pods that will be created.
- spec.replicas: We define the number of pods and set it to 2. This means that there will be two instances of our application running.
- spec.selector.matchLabels: This selects the pod to be used in the Deployment, using the pod label which is app: pixellib-pod.
- spec.template.metadata: We define metadata for the pod. spec.template.metadata.name assigns a name to the pod, which is pixellib-pod. spec.template.metadata.labels specifies the labels for the pod which is app: pixellib-pod that makes it possible for Deployment to select the pod with that label. The label will also be used by the Service we shall define later to select the pod.
- spec.template.spec.containers: We define the specifications for containerized applications. spec.template.containers.name specifies the name of the container that will be created from a docker image, which is given the name pixellib-container. spec.template.containers.image specifies the image from which docker container will be created and the image used is a docker image I published on docker hub with the name ayoolaolafenwa/pixellibapi. spec.template.containers.imagePullPolicy is set to IfNotPresent, that specifies that the image should be pulled or downloaded if it is not available. spec.template.containers.ports.containerPort specifies the container port that must match the exposed port from the docker image used and it is 5000.
Create Kubernetes Deployment
Open your command line within the folder where the deployment file is located and enter the command to create Deployment using kubectl.
kubectl apply -f app_deployment.yml
deployment.apps/pixellib-demo created
This is the output when the deployment is created: pixellib-demo is the name given for the deployment in the yaml file.
Check the pods created: In the yaml file, we set the number of pods to 2 and there will be two pods(two instances of the same application). You can check the state of the pods using this command:
kubectl get pods
NAME                            READY  STATUS    RESTARTS     AGE
pixellib-demo-676bdf6cf9-7vh2    0/1   Container      0      10s
                                       Creating
pixellib-demo-676bdf6cf9-9mvz2   0/1  Container       0       10s
                                      Creating
This will be the state of the pods when the deployment is just created. As we can see that the status of the pod is ContainerCreating(It is still pulling the docker image, when the image is pulled, a container will be created from the image)and the age of the pod is 10s(it is 10 seconds after the pod has been created) . The containers in the pods will be created in few minutes or in seconds, depending on your internet connection speed.
NAME                            READY  STATUS    RESTARTS     AGE
pixellib-demo-676bdf6cf9-7vh2    1/1   Running     0         70s

pixellib-demo-676bdf6cf9-9mvz2   1/1   Running     0         70s
The pods are ready and the containers are created and running. The statuses of the pods have changed to Running.
What to do when the Pods Failed to Run: If you receive the error ImagePullBackOff, it means that the docker image specified in the yaml file does not exit.
NAME                     READY      STATUS         RESTARTS      AGE
pixellib-demo-676-7j2c2     0/1    ImagePullBackOff  0           10s
You can check one of the pods to know what it is wrong by using this command:
kubectl describe pod pixellib-demo-676bdf6cf9-7vh2
This command will display the reasons why a pod failed to complete.
Create Service for Deployment: We have successfully created a Deployment, we need to create a Kubernetes Service to be able to access the application running within the cluster.
Code for Kubernetes Service Creation
Step By Step Service Creation Code Breakdown
- apiVersion: We defined the api version for the Service which is v1.
- kind: We define the kind as Service.
- metadata: We specify the name of the Service as pixellib-service.
- spec: We define the specifications for the Service to be created.
- spec.type: We define the service type as LoadBalancer, that will enable us to access apps running within the pods from outside.
- spec.ports: We define the ports to be used in the Service. We mapped port 80 to port 5000 of the target port of the running container.
- spec.selector: We specify the pod that will use the Service with the name app:pixellib-pod from the Deployment.
Create Kubernetes Service
Open your command line within the folder where the service yaml file is located and enter the command to create service using kubectl.
kubectl apply -f app_service.yml
service/deploy-service created
This is the output when the service is created: pixellib-service is the name given for the Service in the yaml file.
Access Kubernetes Deployment: Access the machine learning application running in the pods of the Kubernetes cluster using this command.
kubectl get service pixellib-service
We obtained the service pixellib-service we created for the pixellib app deployment. This will be the output:
NAME             TYPE         CLUSTER-IP   EXTERNAL-IP  PORT(S)
pixellib-service LoadBalancer 10.0.7.173   20.88.171.40 80:30832/TCP
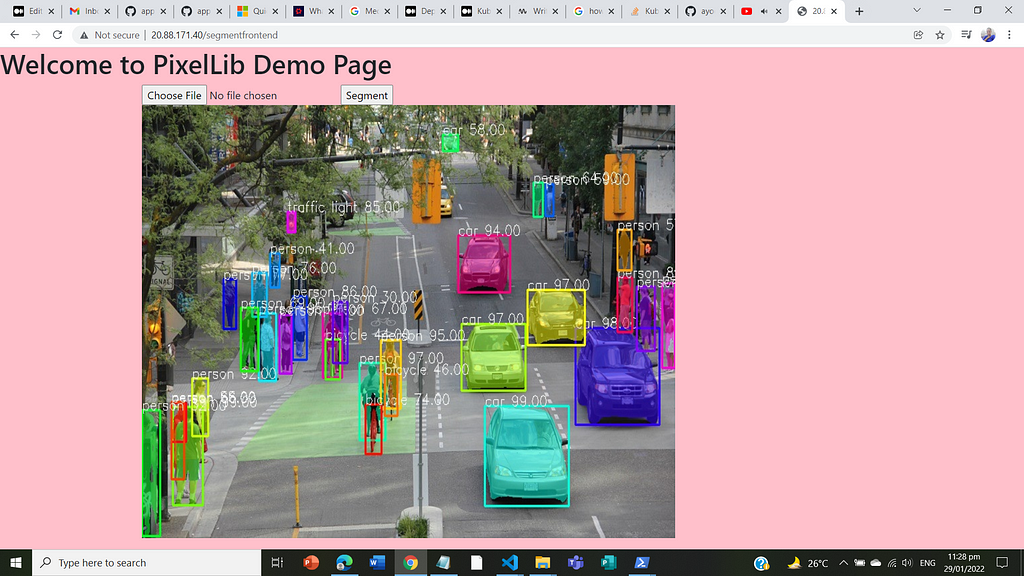
Note: In the output, we have the external ip which is the ip address that will enables us to access the application running within the cluster. In this situation, the ip address is 20.88.171.40. This ip address serves as restapi interface for us to access the application running in the cluster to perform segmentation of objects. We can paste the ip address in our code and perform object detection.
Sample image

Test Code
Outputs
{'boxes': [[145, 119, 282, 457], [162, 273, 261, 512], [238, 283, 398, 387], [442, 321, 496, 350], [411, 219, 422, 242], [31, 316, 51, 356], [352, 217, 366,
243], [272, 264, 291, 317], [274, 241, 368, 306], [277, 233, 369, 309], [377, 307, 405, 350], [0, 157, 65, 563], [468, 301, 497, 328], [49, 307, 73, 328]],
'class_ids': [0, 1, 2, 2, 9, 2, 9, 0, 5, 7, 2, 2, 7, 2], 'class_names': ['person', 'bicycle', 'car', 'car', 'traffic light', 'car', 'traffic light', 'person', 'bus', 'truck', 'car', 'car', 'truck', 'car'], 'mask_shape': [580, 498, 14],
'object_counts': {'bicycle': 1, 'bus': 1, 'car': 6, 'person': 2, 'traffic light': 2, 'truck': 2},
'scores': [99, 99, 99, 99, 97, 94, 90, 67, 65, 47, 47, 44, 37, 36]}
The outputs include a lot of details about the objects detected in the image, which include the box coordinates values, class ids, class names, object counts, segmentation mask shape and prediction scores. We have successfully run an image segmentation application running in Kubernetes cluster.
Image Segmentation Frontend API: If you paste the ip address 20.88.171.40 in your browser, it will load a simple web API for performing object segmentation.
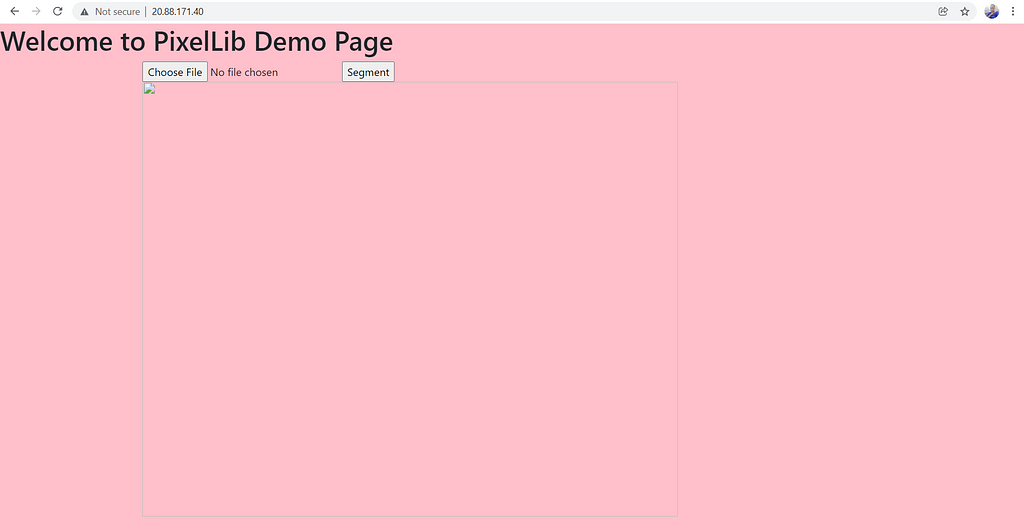

You can choose any image and press the button segment, it will display an output segmented image within seconds.
Log Kubernetes Deployment: If you encounter an error loading your application in Kubernetes deployment, you can easily debug the deployment using:
kubectl logs deployment.apps/<name of your deployment>
example:
kubectl logs deployment.apps/pixellib-demo

It will produce a report of the application running. It produces the log of a flask application running inside the pod of the cluster. Our application is running okay, without any error and if there is any error, we can easily observe the error from the log report.
Remove Kubernetes Deployment:
A Kubernetes deployment can easily be removed using this command,
kubectl delete -n default deployment pixellib-demo
Remove Kubernetes Service:
A Kubernetes service can easily be removed using this command,
kubectl delete -n default service pixellib-service
Delete Kubernetes Cluster
You can easily delete the Kubernetes cluster used for deployment using this azure cli command.
az aks delete --name deploymentcluster --resource-group resgroup
Delete Azure Resource Group
Delete azure resource group with this azure cli command.
az group delete -n resgroup
Conclusion
We discussed in detail in this article the basic concepts of Kubernetes, Kubernetes cluster, and how its components work. We also described the basis of Kubernetes deployment and gave a step by step guide on how to set up the Kubernetes deployment of a machine learning rest API in azure cloud.
Visit the PixelLibAPI github repository:
GitHub - ayoolaolafenwa/PixelLibAPI
Note: Read my article on docker where I explained the basics of docker and how to dockerize machine learning Rest API.
Reach to me via:
Email: olafenwaayoola@gmail.com
Linkedin: Ayoola Olafenwa
Twitter: @AyoolaOlafenwa
Kubernetes Deployment of a Machine Learning Rest API in the Cloud was originally published in Towards Data Science on Medium, where people are continuing the conversation by highlighting and responding to this story.
from Towards Data Science - Medium https://ift.tt/jUcivfY
via RiYo Analytics


No comments