https://ift.tt/OnKDwu8 A simple explanation on creating a website using minimal HTML coding skills. Portfolio Website (Photo by Author) ...
A simple explanation on creating a website using minimal HTML coding skills.

For a long time, I wanted to create my own portfolio website to showcase my skills and experience. I worked well on essentials like LinkedIn and GitHub. The only thing missing is something that wraps all my professional socials into one — The Portfolio Website!
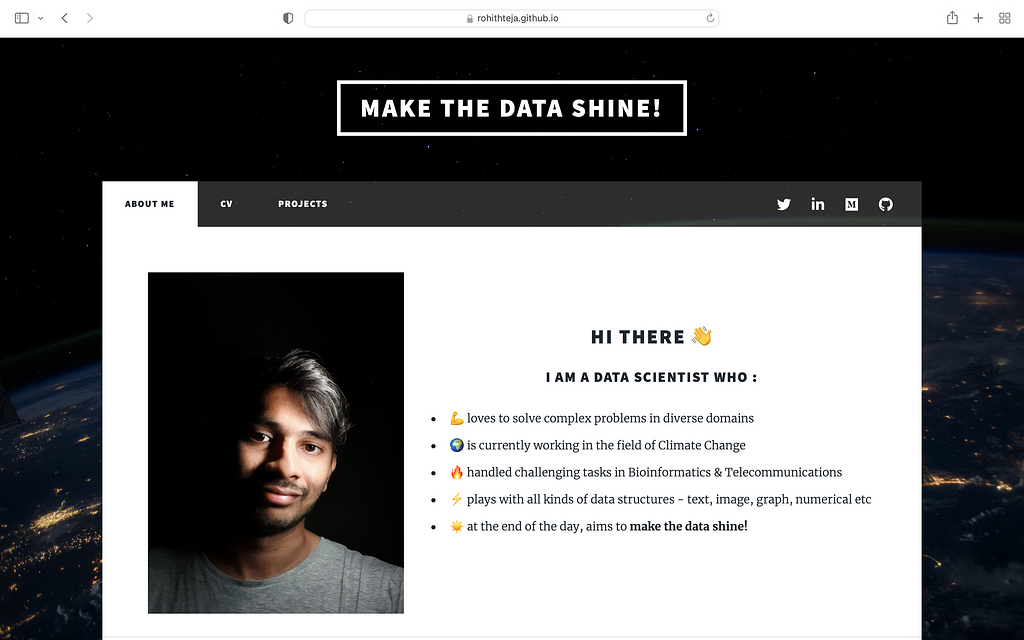
Check this website that I made for myself — link. If you like how it looks, you would enjoy reading this article :)
So, I knew that GitHub Pages was a go-to website for many data scientists to create and host their portfolios. I always avoided it thinking I had to learn HTML-CSS and I was not much keen on putting in that effort. Finally, I had some time on my hands and browsed through different internet articles, YouTube videos and learned a lot on how to create a website without actually having a strong skill set in web development.
I found some interesting ways for website creation which are listed below :
- Take an HTML-CSS template and edit it as per your liking to host with GitHub Pages.
- Use wix.com, which is a free website builder (has premium options if you want to get rid of the Ads and get a custom domain name).
I played a bit with the Wix website and I quite like it. You don’t need to worry much about HTML coding and straight away modify their selection of website templates. But as I did not want to get any paid subscription from Wix, I chose GitHub Pages (for now) which does not run any ads and is free.
Getting started — The overview
Not all profiles are built the same. The Data Scientist profiles these days maintain a good amount of diversity and are also flushed with all the essential aspects. Let’s make a list of some important features to be included in the portfolio website (coming from my point of view) :
- Introducing yourself — This comes as a no-brainer, and usually, the first part of the portfolio website is dedicated to introducing yourself. You can keep it simple or spice up things by adding a photo (like I did). A paragraph with a few lines and the reader would get a brief idea of who you are.
- The CV — It should be tucked in comfortably in some sections of the website where it is easy to find. CV or in other words, a formal way of presenting yourself by glorifying your past experiences is essential in my opinion.
- The Extras — This is the part where you throw some awesome things about yourself at the reader. It could be your data science projects, YouTube videos, tech socials, some notable achievements in the past, etc.
I like the minimalist approach which was the main foundation of my website template selection and design after.
So I planned to make the homepage to give a brief introduction about myself and as you scroll, you unwrap more details. After you learn a little bit about me, the next plan was to showcase the most notable things I did (currently, those are my articles published on Medium). The other parts like CV and data science projects are laced behind the homepage.
Firstly, I feel it would be great if you decide on what kind of things you want to showcase in your profile. For me, it was 3 things — My Medium articles, my CV, and the projects. Thus, the overview was complete.
Note: I followed this YouTube tutorial to get the initial skeleton of the website up and running, then modified it according to my liking.
Website Template
This website has a good collection of HTML templates that are free to use and I picked a popular template called Massively. Just download the zip file from the website.
Next, go to GitHub and create a repository with the same name as your username. Then, clone the repository to your computer and add it to your favorite code editor (I used VSCode for this purpose). Check this tutorial if you are confused about this step.
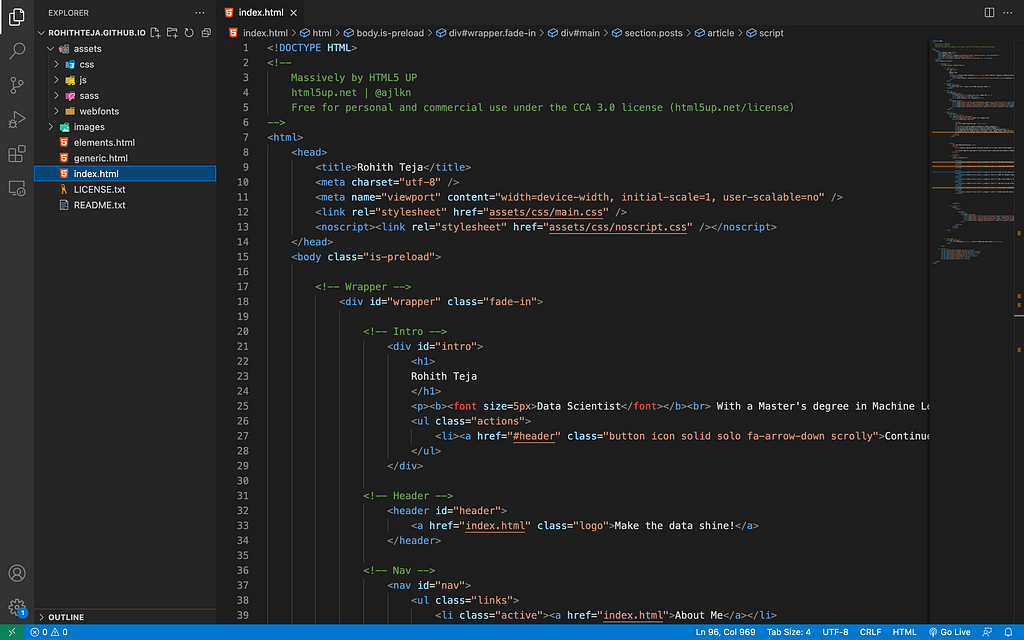
Open VSCode and unzip the template contents into the GitHub repository. It should look something like this —

The index.html, generic.html, and elements.html are the 3 files you would be editing mostly.
Don’t let the HTML intimidate you. It is easy to conquer!
HTML you should know
You need to understand some simple HTML commands to edit the files as per your requirement. I have spent a good amount of time learning these things and below are some important tips that might help you —
- HTML elements use tags that look like <this>. These tags come in pairs and every start <tag>has an end </tag>.
- Most of the tags are self-explanatory like <title>, <article>, <header> etc.
- <div> is a division tag used to make different sections in the website. You will see it a lot in the code.
- Heading tags are represented as <h1> to <h6> where <h1> is the biggest and <h6> is the smallest heading.
- Lists are created using <ul> tag and each element in the list is made with <li> tag. For a numbered list, use <ol>.
- Add hyperlinks using <a href=”https://rohithteja.github.io/”> tag.
- Add paragraphs using <p> tag.
The above-mentioned HTML elements would help you to edit the .html files in the repository.
Coming to CSS, think of it as a helper to HTML. You write the website in HTML and CSS takes care of the layout, fonts, and general presentation of the website. Both HTML and CSS work hand-in-hand to make the website up and running.
I have not modified much of .css files but I used a special item called a Flexbox which basically divides a bigger section of the website into smaller subsections. Imagine a big container box holding multiple smaller containers — that’s what a Flexbox is. I used it to place my photo and text side by side in the About Me section.
.image-txt-container {
display: flex;
align-items: center;
flex-direction: row;
gap: 40px;
@media (max-width: 500px) {
#wrapper {
flex-direction: column;
}
#right-content {
display: flex;
}
section {
flex: 1;
}
}
}
The above-shown code snippet is added to the main.css file and in the .html file, you use the <div class=”image-txt-container”> tag.
HTML Embed
You can embed external links such as blogs, videos, or other content from a different website onto your portfolio website. I write articles on Medium which is something I wanted to showcase on my website. Unfortunately, I can’t embed the Medium articles easily without going through a complicated process or by using some paid services (which curate the external embeds for you).
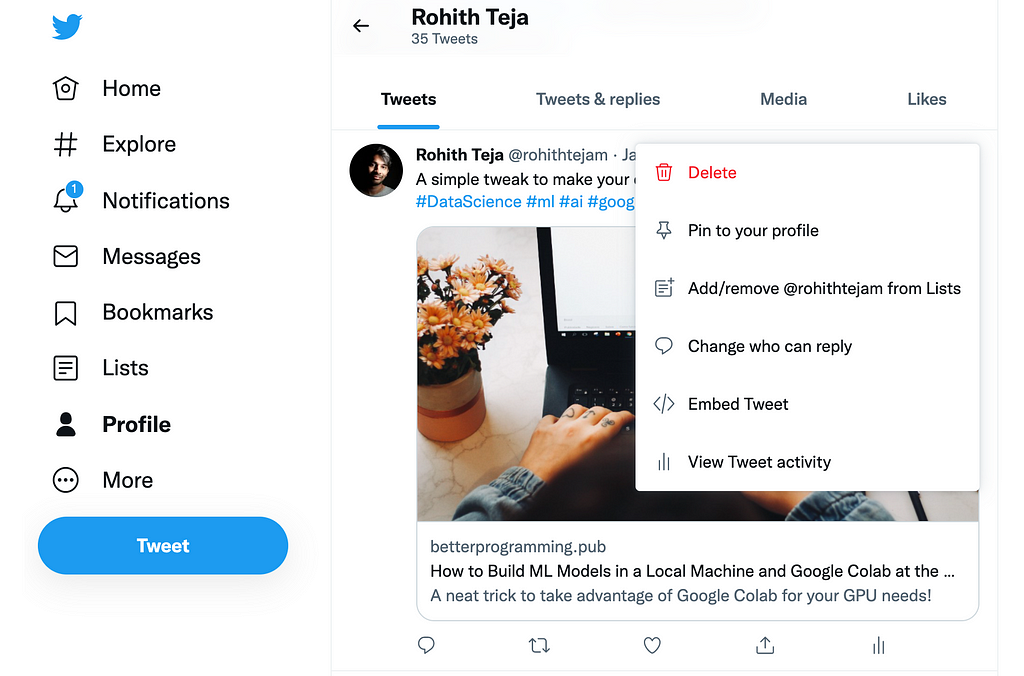
Luckily, I found a workaround to this by using Twitter. Every time, I publish an article on Medium, I tweet about it. And it is very easy to embed a tweet, which is as simple as clicking on </> Embed Tweet option in the photo below:

Then, you copy the embed code provided directly into the .html file. I used the Twitter embeds inside the <article> tag to display them as squared sections on the website.
Wrapping it up
Using the minimal knowledge of HTML, you are now able to edit the .html files in the repository. I forgot to mention that you can change the background image of the website. You need to replace the images/bg.jpg with an image of your choice for this to work.
After everything is set, commit and push the repo to GitHub. Now the website would be deployed to https://ift.tt/QJdODw4
Congrats! you have successfully deployed your portfolio website.
If you wish to use the same website template as me, you can download my repository and modify it as per your liking. My current portfolio website looks good but I admit that there is still room for improvement. Feel free to give me any suggestions to improve the website.
Thanks for reading and cheers!
Want to Connect?
You can reach me on LinkedIn, Twitter, or GitHub.
How I Designed My Own Data Science Portfolio Website? was originally published in Towards Data Science on Medium, where people are continuing the conversation by highlighting and responding to this story.
from Towards Data Science - Medium https://ift.tt/OoStigF
via RiYo Analytics

No comments