https://ift.tt/etgT79b Deploying Machine Learning models with TensorFlow Serving — an introduction Step-by-step tutorial from initial envi...
Deploying Machine Learning models with TensorFlow Serving — an introduction
Step-by-step tutorial from initial environment setup to serving and managing multiple model versions with TensorFlow Serving and Docker

Table of contents
- Introduction
- Environment setup
- Create Machine Learning models
3.1 Data generation
3.2 Split in train, validation and test set
3.3 Train and save regression models - Serve the models
4.1 Install TensorFlow Serving with Docker
4.2 Serve the latest model
4.3 Serve multiple model versions
4.4 Apply custom labels to the model versions
4.5 Automatically reload configurations over time - Conclusion
- References
1. Introduction
This post covers all steps required to start serving Machine Learning models as web services with TensorFlow Serving, a flexible and high-performance serving system¹.
In this example, we will setup a virtual environment in which we will generate synthetic data for a regression problem, train multiple models and finally deploy them as web services, accessing predictions from REST APIs.
The only prerequisite for this tutorial is a working machine with Python² and Docker Engine³ installed. We will finally use curl⁴ to write API calls and consume the Machine Learning models through their prediction endpoints.
2. Environment setup
A virtual environment is a self-consistent Python environment that can be created to manage and segregate projects: it provides isolation so that the dependencies do not affect other packages on the same operating system.
For this tutorial, we create a virtual environment inside the myProject folder. From command line:
# create the virtual environment
python -m venv /myProject
# activate the environment
myProject\Scripts\activate
Once the environment is activated, we can install the needed dependencies:
- pip install scikit-learn to leverage convenient data preparation methods;
- pip install tensorflow for Machine Learning development;
- pip install matplotlib to visually explore data and model metrics;
- pip install jupyter to use notebooks.
After dependencies installation, we start Jupyter Notebook by executing:
jupyter notebook
From the Jupyter Notebook web interface, we can create a notebook (create_models.ipynb) in the myProject folder, as we will use it to generate the Machine Learning models to be served with TensorFlow Serving.
3. Create Machine Learning models
Starting from our notebook , we import the previously installed dependencies:
3.1 Data generation
We generate synthetic data as follows:
3.2 Split in train, validation and test set
We split our dataset into:
- Train and validation sets: used during the training procedure.
- Test set: used to estimate out-of-sample performances.
We observe the obtained sets:

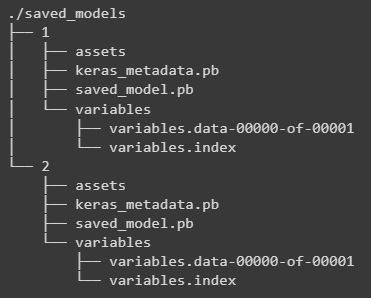
When we train a new model, we want to store it inside a subfolder of our project root, arbitrarily named saved_models. Inside this space, we will save each model in a dedicated directory named with incremental integers:
3.3 Train and save regression models
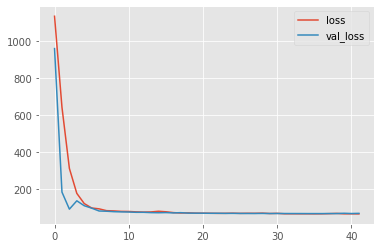
We fit a first simple model made of a Dense layer:
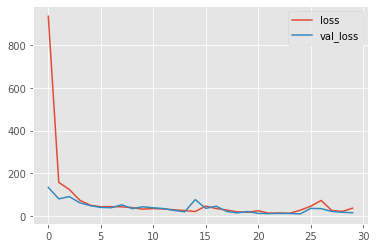
Now, let us create another slightly different model:
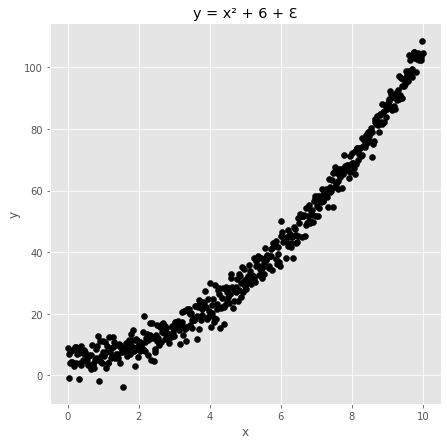
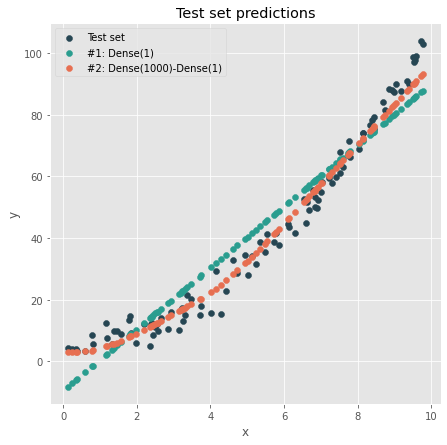
We can observe the test set predictions for the two different models:
By exploring the content of the ./myProject/saved_models folder, we can observe the trained models being saved in dedicated directories:
Our final goal is to explore how to deploy a set of given models as web services for inference using TensorFlow Serving. Therefore, we will not delve deeper into the modeling task, although one may test different models or further improve the training strategy (normalization, shuffling, hyperparameter tuning, …).
4. Serve the models
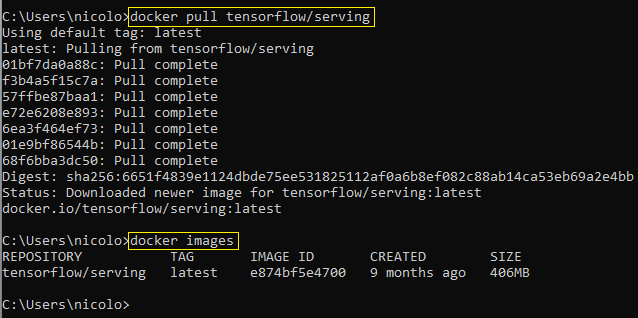
4.1 Install TensorFlow Serving with Docker
The easiest way to get started with TensorFlow Serving is to pull the latest docker image⁵. From command line:
docker pull tensorflow/serving
After pulling the image, we may check its availability by running:
docker images
4.2 Serve the latest model
We create a running container from the pulled image:
docker run --name myTFServing -it -v C:\myProject:/myProject -p 9001:9001 --entrypoint /bin/bash tensorflow/serving
Let us explore this command in further detail:
- docker run creates a container from an input image.
- --name <myName> sets a name to identify the Docker container.
- -it starts the container in the interactive mode.
- -v <host_volume>:<container_volume> binds a volume from the host to a directory inside the container. In our case, the container will access the project folder C:\myProject on the host from a /myProject directory inside the container.
- -p <host_port>:<container_port> binds the port of the host to a port of the container.
- --entrypoint specifies the executable which should run when the container is started. In our case, /bin/bash.
- tensorflow/serving is the name of the image to derive the container from.
From inside the container, we check the presence of the /myProject folder and its content, that should be the same as C:\myProject on the host:

While we are inside the container, we start TensorFlow Serving as follows:
tensorflow_model_server
  --rest_api_port=9001
  --model_name=regression_experiments
  --model_base_path=/myProject/saved_models
We remark that we pass the folder where the models were stored to themodel_base_path flag, and specify an arbitrary name for the model with model_name. This name will become part of the endpoint exposed by TensorFlow Serving.
Once the command is executed, the logs suggest that only the latest model is loaded for inference:

We can test predictions by performing API calls with curl from outside of the container. For example, we start by getting the available models with:
curl -X GET http:/localhost:9001/v1/models/regression_experiments
This call returns:
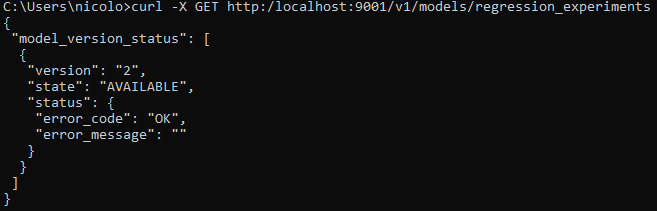
Indeed, TensorFlow Serving automatically loaded, by default, only the latest version of the different models available in the model_base_path.
We test a prediction as follows:
curl -X POST "http://localhost:9001/v1/models/regression_experiments:predict" ^
-H "Content-Type: application/json" ^
-d "{\"instances\":[[1.0], [2.0], [5.0]]}"

Notes
- On a Windows machine, the ^ character can be used for newlines in a curl statement. On MacOS or Unix systems, the backslash \ character should be used instead.
- One may be tempted to use an alternation of double quotes " and single quotes ' to write the curl statement. For example, by typing: -d '{"instances":[..]}'. On Windows, this may result in the following message: {"error":"Malformed request: POST /v1/models/regression_experiments/predict"}, or other curl / JSON parsing errors. To avoid any issues, the command should contain double quotes " only (masked with backslash when nested).
4.3 Serve multiple model versions
In a real-world scenario, we might need to expose multiple models at a time. For example, we might want to gradually switch traffic from a previous version of the service to a new one (blue-green deployment), or we might need to randomly redirect users to one of multiple co-existing versions for testing purposes (A/B testing).
We can easily instruct TensorFlow Serving to load different model versions and make them available for inference with configuration files⁶.
Inside the myProject folder, we create the cfg1.conf file as follows:
model_config_list {
  config {
    name: 'regression_experiments'
    base_path: '/myProject/saved_models'
    model_platform: 'tensorflow'
    model_version_policy: {all: {}}
  }
}
In this file, we are setting a policy instructing TensorFlow Serving to consider all available models inside the given base path.
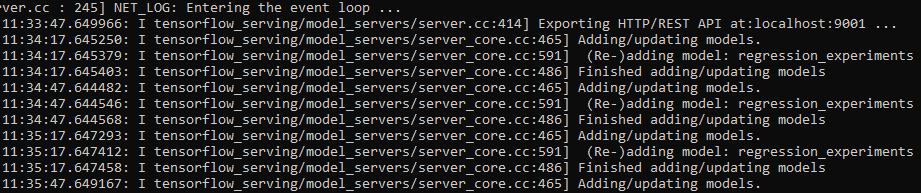
We start TensorFlow Serving from the container as follows:
# entering the container in interactive mode
docker exec -it myTFServing bin/bash
# starting TensorFlow Serving with configuration file
tensorflow_model_server
  --rest_api_port=9001
  --allow_version_labels_for_unavailable_models
  --model_config_file=/myProject/cfg1.conf
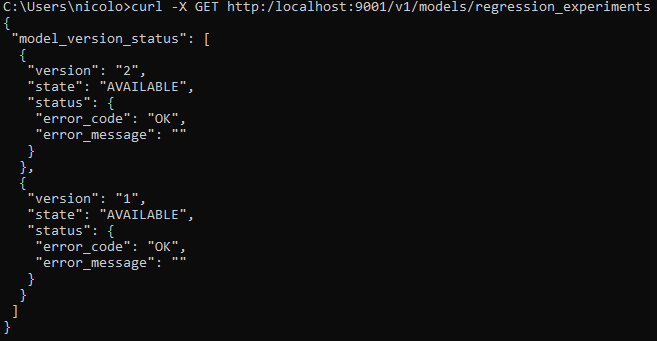
From the service logs, we can see that now both model versions are loaded at startup:

Let us check the available models with a GET request from outside the container:
curl -X GET http:/localhost:9001/v1/models/regression_experiments
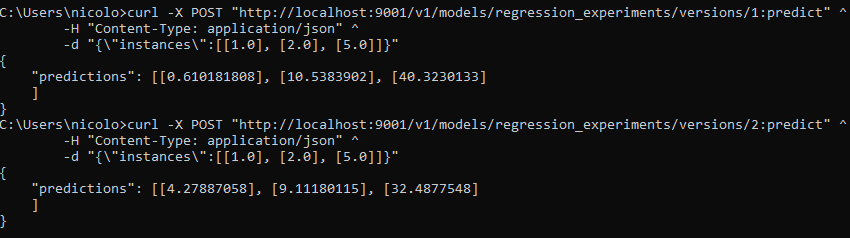
We can now perform external API calls to the service and redirect traffic at will to any desired version as follows:
# call to model version 1
curl -X POST
"http://localhost:9001/v1/models/regression_experiments/versions/1:predict" ^
-H "Content-Type: application/json" ^
-d "{\"instances\":[[1.0], [2.0], [5.0]]}"
# call to model version 2
curl -X POST "http://localhost:9001/v1/models/regression_experiments/versions/2:predict" ^
-H "Content-Type: application/json" ^
-d "{\"instances\":[[1.0], [2.0], [5.0]]}"
4.4 Apply custom labels to the model versions
We can easily apply string labels to model versions⁶. In this way, it is possible to add a layer of “semantic abstraction” to our prediction service, improving readibility and facilitating DevOps practices. For example, an integration layer consuming our models through a REST interface might prefer to call a “production” or “test” version rather than a random integer such as “23” or “57”.
This result can be achieved by specifying the desired labels in a configuration file. Let us create a cfg2.conf file in the project directory as follows:
model_config_list {
  config {
    name: 'regression_experiments'
    base_path: '/myProject/saved_models'
    model_platform: 'tensorflow'
    model_version_policy {
      specific {
        versions: 1
        versions: 2
      }
    }
    version_labels {
      key: 'production'
      value: 1
    }
    version_labels {
      key: 'test'
      value: 2
    }
  }
}
In this file, we assigned our model versions to the production and test labels, respectively. We can now start the service:
# entering the container in interactive mode
docker exec -it myTFServing bin/bash
# starting TensorFlow Serving with configuration file
tensorflow_model_server
  --rest_api_port=9001
  --allow_version_labels_for_unavailable_models
  --model_config_file=/myProject/cfg2.conf
After service startup, we can perform external API calls. Notably, this time the endpoint will be /v1/models/<model_name>/labels/ instead of /v1/models/<model_name>/versions/:
# call to production model
curl -X POST
"http://localhost:9001/v1/models/regression_experiments/labels/production:predict" ^
-H "Content-Type: application/json" ^
-d "{\"instances\":[[1.0], [2.0], [5.0]]}"
# call to test model
curl -X POST "http://localhost:9001/v1/models/regression_experiments/labels/test:predict" ^
-H "Content-Type: application/json" ^
-d "{\"instances\":[[1.0], [2.0], [5.0]]}"

4.5 Automatically reload configurations over time
We have used configuration files by passing them to the --model_config_file flag at startup.
We may also pass the --model_config_file_poll_wait_seconds flag to instruct TensorFlow Serving to periodically check for updates in the configuration files at the specified path. For example, the statement
# entering the container in interactive mode
docker exec -it myTFServing bin/bash
# starting TensorFlow Serving
tensorflow_model_server
  --rest_api_port=9001
  --allow_version_labels_for_unavailable_models
  --model_config_file=/myProject/cfg2.conf
  --model_config_file_poll_wait_seconds=30
will start the service inside the myTFServing container based on the configurations from the cfg2.conf file, and updates will be pulled periodically. We can verify from the logs how the system checks every 30 seconds for updates:
5. Conclusion
In this post, we explored how to deploy models with TensorFlow Serving, making predictions easily accessible through REST APIs.
In particular, we started from scratch. We created a virtual environment where we installed a minimum set of dependencies needed to generate synthetic data and fit a number of models. Then, we pulled the TensorFlow Serving Docker image and created a running container from it, covering all steps required to manage and serve multiple model versions.
6. References
[1] https://www.tensorflow.org/tfx/serving/architecture
[2] https://docs.python.org/3/using/
[3] https://docs.docker.com/engine/install/
[4] https://curl.se/
[5] https://www.tensorflow.org/tfx/serving/docker
[6] https://www.tensorflow.org/tfx/serving/serving_config
Deploying Machine Learning models with TensorFlow Serving — an introduction was originally published in Towards Data Science on Medium, where people are continuing the conversation by highlighting and responding to this story.
from Towards Data Science - Medium https://ift.tt/KB2NRD4
via RiYo Analytics


No comments