https://ift.tt/3qUc8VL A guide for data scientists and others who would like to turn their Python functions into an interactive app. From...
A guide for data scientists and others who would like to turn their Python functions into an interactive app.
I will demonstrate a robust, yet easy-to-use solution, which requires very little knowledge in addition to well-known tools such as Python, the Jupyter notebook and Ipywidgets.
We will build an interactive app to solve a quadratic equation. This is a very simple example, yet sufficient to demonstrate the method. We will not jump directly to the final solution, but will build up to it in few easy steps. I will start with the simplest notebook based implementation and finish with a fully interactive solution.
Problem formulation:
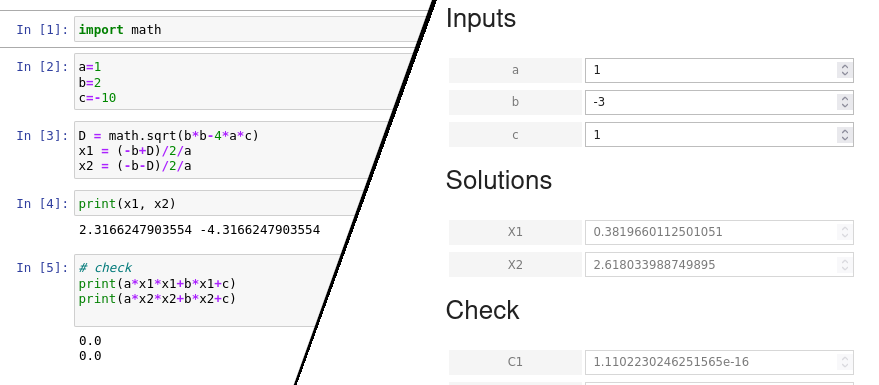
Given three numbers, a, b, and c. Find x which satisfies:
a x²+b x +c = 0
As we know, the solutions to this equation are given by:
(-b + D)/2a and (-b-D)/2a, where D = sqrt(b²-4ac)
1. Direct approach
Our first attempt to create a notebook for this problem would look something like this:
So now we have implemented the functionality. It is time to refactor our notebook to use functions, instead of heaving the code lying around.
2. Using functions
By creating these functions the first immediate benefit is reusability. We don’t need to copy&paste code every time we would like to use the functionality.
But at least that important is the structure it gives: functions clearly show what is their input and what is their output. It also helps structuring the problem in our brain and separating the main building blocks of the solution.
3. Widgets
So now we have implemented the main functions, we can do our calculations.
However, it isn’t very convenient for our users having to enter the value in code cells. We can do much better than that by introducing input widgets for the coefficients. Note, that the last few cells, which didn’t change are omitted.
Now it tarts to look like an app, user does no longer need to modify code, but still need to press Ctrl-Enter after each cell. In addition cell #5 needs to be re-executed every time user changes the values. (Note, that we had to refer to the values, of the widgets using “.value”.)
4. Voila
If you work with Jupyter notebooks you most probably heard of “Voila”. What it does is that it takes a regular Jupyter notebook, keeps the output cells, and hides the code cells. This results in a much cleaner look.
Voila is super-easy to install. If not already installed in your environment, you can install it by:
pip install voila
If you now restart jupyter-notebook you should see a “Voila” button in the button-bar.
However, when you voila-ize your notebook you will have to conclude that it doesn’t work, at least not how it is intended : changing the values in the input boxes have no effect.
Why? Because voila executed all the code cells, before user had a chance to enter/modify the values. So whatever the initial values were set, those will be used.
In order to make voila work, you have to set up some kind of interactivity: code execution needs to be triggered by the interaction with the widgets. You no longer have the option to manually execute a code-cell.
5. Let’s add interactivity
There are several ways on how you can attach some action to be triggered when the state of a widget changes. You can use the interact function, or the observe method. But note, that these only operate at a single widget level. You can set an action to be performed in case of a widget change, but you have no control on the chain of events it will trigger: you can easily trigger the recalculation of D, but what you would really need is the recalculation of x1 and x2. You can manually keep track of the entire dependency graph and remember to update x1 and x2 when c changes. But that is inconvenient and error-prone. Assume you have a slightly bigger project with 20 or 30 internal variables which depend on each other in some non-trivial way. Manually keeping track of which variables to update will very shortly lead to errors.
Instead, the solution I’m proposing is using the autocalc package. This package lets you set up the dependency graph between your internal and user-exposed variables. Once this graph (DAG) is set up, you don’t need to bother to manually recalculate the variables. It is like the automatic update feature of Excel.
There are other packages targeting the same issue, the advantage of autocalc is its simplicity: you only need to learn a single class, called Var to set up the DAG. So let’s dive into it:
First you need to install the package with
pip install autocalc
If you now voila-ize your notebook, it will work as expected
Notes:
- Check out the documentation of autocalc for advanced features, such as “lazy” computation.
- Some output values (e.g. DataFrames) can’t be displayed by a widget. In such cases it is still possible to automatically update the output. The trick is to set up a dummy variable, which depends on the output. The function assigned to this variable needs to perform the necessary action upon the change of the value. This technique is used in the autocalc.tools.PreviewAcc helper class, which is a ready-to-use solution for this case.
I hope you found this little description useful.
Disclaimer
I am the author of the autocalc package.
Create a Simple App Quickly Using Jupyter Notebook was originally published in Towards Data Science on Medium, where people are continuing the conversation by highlighting and responding to this story.
from Towards Data Science - Medium https://ift.tt/3r1i6o2
via RiYo Analytics


ليست هناك تعليقات