https://ift.tt/3o4Va5B The swiss army utility you are missing from your toolset. Photo by Victoriano Izquierdo on Unsplash While work...
The swiss army utility you are missing from your toolset.

While working on machine learning projects, I usually log in to some server over ssh, where the terminal is the only interface available. However, barebone tools can be very limiting, which slows down my productivity.
This post will show you how to use a fuzzy finder called fzf to turbocharge your command-line game, leading to a noticeable productivity increase. Since it will be lengthy to go over all the features that fzf provides, my goal is to let you know that this tool exists, that you don’t need to be an advanced programmer to use it, and finally, to provide you with the basic blocs to adapt it for your workflow.
Setup
First, you have to install fzf using either your package manager or from git. For other operating systems checkout the installation section in the fzf documentation.
# Conda
conda install -c conda-forge fzf
# Debian 9+ and Ubuntu 19.10+
sudo apt-get install fzf
# Git
git clone --depth 1 https://github.com/junegunn/fzf.git ~/.fzf
~/.fzf/install
# macOS
brew install fzf
$(brew --prefix)/opt/fzf/install
Once installed, you can check that it is working correctly by typing fzf in your terminal. It should show the list of all files in the current folder recursively.

At this point, you might ask yourself how this is useful since the command returns the file path, and that’s it. So, let see some use cases.
Usage
Before we start, I highly recommend that you try the commands on your end as you go over this section.
Basics
First, let’s go over some basics on how to interact with fzf :
- To go up and down the list, use <CTRL j/n>and <CTRL k/p>.
- Once you find the file you are looking for, hit <ENTER>to select the file.
- To do an exact match, use'. For example, 'myfile.
- To match a suffix, use $ . For example, .py$.
- To match a prefix, use ^ . For example, ^test_.
- To match multiple criteria, use | . For example, .py$ | .json$.
- To exit, hit <CTRL c>.
Command History
We all have been in the situation where you want to execute a command that you’ve used previously and can’t find it. First, the native UNIX search command history is hard to use. Second, hitting the arrow keys 20 times is not practical. So now that you have fzf installed, hit <CTRL r> in your terminal and enjoy!

Change Directory
Moving around can become very tedious when working on a deeply nested folder structure project, especially if unfamiliar with it. To use fzf to change directory, hit <ATL c> in your terminal, then fuzzy find the folder you are searching.
Display File Content
Let’s say you want to display the content of a specific file, but you don’t recall the exact file name and the location. The brute force solution would be to cd to a bunch of folders trying to find it. Another solution is to use a search utility. However, if you don’t know the exact file name, you will need to use regexp. Finally, you end up opening your IDE, waiting for it to start, opening the project, and then finding the file.
Now let’s look at how this workflow will look using fzf. As an example, I want to display the content of myfile.txt, but let’s say that I only remember that the file name contained my.

The command that I’ve used above is cat since I wanted to display the content of the file. But, you can use any command that takes a file path as an argument. Also, you can achieve the same results using $(fzf) or **<TAB> as follow:
<YOUR COMMAND> $(fzf)/`fzf`
# or
<YOUR COMMAND> <CTRL t>
# or
<YOUR COMMAND> **<TAB>
Selecting Multiple Files
Let’s say that you want to delete three files in different directories, but you don’t know exactly where they are. From what we’ve seen, the solution will be to select and delete the files one by one.
# For file 1
rm <CTRL t>
# For file 2
rm <CTRL t>
# For file 3
rm <CTRL t>
However, fzf provides a multi-selection feature using the <TAB> key. In the example below, I use multi-selection to delete three files in three different directories.
Filtering the Output of a Command
In all the examples above, we used fzf to provide the arguments to a command (cd, rm, etc.). However, fzf can also filter the output of a command, which is very useful in cases where the command output is very long. In the example below, I use fzf to search in the ps command output to check the status of some processes, using ps aux | fzf.
Building Your Own
In all the examples above, we used the interface and shortcuts that fzf provides by default. However, you can create your own. The section will show how to build a custom utility using fzf that matches your needs. I chose a simplified version of a workflow that I often use, but you can easily modify it to create your own.
The Use Case
I rely on the JSON lines format for the datasets in many machine learning projects. In my workflow, I usually need to take a sneak peek at the files before using them as arguments for my training script, especially since some of them are auto-generated and might contain errors.
Below is the simplified project structure. train.py is the python training script and data is the folder that contains the data files. Also, the training script takes a single argument that represents the data file to use.
fzf-demo
├─ train.py
├─ data/
├─── dataset_1.jsonl
├─── dataset_2.jsonl
...
├─── dataset_n.jsonl
Also, I have created a demo repository that you can clone to replicate the demo yourself.
git clone git@github.com:Am1n3e/fzf-demo.git
Listing the Dataset Files
First, we need to list the available dataset file and then use fzf to select one.
ls data/*.jsonl | fzf
The output of the command above should be something like the following:
In this example, I’m only listing local files using the ls command. However, you can use fzf with the output of any command or application. For example, you can list the files of an S3 bucket.
Adding a Preview
As I explained earlier, I need to take a quick look at the files (maybe the first two lines) before starting the training. Also, I don’t want to open the entire file since some files are enormous and can take time to open. Finally, I want to see the preview while I’m selecting the data file without exiting fzf.
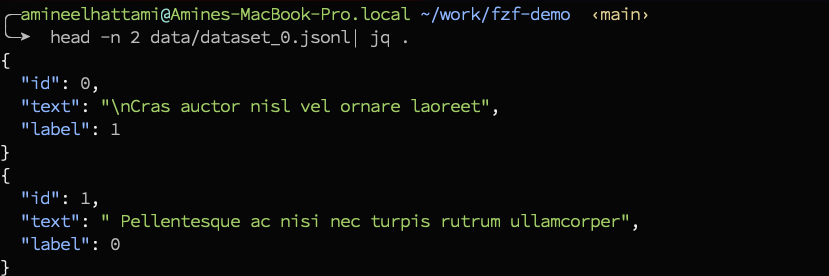
First, I will use head to read the first two lines and jq (See here for more information on the jq command) to format the output. For example, head -n 2 data/dataset_1.jsonl | jq . will output the following:
Then, I can use the --preview argument for adding it to fzf as shown below.
ls data/*.jsonl | fzf --preview 'head -n 2 {} | jq .'
The following is the output of the command above. As you can see, the preview gets updated as I select the data files.
The value of the --preview argument can contain any command. You can even call a script that you create if the preview is more complex. The only thing that you need to remember is that fzf will replace {} with the currently selected line. Here in our example, it is the file path.
Binding Commands
In my use case, I also want to delete the files that contain errors without existing fzf. To do so, we can bind a command using the --bind argument as follow:
ls data/*.jsonl | \
  fzf \
  --preview 'head -n 2 {} | jq .' \
  --bind 'tab:execute(rm {})'
Here, I mapped <TAB> to run rm. Similarly to the --preview argument, {} contains the content of the selected line. Note, you can map more than one command. However, there is a setlist of shortcuts you can use (See man fzf for more details).
Extras
fzf provides multiple options to customize the interface like the colors, borders, help, layout, size, etc. The following are the options I use:
ls data/*.jsonl | \
  fzf \
  --preview 'head -n 2 {} | jq .' \
  --bind 'tab:execute(rm {})' \
  --layout=reverse \
  --border \
  --prompt "train_file> " \
  --header $'Press TAB to delete the selected file\n\n'

For more details, check out the documentation.
Putting it Together
Now that we have the fzf command ready, we can use its output as an argument of the train.py script, as shown below. For convenience, I created a function and added it to my ~/.zshrc or ~/.bashrc file.
train() {
    data_file=$(ls data/*.jsonl | \
        fzf \
        --preview 'head -n 2 {} | jq .' \
        --bind 'tab:execute(rm {})'  \
        --layout=reverse \
        --border \
        --prompt "train_file> "  \
        --header $'Press TAB to delete the selected file\n\n') && \
        python train.py $data_file
}
Finally, If you want to build an fzf utility for any well-known tool, first check this library. It contains multiple utilities that you can use as-is or serve you as examples.
Conclusion
I went over some basic fzf usage in this post and showed you how to build your own. However, I only brushed the surface of what you can accomplish using fzf. My goal was to let you know that this tool exists and it is not hard to use.
*All the pictures are by Amine El hattami unless stated otherwise.
Before You Go
Follow me on Twitter, where I regularly tweet about software development and machine learning.
Turbocharge Your Command-Line Game was originally published in Towards Data Science on Medium, where people are continuing the conversation by highlighting and responding to this story.
from Towards Data Science - Medium https://ift.tt/2ZXVM5f
via RiYo Analytics


ليست هناك تعليقات