https://ift.tt/3ctwmyK An article describing how to set up GPU infrastructure automatically using conda, Docker, make and terraform. By N...
An article describing how to set up GPU infrastructure automatically using conda, Docker, make and terraform.
By Nixtla Team.
TLDR; Running Deep Learning models with GPUS is complicated, particularly when configuring the infrastructure. Prefabricated GPU cloud infrastructure tends to be particularly expensive.
To help people focus on their models rather than on their hardware and its configuration, we at Nixtla developed a fast and simple way to use GPUs on the AWS cloud without paying for the AMI environment and made it open-source: https://github.com/Nixtla/nixtla/tree/main/utils/docker-gpu and https://github.com/Nixtla/nixtla/tree/main/utils/terraform-gpu.
INTRODUCTION
Deep Learning has become widespread in many areas: computer vision, natural language processing, time series forecasting, etc. Due to the state-of-the-art results it has obtained, it has become increasingly popular in the daily practice of data scientists and researchers.
GPUs have accelerated the training and inference of the models because they are optimized to perform linear algebra computations on which deep learning heavily relies. The need for this specialized hardware, however, increases the monetary/economic cost of experimenting and deploying these models to production.
A common problem faced by Deep Learning practitioners is the proper configuration of the GPU infrastructure on the cloud. The installation of required drivers for hardware management tends to be bothersome. When this is not tackled correctly, it can be detrimental to reproducibility or unnecessarily increase the cost of these novel models. In this post, we provide the community with a simple solution to this problem using Docker.
SOLUTION
- NVIDIA Deep Learning AMI + Conda environment + Terraform
a) NVIDIA Deep Learning AMI
To run your code with GPU accelerated computation, you need two things covered: (i) have NVIDIA GPUs and (ii) their necessary drivers.
If you opt for EC2 instances (P2, P3, P4D, or G4), NVIDIA provides a free AMI with pre-installed and optimized GPU software for which you only need to pay the EC2 computational costs.
You can easily launch GPU EC2 instances with their corresponding drivers from your terminal with the AWS console. To do it you need:
- AWS CLI installed.
- EC2 launch permissions.
- EC2 connection permissions: (I) The .pem file from the instance launch <YOUR_KEY_NAME> (you can create one following the instructions here). (II) The instance’s security group <YOUR_SECURITY_GROUP>.
If you don’t have your own <YOUR_SECURITY_GROUP> you can create one using:
aws ec2 create-security-group \
        --group-name nvidia-ami \
        --description “security group for nvidia ami”
And add to it ingress rules using:
aws ec2 authorize-security-group-ingress \
        --group-name nvidia-ami \
        --protocol tcp \
        --port 22 \
        --cidr 0.0.0.0/0
With the above, launching a GPU ready EC2 instance is as simple as running:
aws ec2 run-instances \
        --image-id ami-05e329519be512f1b \
        --count 1 \
        --instance-type g4dn.2xlarge \
        --key-name <YOUR_KEY_NAME> \
        --security-groups nvidia-ami
The image id ( — image_id) identifies the required NVIDIA AMI. The values for the number of instances ( — count) and the instance type ( — instance-type) are optional.
Once the instance is initialized, we can access it with ssh. The AMI comes pre-installed with git, so we can clone the repo of our project without much additional difficulty.
ssh -i path/to/<YOUR_KEY_NAME>.pem ubuntu@<PUBLIC_EC2_IP>
b) Conda environments
We recommend the use of Conda to facilitate the handling of Deep Learning dependencies (PyTorch, TensorFlow, etc.), in particular, we recommend creating environments with environment.yml files.
The following image shows an example. The Deep Learning framework used in this example is PyTorch, and standard libraries such as NumPy and pandas were also included. This file is a skeleton, so any additional dependencies can be added without any difficulty. In addition, jupyterlab is included.
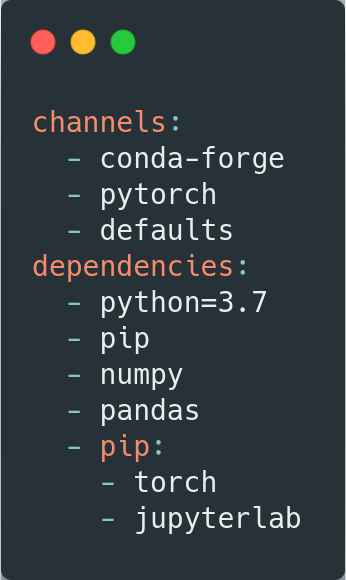
As can be seen, the python version to be used is 3.7. This version can be easily adjusted to the user’s needs, as can the other versions of the packages.
To use conda environment you need to install conda first because the NVIDIA AMI doesn’t have it installed. You can follow the next set of instructions:
wget https://repo.anaconda.com/miniconda/Miniconda3-latest-Linux-x86_64.sh && \
bash Miniconda3-latest-Linux-x86_64.sh -b -p $HOME/miniconda && \
rm -rf Miniconda3-latest-Linux-x86_64.sh && \
source $HOME/miniconda/bin/activate && \
conda init
So you can install your environment with,
conda env create -n <NAME_OF_YOUR_ENVIROMENT> -f environment.yml
To verify that everything is correctly installed, you can clone our repo and run a test,
git clone https://github.com/Nixtla/nixtla.git
cd nixtla/utils/docker-gpu
conda env create -n gpu-env -f environment.yml
conda activate gpu-env
python -m test
A final piece of advice: the user must be careful with the version of the Deep Learning framework used, verifying that it is compatible with the NVIDIA AMI drivers.
c) Terraform
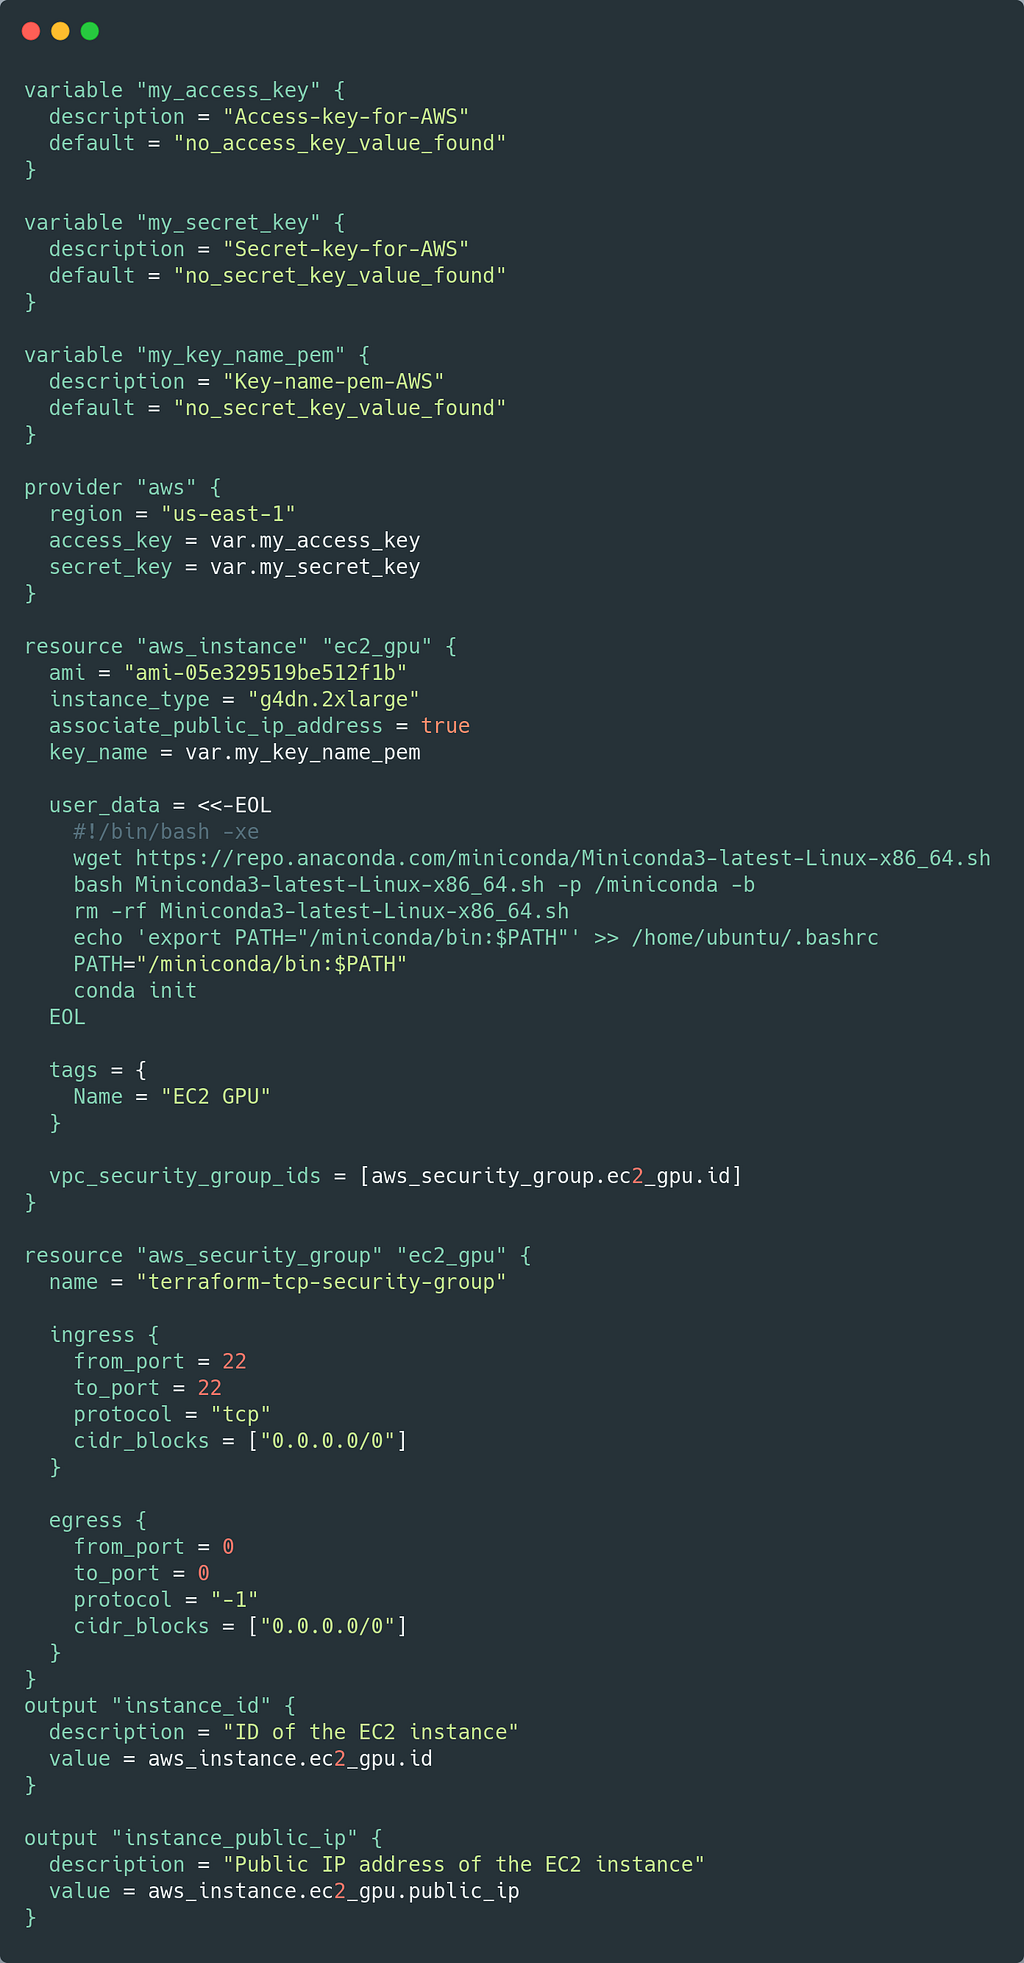
To facilitate the creation of the whole process described above, we developed a Terraform script. Terraform is an open-source infrastructure as Code tool that allows you to synthesize all the manual development into an automatic script. In this case, the infrastructure as code we wrote mounts the NVIDIA AMI (including the creation of a compatible security group) and installs conda. The following image shows the main.tf file.
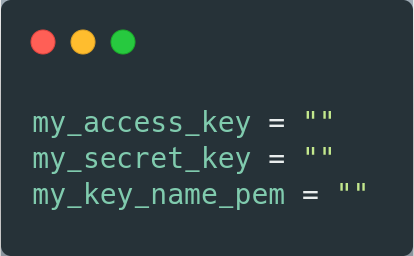
Additionally, a terraform.tfvars file is required for the credentials. An image of this file is shown below.
To use Terraform you only have to install it, following these instructions. Subsequently, you must run
terraform init
terraform apply
This will create the required infrastructure and install conda on the deployed EC2. When Terraform finishes running, you will be able to see the public IP associated with the instance so you only need to use an ssh connection to access it.
ssh -i path/to/<YOUR_KEY_NAME>.pem ubuntu@<PUBLIC_EC2_IP>
2) NVIDIA Deep Learning AMI + Conda environment + Terraform + Docker + Make
a) Docker
It is common practice to use Docker to ensure the replicability of projects and experiments. In addition, it allows the user to concentrate all the necessary dependencies in one place, avoiding installing dependencies locally that can later cause conflicts.
We use docker because it allows us to isolate the software from the hardware, making computation more flexible. If the load is very heavy, it is enough to change the EC2 instance and just run the code inside the container. On the other hand, if the load is lighter, we can choose a smaller instance.
The following image shows the Dockerfile we built for images to access the instance’s GPU. First of all, an image compatible with the drivers installed on EC2 must be chosen. To date, the NVIDIA AMI uses CUDA version 11.2, so this is the selected image.
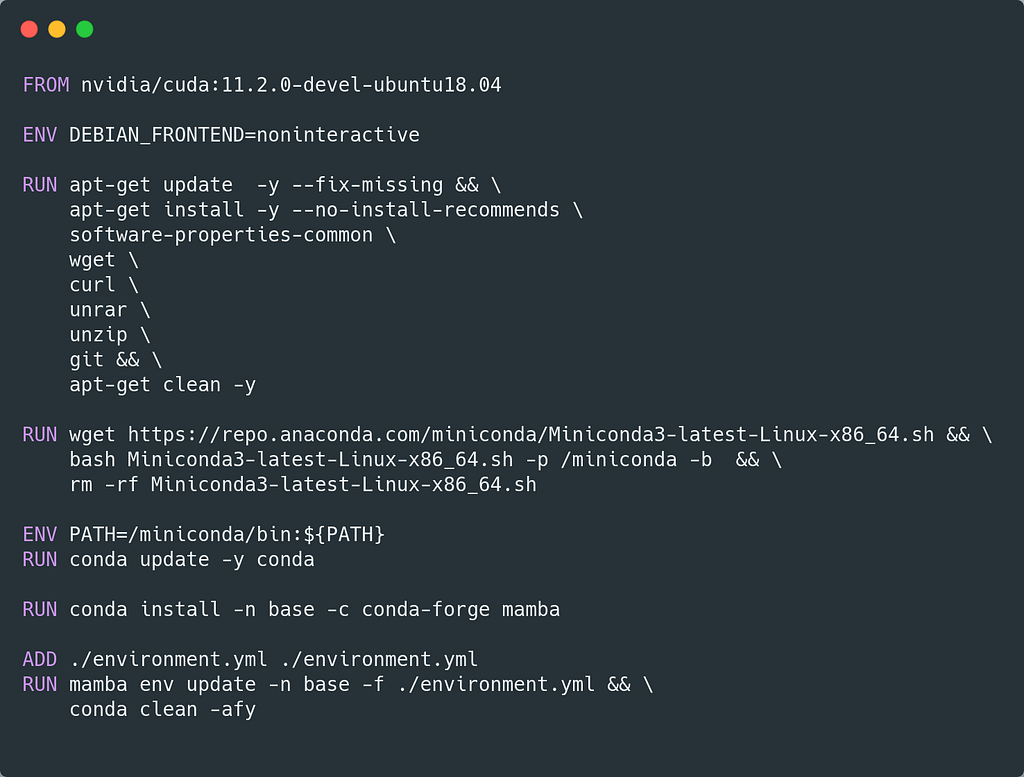
Subsequently, additional operating system libraries are installed that may be needed for the project. For example, in the Dockerfile above, wget and curl are installed, which might be useful for downloading data that the project requires.
In the next instruction, miniconda is installed. Conda, as we discussed earlier, will allow us to handle python dependencies and also install them with the environment.yml file shown in the previous section.
We highly recommend using mamba for version management and installation as it significantly improves the waiting time. If the user prefers, she can easily switch to Conda.
Finally, the environment.yml file created earlier is added to the Docker image and installed in the base environment. It will not be necessary to initialize a specific environment every time a container is required.
b) Makefile
Finally, we facilitate the use of a Makefile. Make is a powerful tool for controlling workflows and executable files. Our workflow will allow us to quickly build the Docker image from the Dockerfile and run python and bash modules without continuously declaring the necessary arguments.
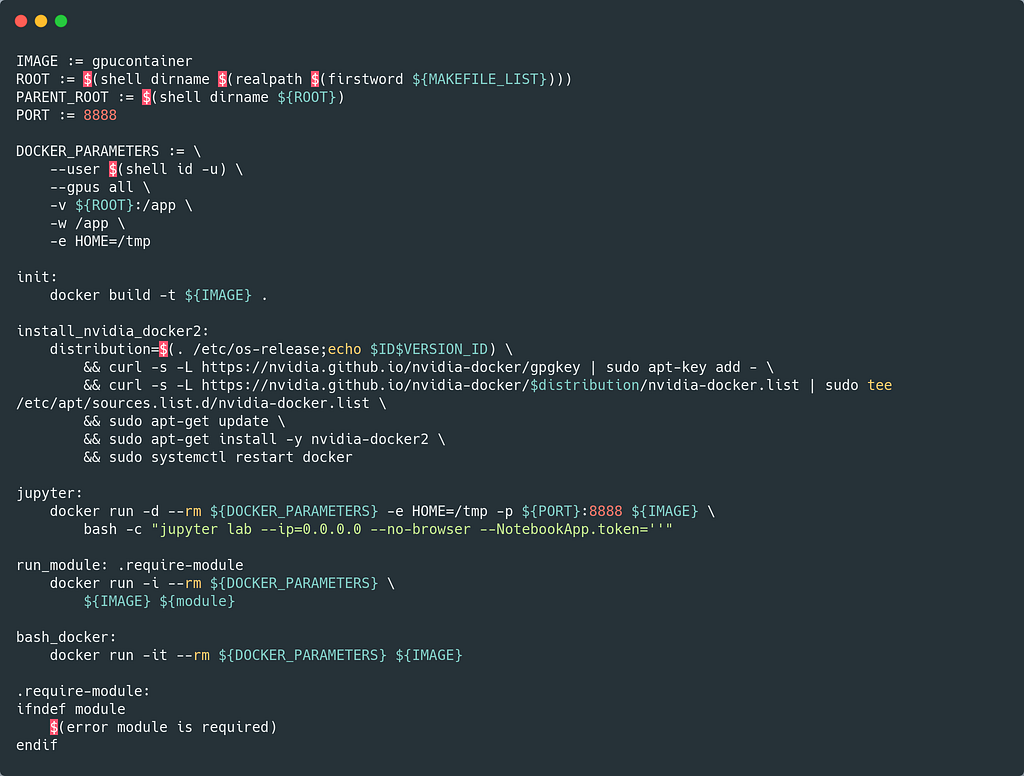
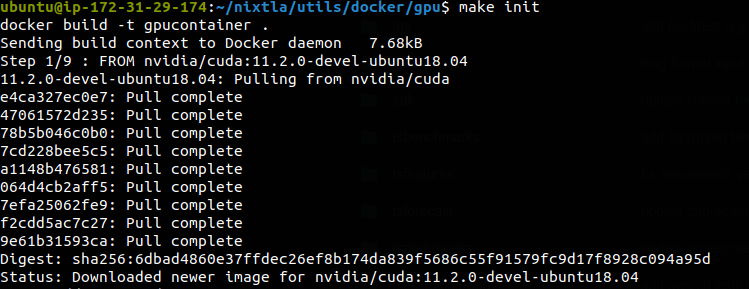
In this example, the Docker image will be called gpucontainer, and you can just run make init to build it. Once this instruction is executed, the user can use the run_module instruction to run her python or bash modules using GPUs.
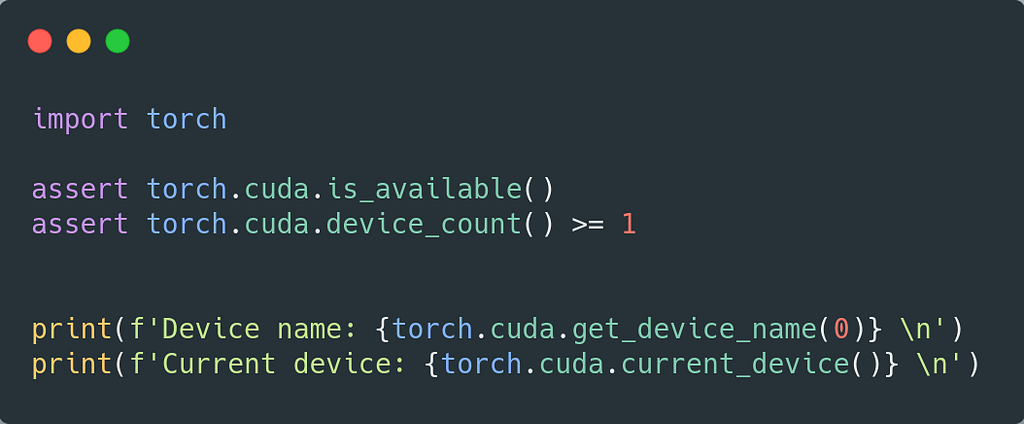
For example, to verify that everything works fine as expected, we create the test.py file that makes sure that CUDA is available for PyTorch and the GPUs are available. This module would be executed as follows:
make run_module module="python -m test"

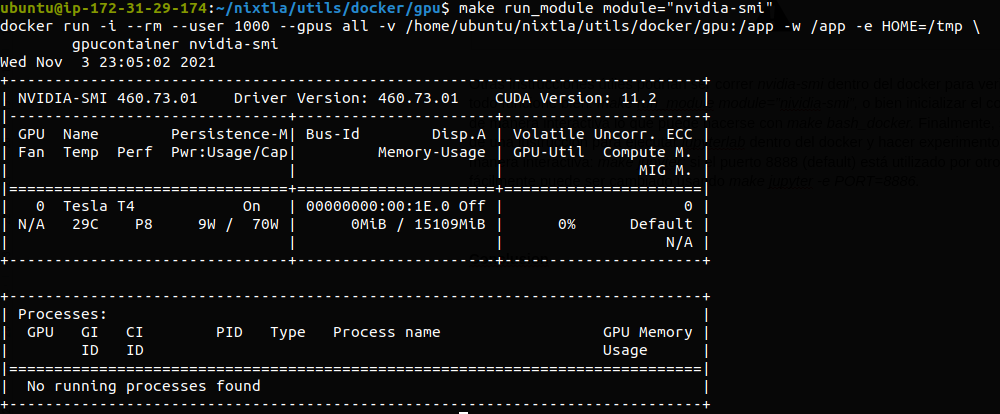
Other valuable instructions could be to run nvidia-smi inside the Docker container to verify that everything works fine:
make run_module module="nividia-smi"
Or initialize the container interactively, which can be done with make bash_docker. Finally, an instruction is provided to run jupyterlab inside the docker and do experiments interactively:
make jupyter
If port 8888 (default) is used by another process, it can easily be changed using
make jupyter -e PORT=8886
SUMMARY
In this post, we show a simple solution to the problem of configuring GPUs for Deep Learning on the cloud. With this fully open-source workflow, we hope that practitioners in the field will spend more time implementing the models and not so much on the infrastructure as we have done.
Open Source Alternative to the AWS Deep Learning AMI was originally published in Towards Data Science on Medium, where people are continuing the conversation by highlighting and responding to this story.
from Towards Data Science - Medium https://ift.tt/30Cn0xU
via RiYo Analytics


ليست هناك تعليقات