https://ift.tt/2ZPDgM0 Working with saved models and endpoints in Vertex AI In this article, I step you through how to deploy a TensorFlow...
Working with saved models and endpoints in Vertex AI
In this article, I step you through how to deploy a TensorFlow/Keras model into Vertex AI and get predictions from it.
Concepts
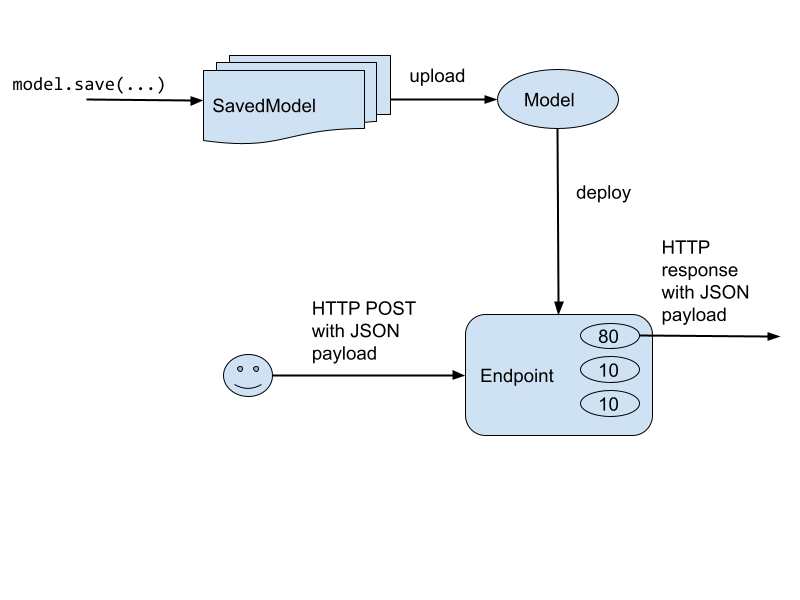
There are few concepts here, so refer to this diagram as we go along. The code snippets are from this notebook in GitHub.

The basic idea is that clients access an Endpoint. Every endpoint is associated with a URL. The clients send a HTTP Post request with a JSON payload that contains the input to the prediction method.
The Endpoint contains a number of Vertex AI Model objects among which it splits traffic. In the diagram above, 80% of traffic goes to Model 1, 10% to Model 2, and the remainder to Model 3.
A Vertex AI Model is an object that references models built in a wide variety of frameworks (TensorFlow, PyTorch, XGBoost, etc.). There are pre-built container images for each framework. You can also bring in your containers if you are using an ML framework that is not directly supported by Vertex AI.
The TensorFlow container image looks for SavedModel files, the format that Keras/TensorFlow 2.0 models are exported into by default when you call model.save(…) from your training code.
Step 1. Save trained model in Keras
The recommended way to write a machine learning model in TensorFlow 2.0 is to use the Keras API. Briefly, it consists of the following steps:
# 1. Create a tf.data Dataset
train_dataset = read_dataset(training_data_uri, train_batch_size)
eval_dataset = read_dataset(validation_data_uri, eval_batch_size)
# 2. Create a Keras Model
inputs = tf.keras.layers.Input(...)
layer_1 = tf.keras.layers.... (inputs)
...
outputs = tf.keras.layers.Dense(...)(layer_n)
model = tf.keras.Model(inputs, output)
model.compile(optimizer='adam',
              loss='binary_crossentropy',
               metrics=['accuracy'])
# 3. Train
model.fit(train_dataset, validation_data=eval_dataset, ...)
# 4. Save model
EXPORT_PATH = 'gs://{}/export/flights_{}'.format(bucket,
                                     time.strftime("%Y%m%d-%H%M%S"))
model.save(EXPORT_PATH)
The key step above is that your training program saves the trained model to a directory in Google Cloud Storage.
Step 2. Upload Model
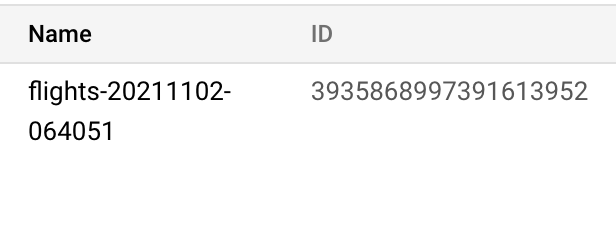
I recommend that you use a unique display name for every Model (Vertex AI does assign a unique model id, but it’s an opaque number that is not human readable).

An easy way is to append a timestamp to the name that you want to use, so each time you upload a model you have a new name:
TIMESTAMP=$(date +%Y%m%d-%H%M%S)
MODEL_NAME=flights-${TIMESTAMP}
Then, upload the saved model files to the Model above, specifying the pre-built Vertex container for your ML framework:
gcloud beta ai models upload --region=$REGION \
     --display-name=$MODEL_NAME \
     --container-image-uri=us-docker.pkg.dev/vertex-ai/prediction/tf2-cpu.2-6:latest \
     --artifact-uri=$EXPORT_PATH
Step 3. Create Endpoint
You want a unique name for the endpoint as well, but you will not be creating multiple endpoints. Just one. So, there is no need for a timestamp. Just verify that the endpoint doesn’t exist before you create it:
ENDPOINT_NAME=flights
if [[ $(gcloud ai endpoints list --region=$REGION \
        --format='value(DISPLAY_NAME)' --filter=display_name=${ENDPOINT_NAME}) ]]; then
    echo "Endpoint $ENDPOINT_NAME already exists"
else
    # create model
    echo "Creating Endpoint $ENDPOINT_NAME for $MODEL_NAME"
    gcloud ai endpoints create --region=${REGION} --display-name=${ENDPOINT_NAME}
fi
Step 4. Deploy Model to Endpoint
Deploy the model to the endpoint, making sure to specify the machine type you need (including GPUs, etc.) and traffic split:
gcloud ai endpoints deploy-model $ENDPOINT_ID \
  --region=$REGION \
  --model=$MODEL_ID \
  --display-name=$MODEL_NAME \
  --machine-type=n1-standard-2 \
  --min-replica-count=1 \
  --max-replica-count=1 \
  --traffic-split=0=100
Because this is the first model, we send 100% of the traffic to this one with
— traffic-split=0=100
If we had an older model, we’d specify the relative split between two models. To send 10% of the traffic to this new model and 90% to an older model, we’d do:
--traffic-split=0=10,OLD_DEPLOYED_MODEL_ID=90
Note that all these commands require the model ID and endpoint ID (not the model name and endpoint name). To get the ID from the name (assuming you are using unique names as I recommended):
MODEL_ID=$(gcloud ai models list --region=$REGION \
           --format='value(MODEL_ID)' \
           --filter=display_name=${MODEL_NAME})
ENDPOINT_ID=$(gcloud ai endpoints list --region=$REGION \
              --format='value(ENDPOINT_ID)' \
              --filter=display_name=${ENDPOINT_NAME})
Putting it all together.
Here’s all of the code snippets above in one block for easy copy-paste:
## CHANGE
EXPORT_PATH=gs://some-bucket/some-model-dir
TF_VERSION=2-6
ENDPOINT_NAME=flights
REGION=us-central1
##
TIMESTAMP=$(date +%Y%m%d-%H%M%S)
MODEL_NAME=${ENDPOINT_NAME}-${TIMESTAMP}
EXPORT_PATH=$(gsutil ls ${OUTDIR}/export | tail -1)
echo $EXPORT_PATH
if [[ $(gcloud ai endpoints list --region=$REGION \
        --format='value(DISPLAY_NAME)' --filter=display_name=${ENDPOINT_NAME}) ]]; then
    echo "Endpoint for $MODEL_NAME already exists"
else
    # create model
    echo "Creating Endpoint for $MODEL_NAME"
    gcloud ai endpoints create --region=${REGION} --display-name=${ENDPOINT_NAME}
fi
ENDPOINT_ID=$(gcloud ai endpoints list --region=$REGION \
              --format='value(ENDPOINT_ID)' --filter=display_name=${ENDPOINT_NAME})
echo "ENDPOINT_ID=$ENDPOINT_ID"
# delete any existing models with this name
for MODEL_ID in $(gcloud ai models list --region=$REGION --format='value(MODEL_ID)' --filter=display_name=${MODEL_NAME}); do
    echo "Deleting existing $MODEL_NAME ... $MODEL_ID "
    gcloud ai models delete --region=$REGION $MODEL_ID
done
# upload model
gcloud beta ai models upload --region=$REGION --display-name=$MODEL_NAME \
     --container-image-uri=us-docker.pkg.dev/vertex-ai/prediction/tf2-cpu.${TF_VERSION}:latest \
     --artifact-uri=$EXPORT_PATH
MODEL_ID=$(gcloud ai models list --region=$REGION --format='value(MODEL_ID)' --filter=display_name=${MODEL_NAME})
echo "MODEL_ID=$MODEL_ID"
# deploy model to endpoint
gcloud ai endpoints deploy-model $ENDPOINT_ID \
  --region=$REGION \
  --model=$MODEL_ID \
  --display-name=$MODEL_NAME \
  --machine-type=n1-standard-2 \
  --min-replica-count=1 \
  --max-replica-count=1 \
  --traffic-split=0=100
Step 5. Invoking the model
Here’s how clients can invoke the model that you have deployed. Assume that they have the input data in a JSON file called example_input.json:
{"instances": [
  {"dep_hour": 2, "is_weekday": 1, "dep_delay": 40, "taxi_out": 17, "distance": 41, "carrier": "AS", "dep_airport_lat": 58.42527778, "dep_airport_lon": -135.7075, "arr_airport_lat": 58.35472222, "arr_airport_lon": -134.57472222, "origin": "GST", "dest": "JNU"},
  {"dep_hour": 22, "is_weekday": 0, "dep_delay": -7, "taxi_out": 7, "distance": 201, "carrier": "HA", "dep_airport_lat": 21.97611111, "dep_airport_lon": -159.33888889, "arr_airport_lat": 20.89861111, "arr_airport_lon": -156.43055556, "origin": "LIH", "dest": "OGG"}
]}
They can send a HTTP POST:
PROJECT=$(gcloud config get-value project)
ENDPOINT_ID=$(gcloud ai endpoints list --region=$REGION \
              --format='value(ENDPOINT_ID)' --filter=display_name=${ENDPOINT_NAME})
curl -X POST \
  -H "Authorization: Bearer "$(gcloud auth application-default print-access-token) \
  -H "Content-Type: application/json; charset=utf-8" \
  -d @example_input.json \
  "https://${REGION}-aiplatform.googleapis.com/v1/projects/${PROJECT}/locations/${REGION}/endpoints/${ENDPOINT_ID}:predict"
They will get the result back as JSON:
{
  "predictions": [
    [
      0.228779882
    ],
    [
      0.766132474
    ]
  ],
  "deployedModelId": "2339101036930662400",
  "model": "projects/379218021631/locations/us-central1/models/3935868997391613952",
  "modelDisplayName": "flights-20211102-064051"
}
Of course, it’s a REST API, so you can invoke it from pretty much any language. There are also client API libraries available.
Benefits
In this article, I showed you how to deploy a trained TensorFlow model onto Vertex AI.
Vertex AI provides a fully managed, autoscaling, serverless environment for Machine Learning models. You get the benefits of paying for GPUs only when you are using them. Because the models are containerized, dependency management is taken care of. The Endpoints take care of traffic splits, allowing you to do A/B testing in a convenient way.
The benefits go beyond not having to manage infrastructure. Once your model is deployed to Vertex AI, you get a lot of neat capabilities without any additional code — explainability, drift detection, monitoring, etc.
Enjoy!
How to Deploy a TensorFlow Model to Vertex AI was originally published in Towards Data Science on Medium, where people are continuing the conversation by highlighting and responding to this story.
from Towards Data Science - Medium https://ift.tt/3mItjsD
via RiYo Analytics

No comments